Capstone FE TD User Manual
#ConfidentialityThirdParties
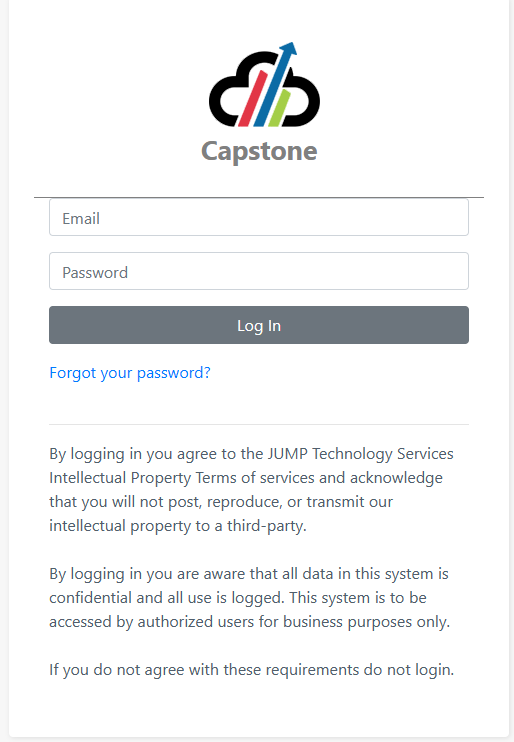
By logging in you agree to the JUMP Technology Services Intellectual Property Terms of Services and acknowledge that you will not post, reproduce, or transmit our intellectual property to a third-party.
By logging in you are aware that all data in this system is confidential and all use is logged. This system is to be accessed by authorized users for business purposes only.
Roles
In Capstone, users may have one or more roles that correspond to their job functions.
Case Supervisor – This role oversees case workers and the clients assigned to them. This role has reassignment privileges.
Case Worker – For Family Expectations and True Dads the Case Worker Role corresponds with the Family Support Coach (FSC). FSC monitors and facilitates workshop completion and provides individualized support to couples enrolled in the Family Expectations (FE) or True Dad’s (TD) program through reminder phone calls, consistent follow up and assessment of couple’s relationship challenges and immediate needs. The FSC will connect couples with community resources especially related to employment and mental health. As needed, the FSC will also reinforce the use of skills learned in workshops and serve as a liaison between couples and the Family Expectations Educators (FEE).
Check In Role - The Check In Role sees all incoming participants and checks them in for appointments. They check the participants out on this screen as well. This role also monitors the transportation page to schedule taxis.
Intake Supervisor - This user role has visibility of all work in process by intake workers for the designated site. This role ensures that all work is completed in a timely manner and may reassign work to another user.
Intake Worker – The Community Relations and Intake Specialist (CRIS) is a key role in the success of Family Expectations and True Dad’s. This professional is responsible for the recruitment of program/study participants. This CRIS will be responsible for engaging in recruitment activities, maintaining effective community partnership relationships, completing intake and enrollment processes, and implementing evaluation processes and data collection tools.
Intake Supervisor – This user role has visibility of all work in process by intake workers for the designated site. This role ensures that all work is completed in a timely manner and may reassign work to another user.
Program Admin – This role has the ability to run reports for one or more programs under a site. This role also has the scheduling tool for scheduling meeting space.
Provider Management - The Provider Management role is specific to Provider setup and management. The user with this role will provide setup support, and resource management.
Site Admin – This role has special privileges to set up work groups, manage user and other custom tools and functions that are specific to a site.
System Administrator – This role is restricted to users who will be able to activate other users, reset password, configure lists, and other setup functions.
If you have more than one Role you can switch between roles by selecting the down arrow next to your current Role which is located in the top right-hand corner of the screen. (See screenshot Capstone - User Roles)
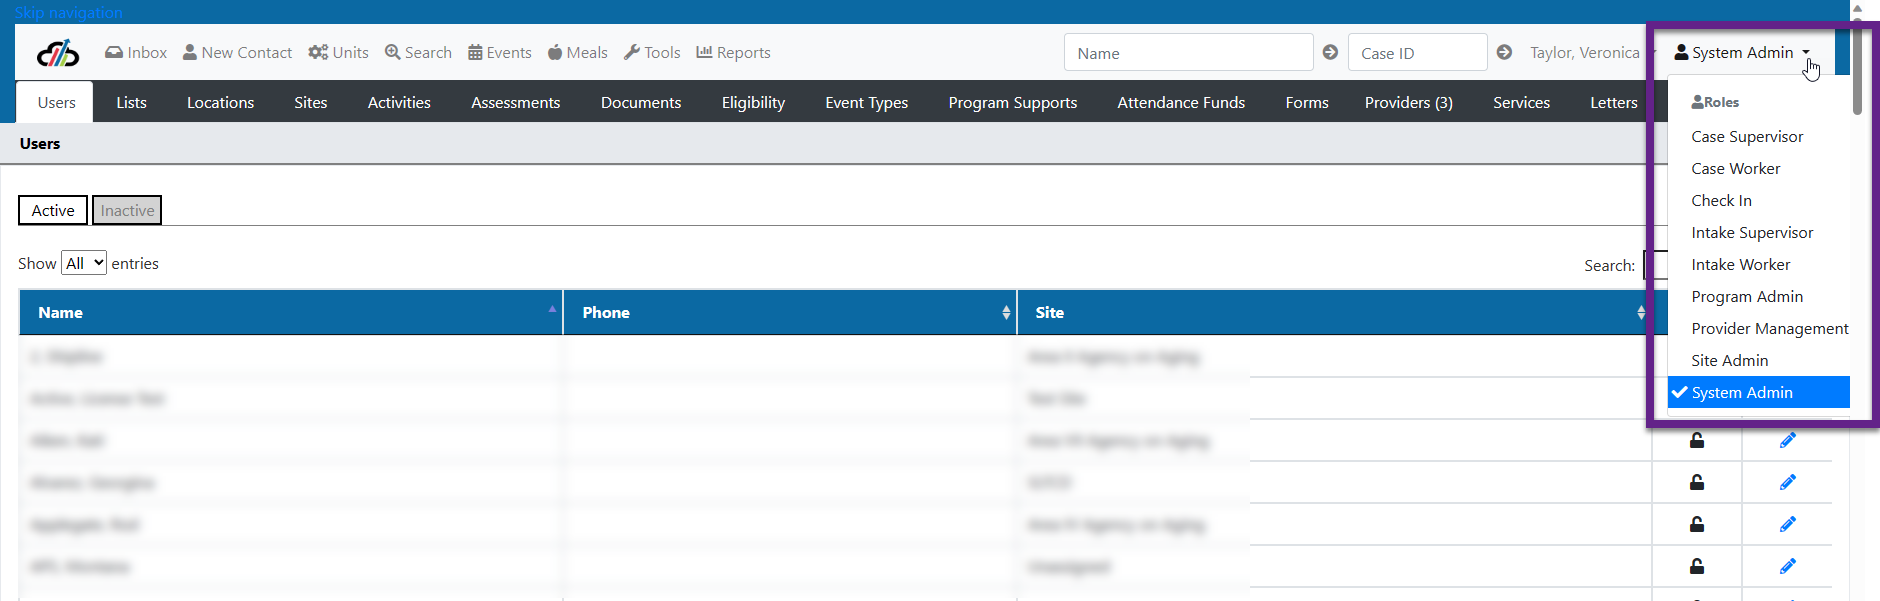
Capstone - User Roles
Inbox
The Inbox tab is the users homepage. The role specific tabs will change based on the role selected.
Providers Tab
The Providers tab is used to edit, add or remove any outside agencies that we do community outreach with. It is covered in detail in the Prover Management section.
New Contact
The New Contact tab is used to add new contacts into Capstone. This is covered in detail within the Intake Workflow section
#SearchClients #SearchContacts #SearchAlerts
Search
Quick Search
The shortcut bar at the top of the page includes quick lookup boxes to access a client's case by name or case ID. If, for example, you are speaking on the phone with another employee, the caller may provide a case id or the client's name. By entering the case ID or client's name and clicking the the gray arrow button, the system will direct you to the case overview. Please note, when you enter a client's name on the Name field, it will show you a number along with the name; that number provides a reference to the client ID, not a case ID.

Search Feature
Another way to access a client's case is by using the search feature. Click the search button on the shortcut bar at the top of your screen.
The client's tab will allow you to locate any person in the system who has a case.
Fill out the form by entering your search criteria. You do not need to fill out every filter. Instead, enter the details you have for the person. Be aware that if the system does not return the search results you expect, then your filters are too restrictive or do not match the person's information. This is especially true of names since they are often misspelled by different users.
The system has an algorithm for a "sounds like" search, but keep in mind that the algorithm creates a score based on how the name sounds, not how similar it looks.
For example, George and Georg are similar in sound. Johnathan and Jonathan are also similar, but John and Jonathan are not. If you are unsure of the exact spelling, enter only 2 or 3 letters of the name.
Searching on the DOB is an excellent way to locate someone as few people in the database will have an exact match on the date of birth as well as the other criteria such as gender, or location.
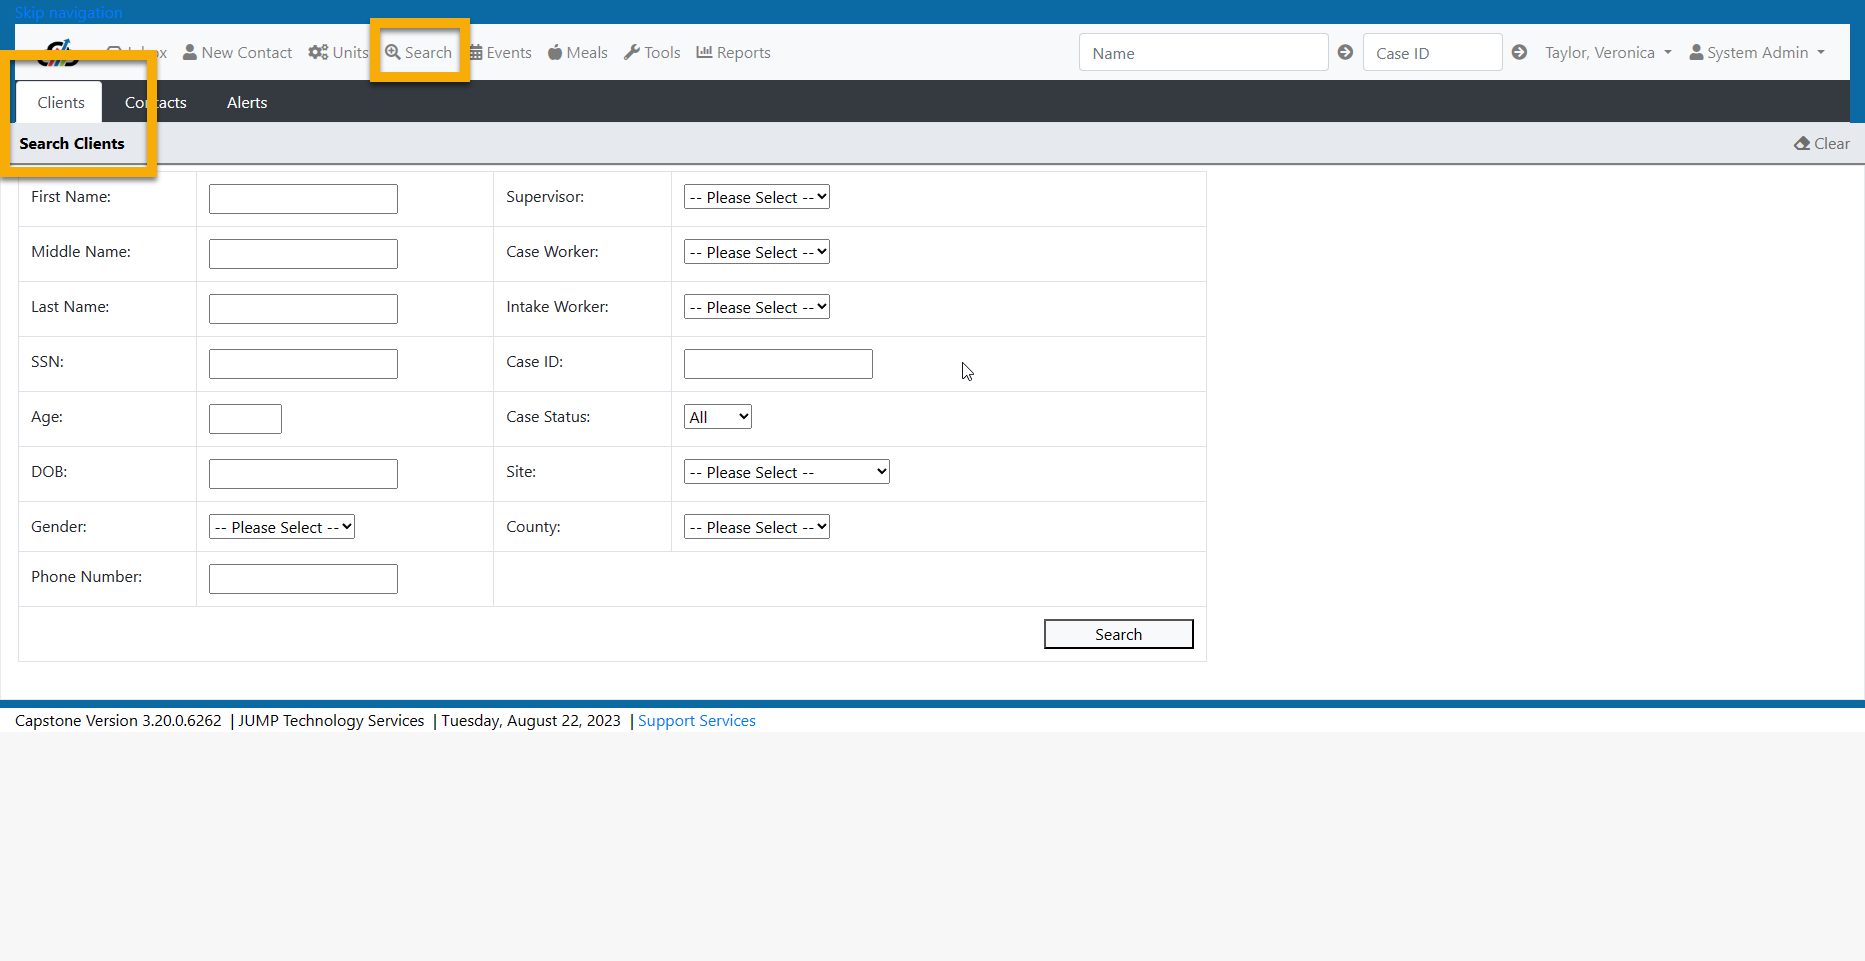
Search Clients
The rules for searching contacts are the same as the rules for searching for clients. A contact search may include clients in its results as the contact search includes all people in the database. The search results display the association of one contact with another. For exampe a past participant may have recommended the program to multiple friends and the would be displayed in the results associated with each client.
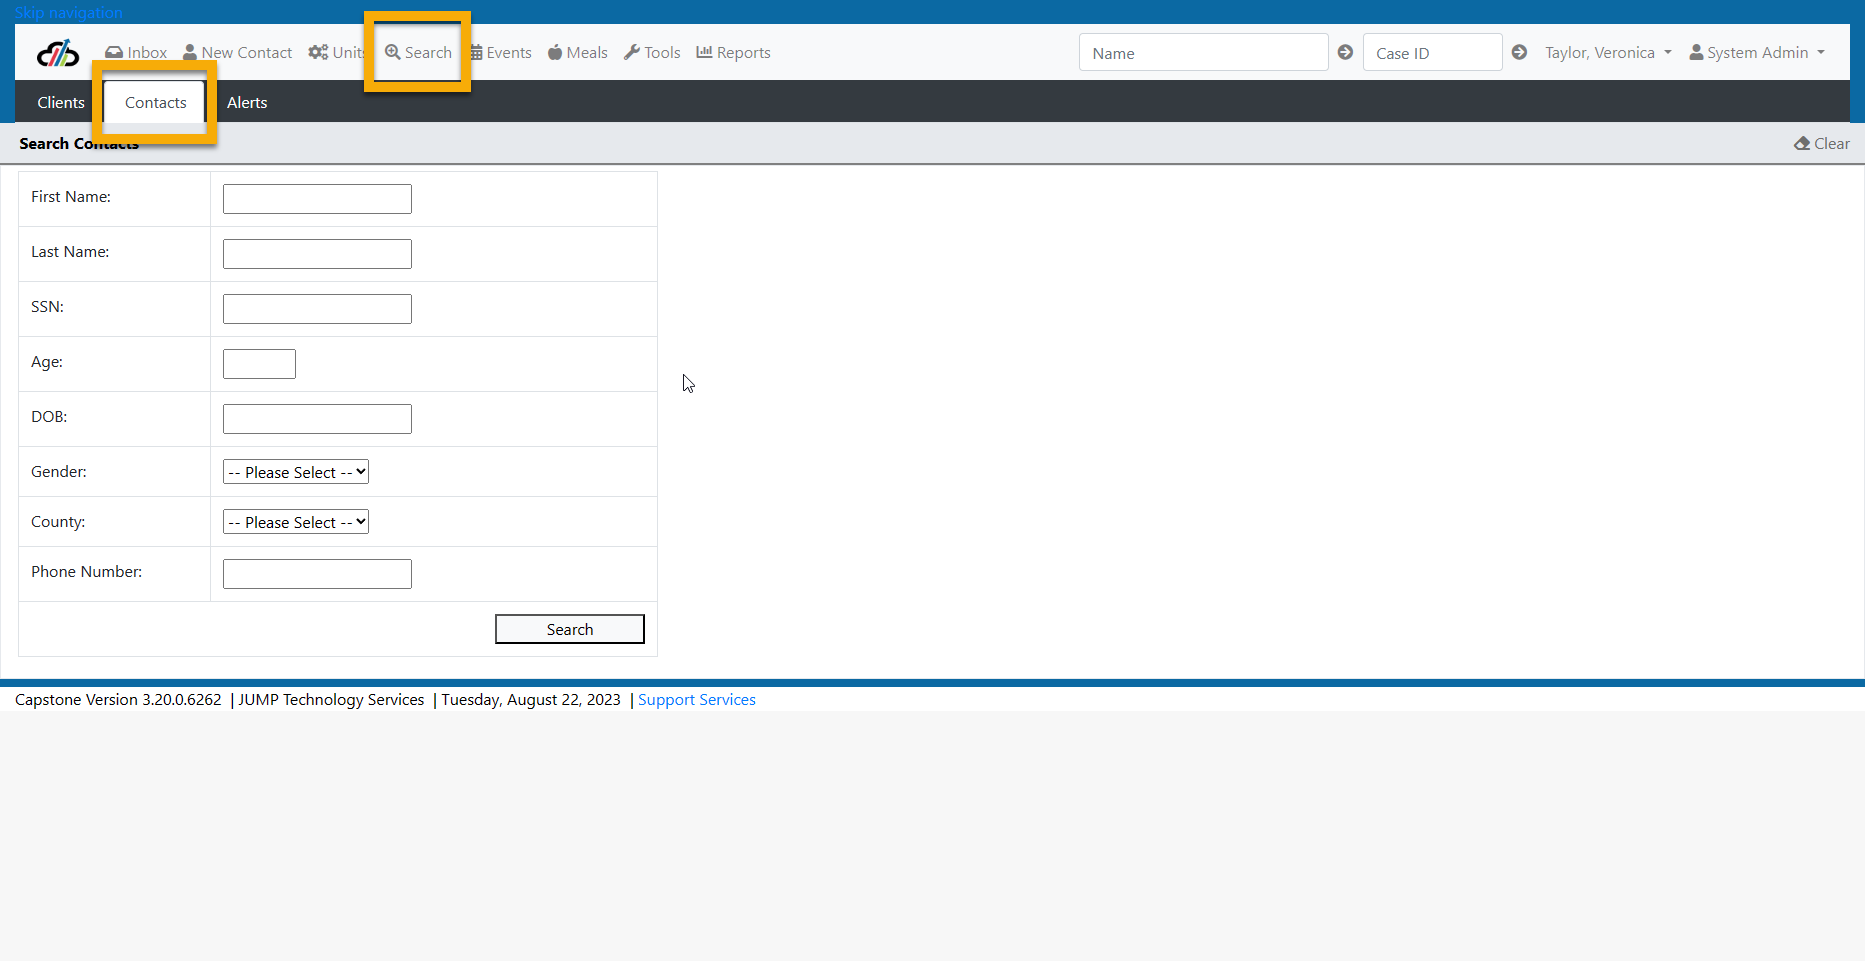
Search Contacts
The alerts search tool allows the user to locate information about alerts that were sent to individuals or workgroups. This tool may be used as part of an audit task or by administrative support to locate information for administrative processing.
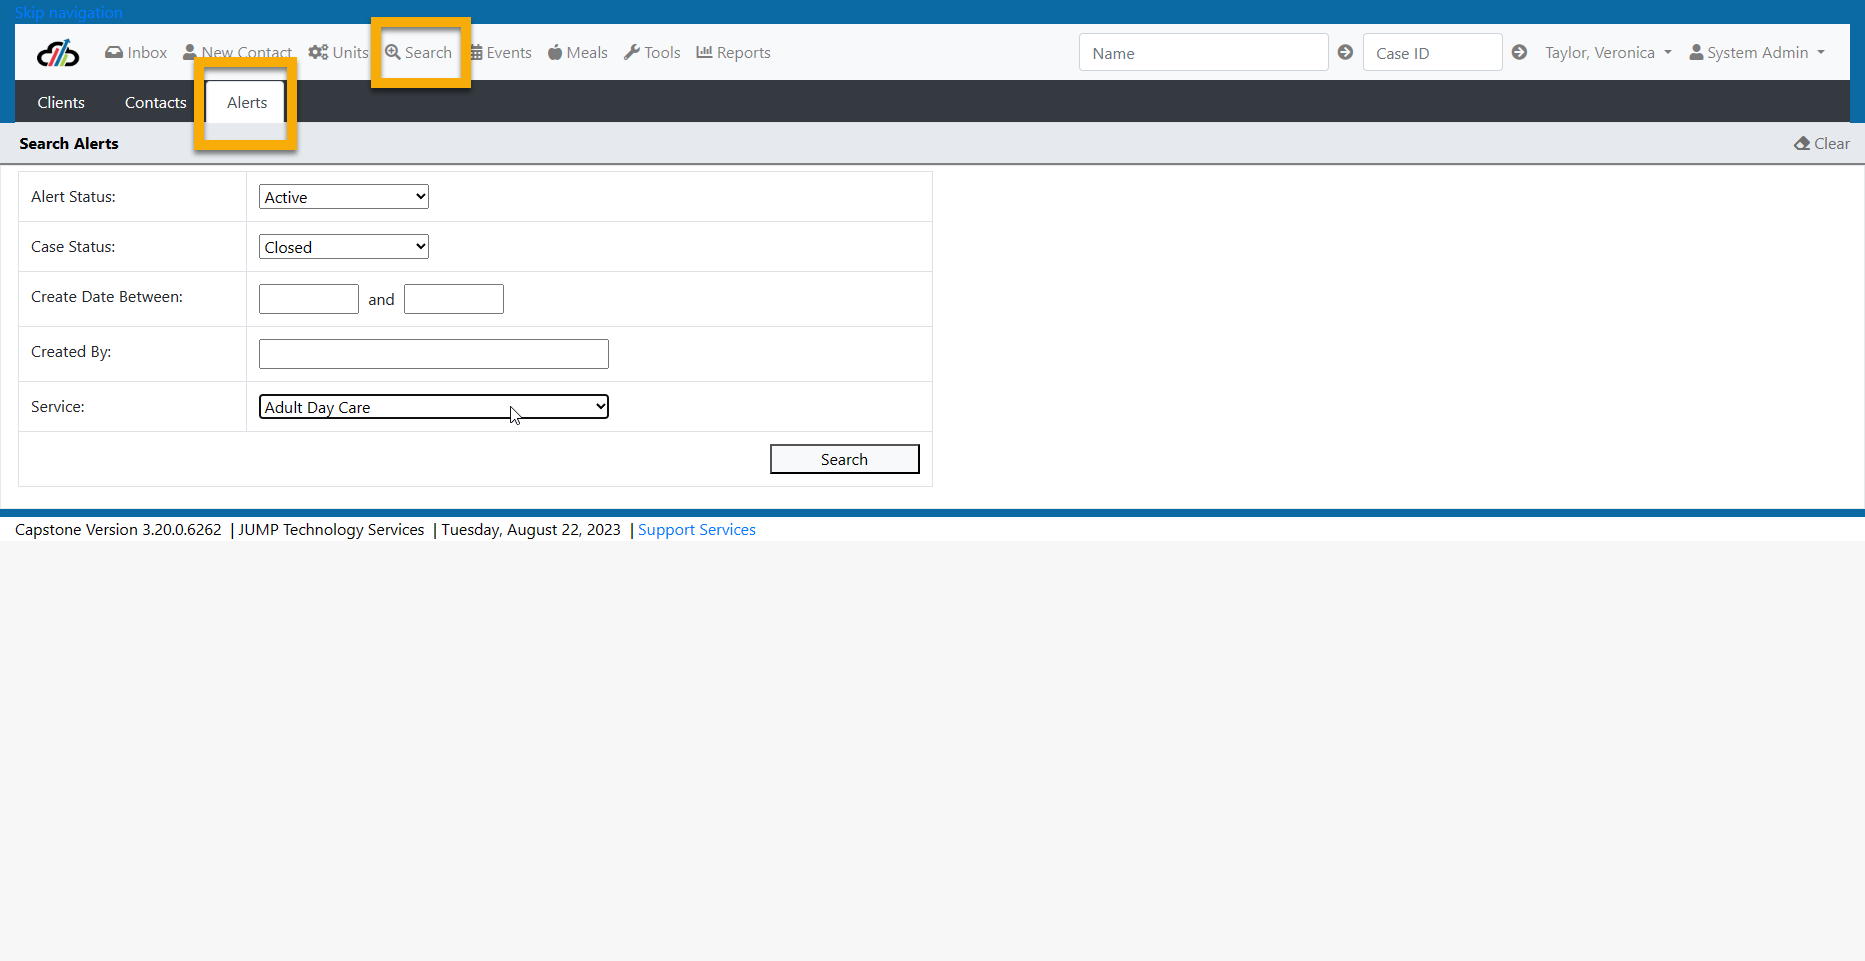
Search Alerts
Tools
Tools are covered in the Role Specific Tabs section.
Reports
Reports are used differently by all positions. When you click User Manual inside Capstone it takes you to the support page where you can view the reports manual.
In addition to Capstone Reports, FE and TD users have access to role specific custom reports which can be viewed by clicking the Custom Reports link on the page.

#CallLog #CaseNotes #FollowUps #Contacts #ClientAddress #Appointments #Events - Case Client List #Assessments
#UploadDocuments #DocumentingDeceased #PrimaryClient and MOB #PrimaryClient and FOB
#Adding Child and Other Family Members #Submit the Case #Case Summary
Case Management
Intake Workflow
An intake is the initiation of a service. Workflow logic is connected to the Intake and will automatically create logs to be completed so that if the user is interrupted during the entry, they will not forget to complete the remaining information.
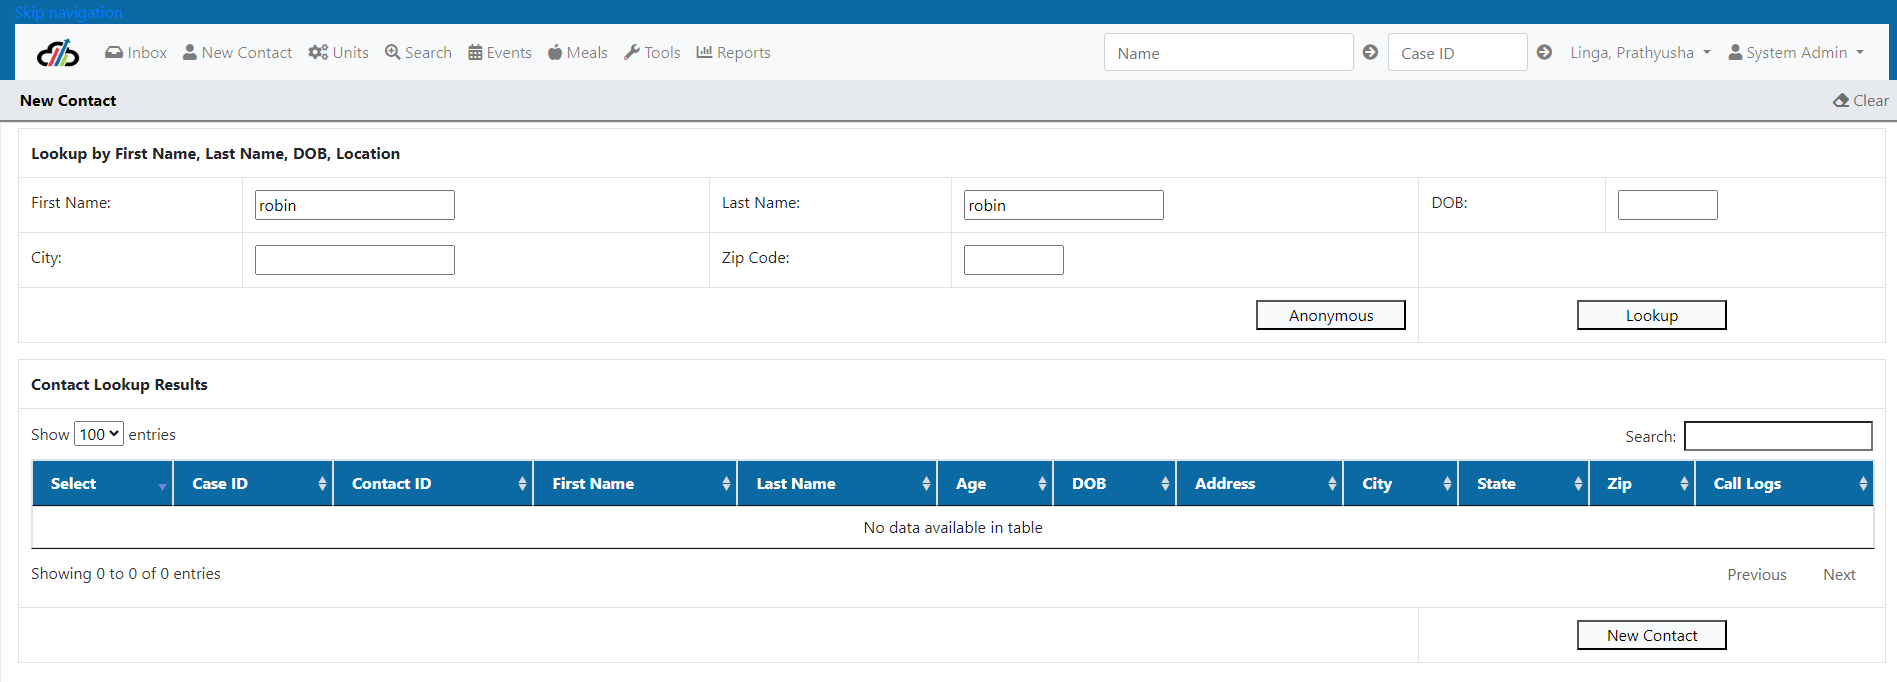
The general workflow for intake is to start with New Contact. Select the New Contact button and enter the first and last name to see if the person is in the system already. You may want to enter their date of birth and additional information to narrow the lookup result.
1. From your Shortcut menu at the top of the screen, click New Contact.

2. Enter the name
3. Click Lookup

4. Look at the results in the Contact Lookup Results list. If your client appears in the list, click the Select checkbox. (NOTE: Doing this means you intend to either reopen a case or enroll a closed case in a new service).
Click New Contact. (Notice that you may alternatively select the spyglass to view the client's contact logs. If you do not want to initiate a new contact but need to enter a contact log, use the spyglass to record a new log entry). TIP: If your lookup returns no matches and you want to start a new contact, you can click the shortcut ALT + N to fire the New Contact button.
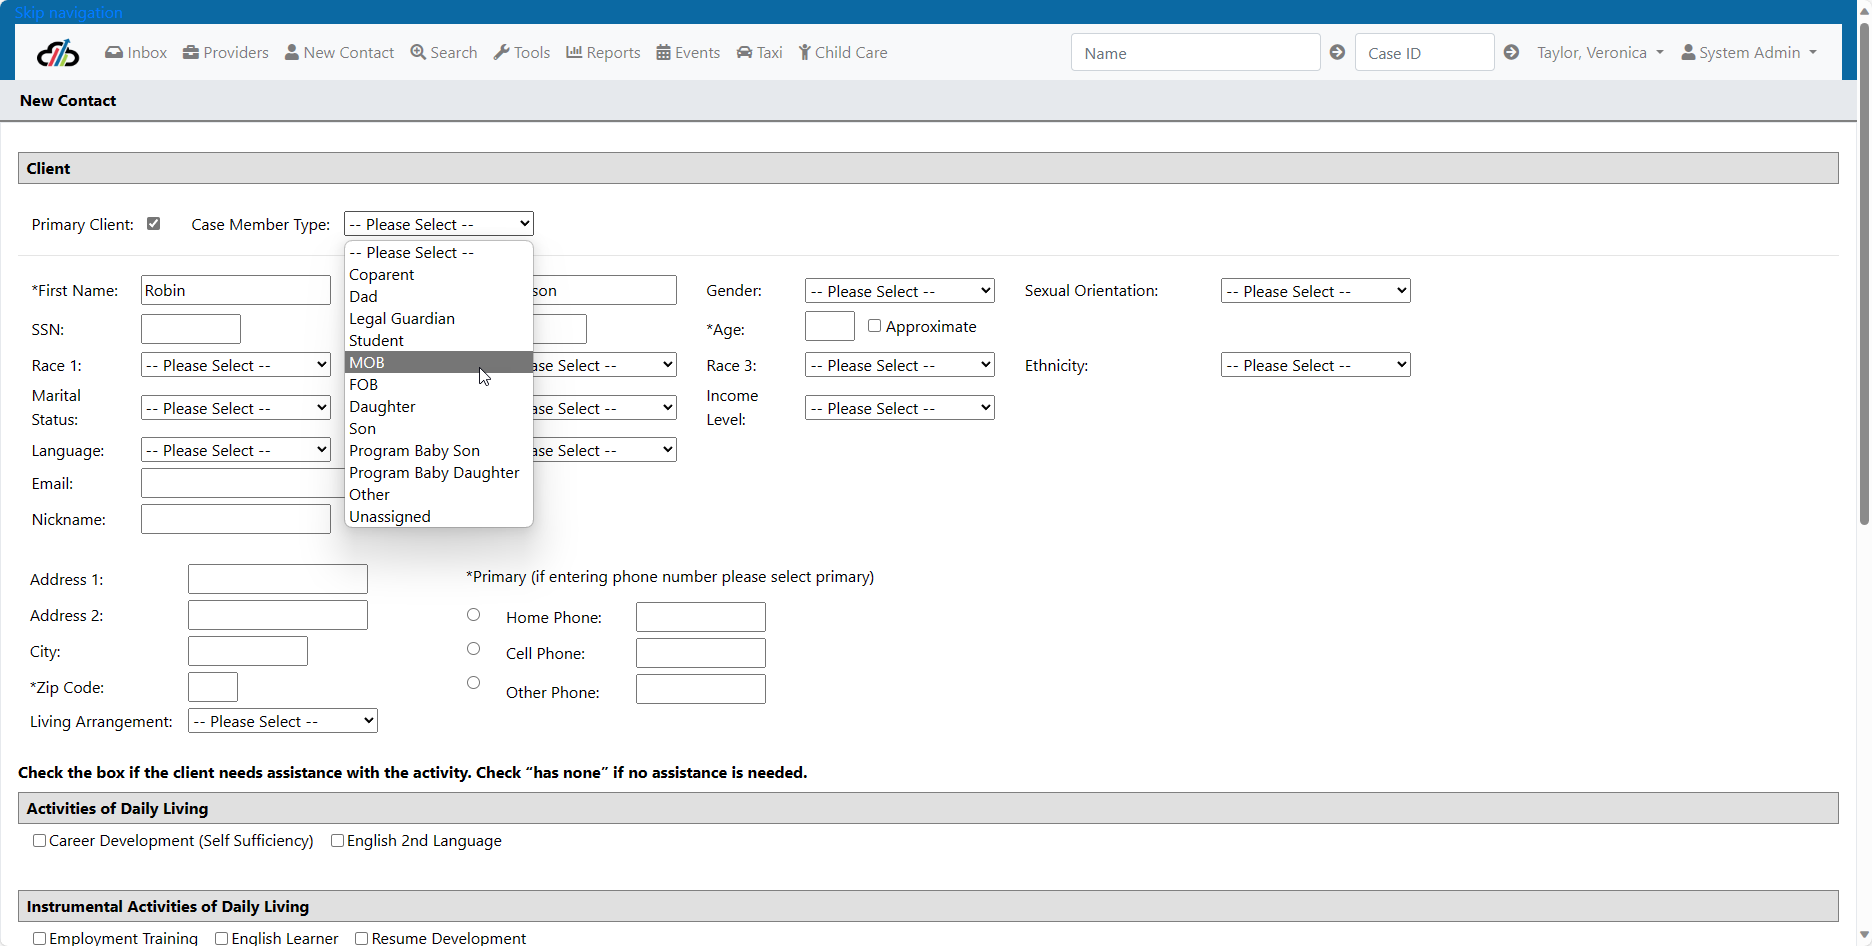
5. The system displays the New Contact screen. Complete the relevant information for the client in the Client details section, Acivities of Daily Living, and Instrumental Activities of Daily Living.
NOTE: For Family Expectation Capstone Users
NOTE: For TRUE Dads Capstone Users:
NOTE: For TD Solo/FE Solo Capstone Users:
- When entering client data you must enter the Particpating parent as Primary Client. Enter the co-parent information but do NOT enter them as primary. Enter the eligible child as Program Son/Daughter but do not select Primary Client. Enter all other children as son/daughter and do not select Primary Client.
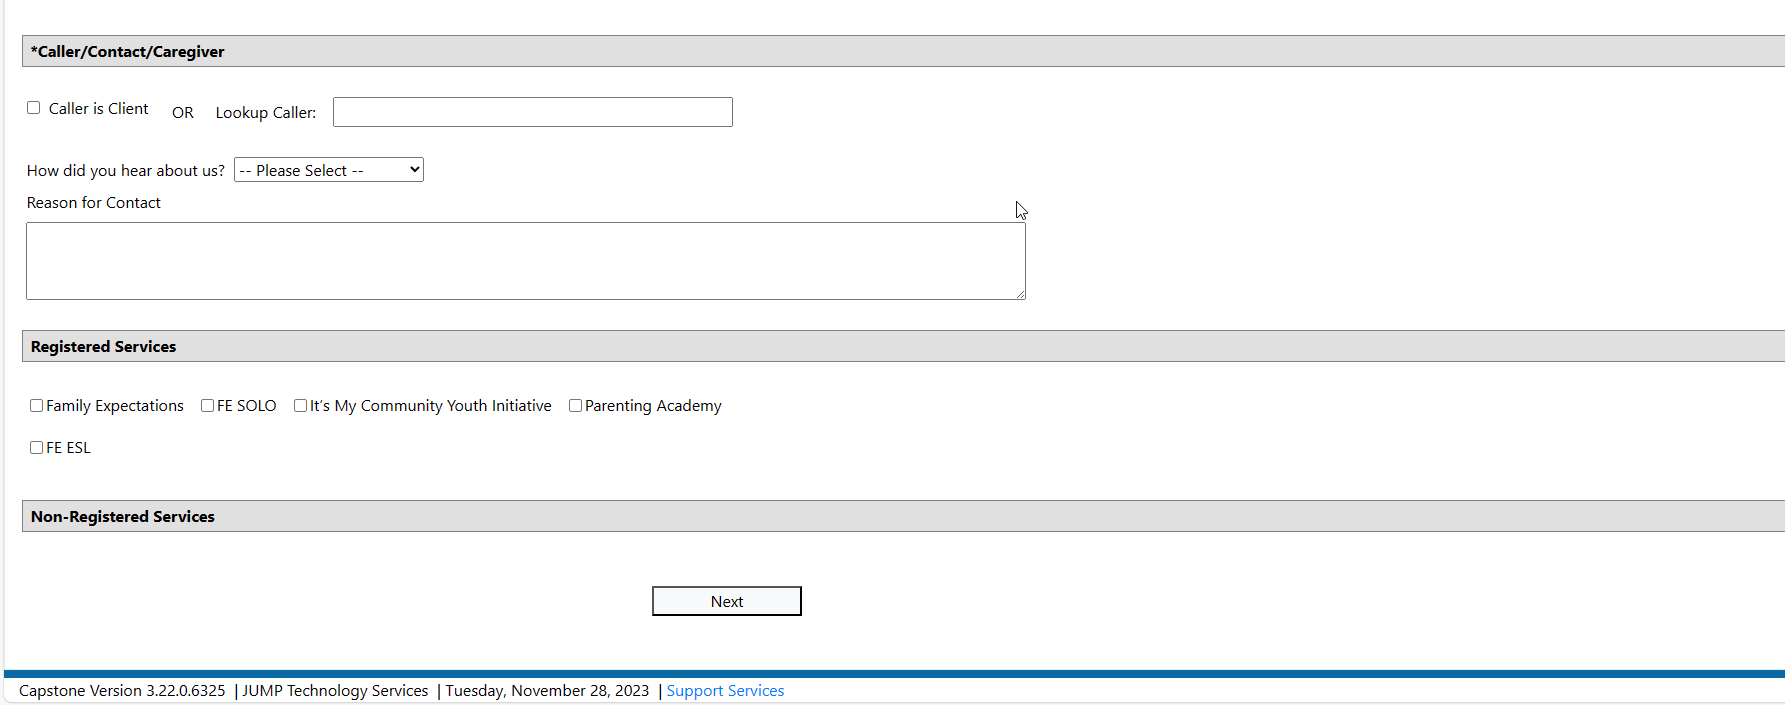
6. Complete the Caller section if applicable or selct caller is client. This is an easy way to enter the consumer's emergency contact.
7. Select Service Categories by clicking the checkboxes of the services that will be added to the client. NOTE: If you have a workflow set up, the system will create a list of work that will need to be completed to set up the client in the assigned services.
Call Log at Check-In
Anytime the participant is checked in to an Intake or Office Visit, a call log is automatically created. This call log should be used to document the appointment.
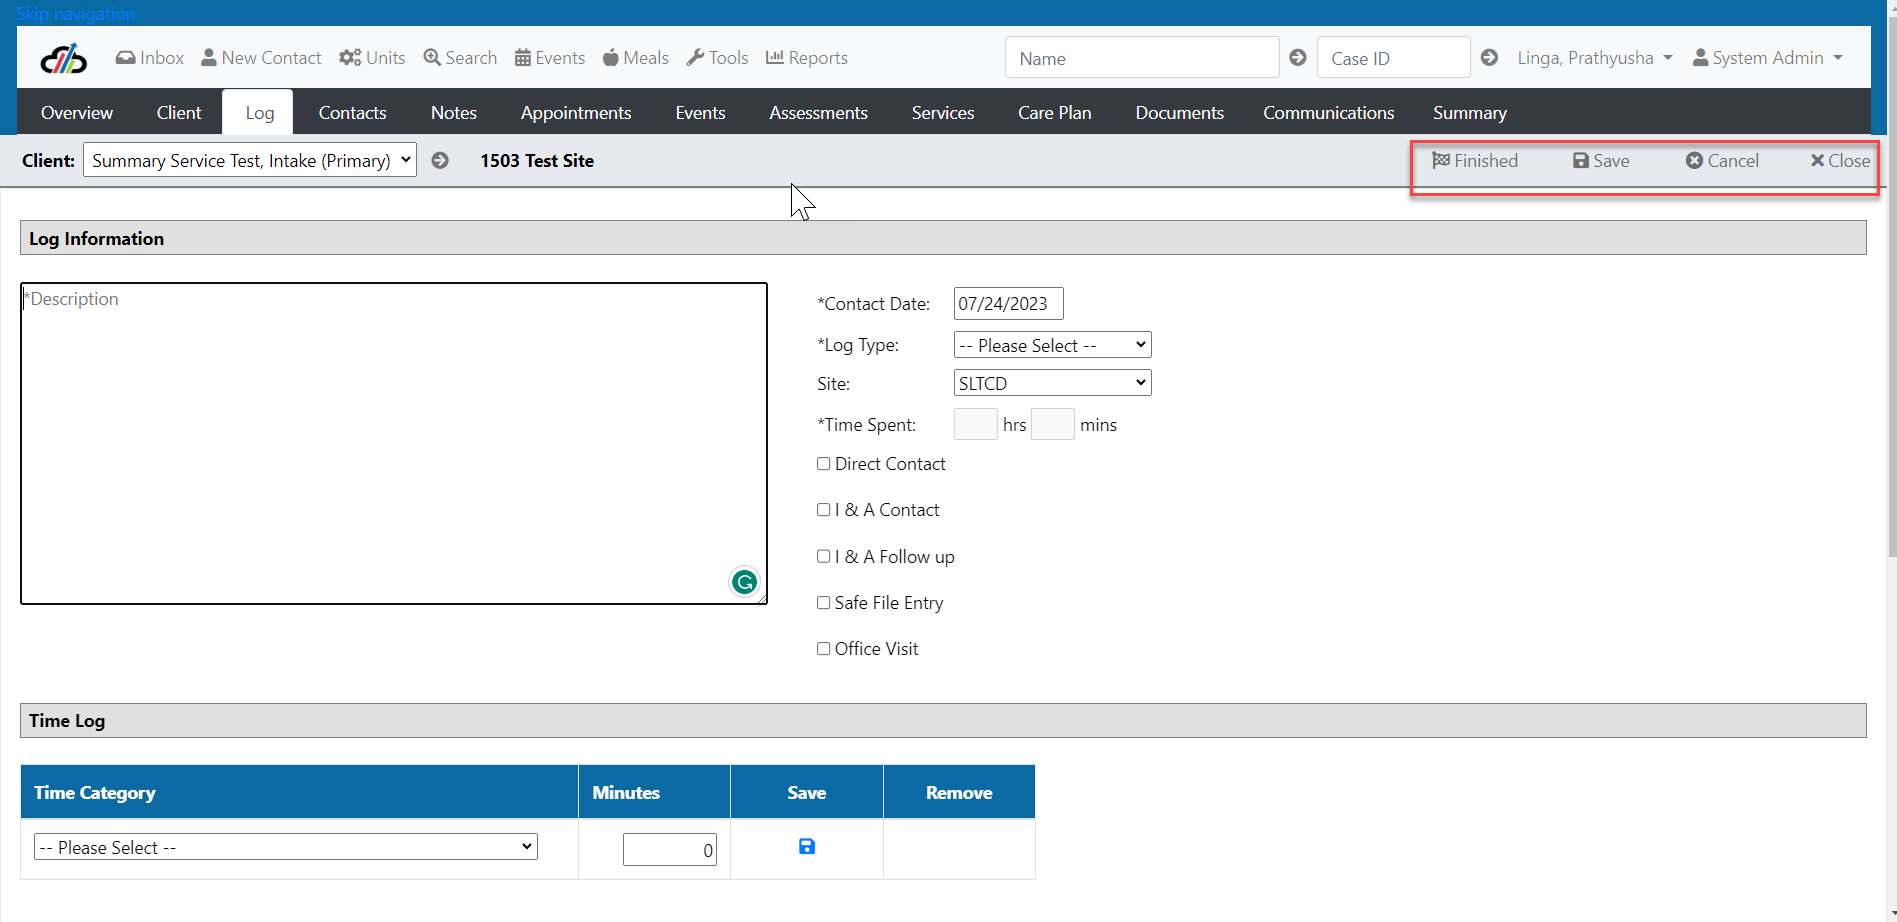
Completing a Case/Call Log
A draft log is one that has been created but not marked complete by its owner.
- Complete the information on the call log
- Record your time entries
- Mark the entry "Finished" when you do not wish to make further changes.
*NOTE: You may create a new Log file entry at any time by clicking the New button in the upper right corner as shown below.
- Click Next
- Your new case is created and you can create a log to capture the conversation.
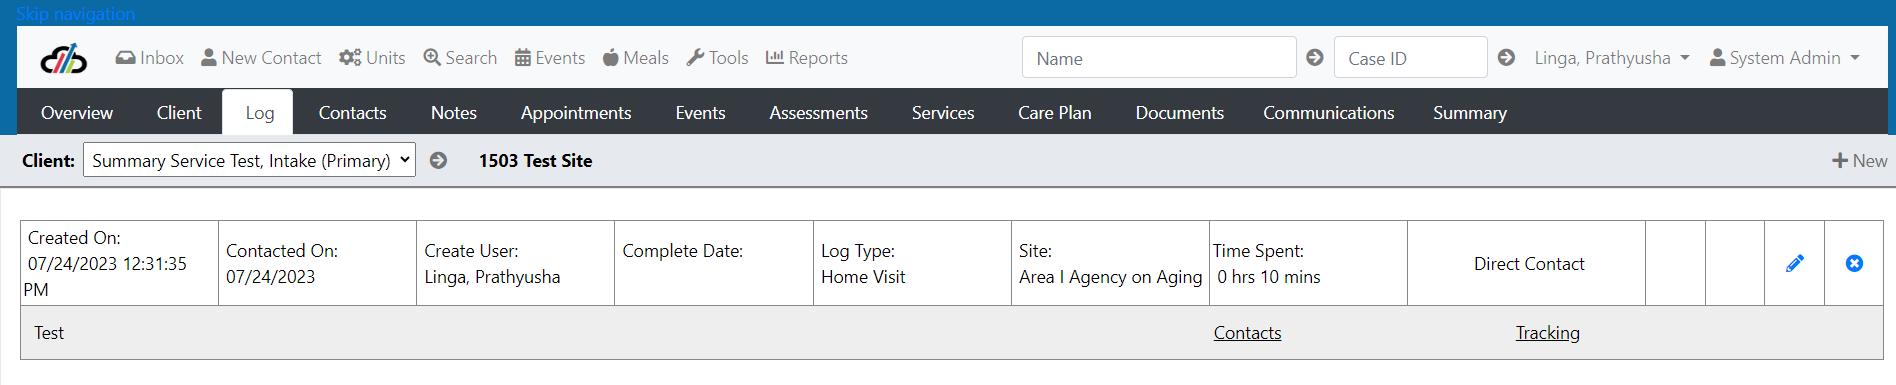
Deleting a Call Log
A user can delete any of their own logs as long as the case is not archived or the log is not associated with a checked in office visit appointment.
- Navigate to your “Log” tab
- Find the log you wish to delete and click the “x” button on the far right
- The system will ask if you are sure you wish to delete the log
- Click “OK”
NOTE: This should only be done when a duplicate log is created or the log was entered on the wrong case.
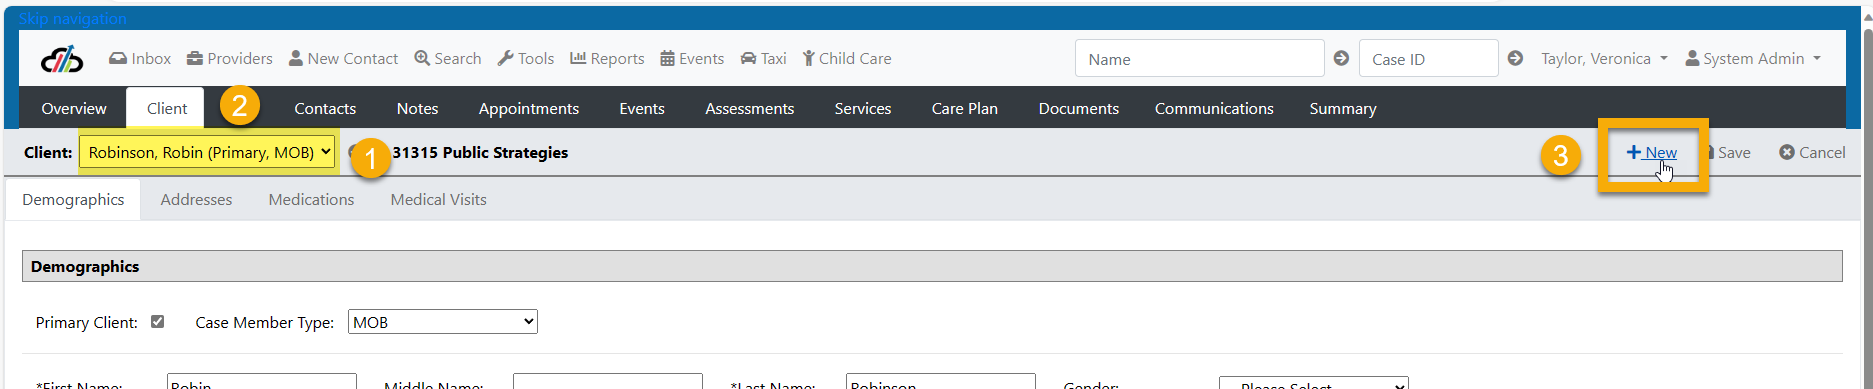
Adding the Father of the Baby (FOB) as a Primary
NOTE: For TRUE Dads you will add the coparent information
Once the Mother of the Baby (MOB)'s/dad case has been created you can add the FOB/coparent
To do so:
1. Verify you are in the right case
2. Select Client
3. Select Add New
Check the Primary Checkbox and select FOB/coparent from the dropdown
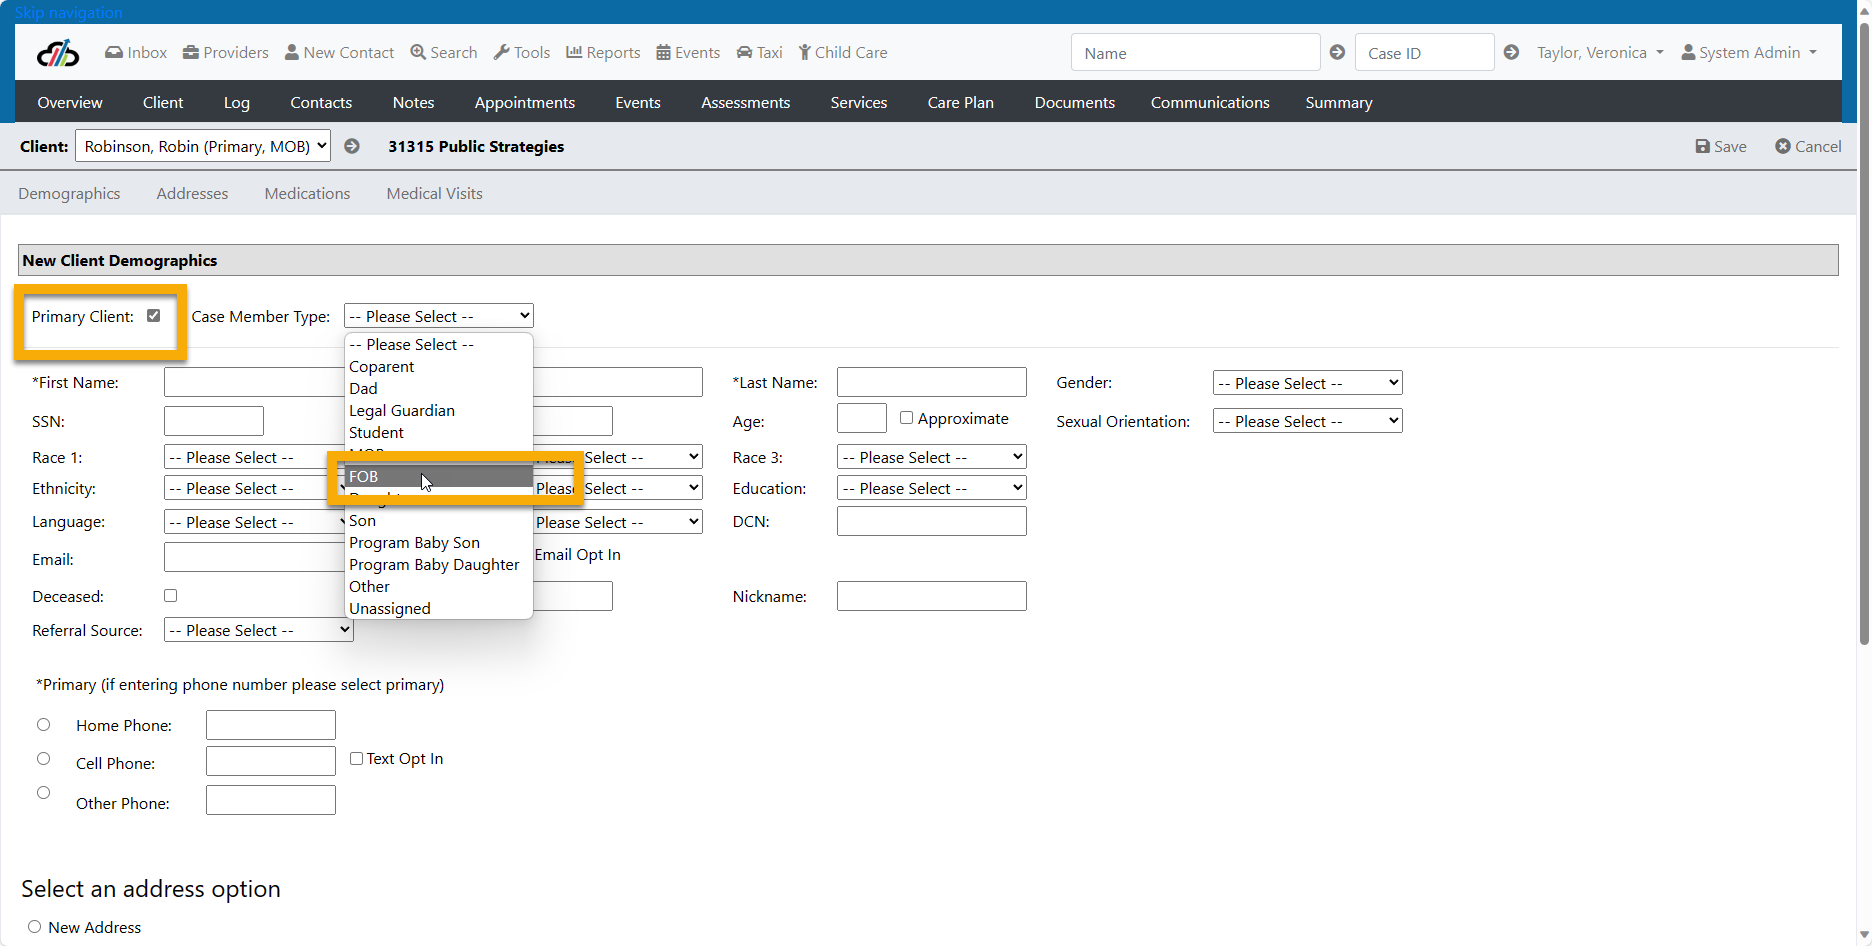
Complete the FOB's name and demographic information. You can select to import the mother's address or create a new address for father.
Next, you can add the child and other family members to the case following almost the same process as you used when entering the FOB. The only difference is that the child and other family members will NOT be marked as Primary. Every case must have a program child listed, there can only be one program child on each case.
The notes tab is useful for documenting procedural notes (example: exception approvals from the supervisor) as well as creating communications with other Capstone users..
Click the New button.
Select the Note Type. (If you do not see the note type you need, please check with your system administrator.)
Enter the note text in the note box.
Click Save. (Unless you want to create an alert)
If you wish to create an alert to another user or a workgroup, click the Send Alert box.
The system will allow you to select Individual or Workgroup. Choose Individual for a single person and select their workgroup, select the user's name from the list. Alternatively, you can select the Workgroup. Click Save.
The system sends the Alert to the user(s) you selected.
NOTE: Alerts appear on the Alert's tab of the inbox.
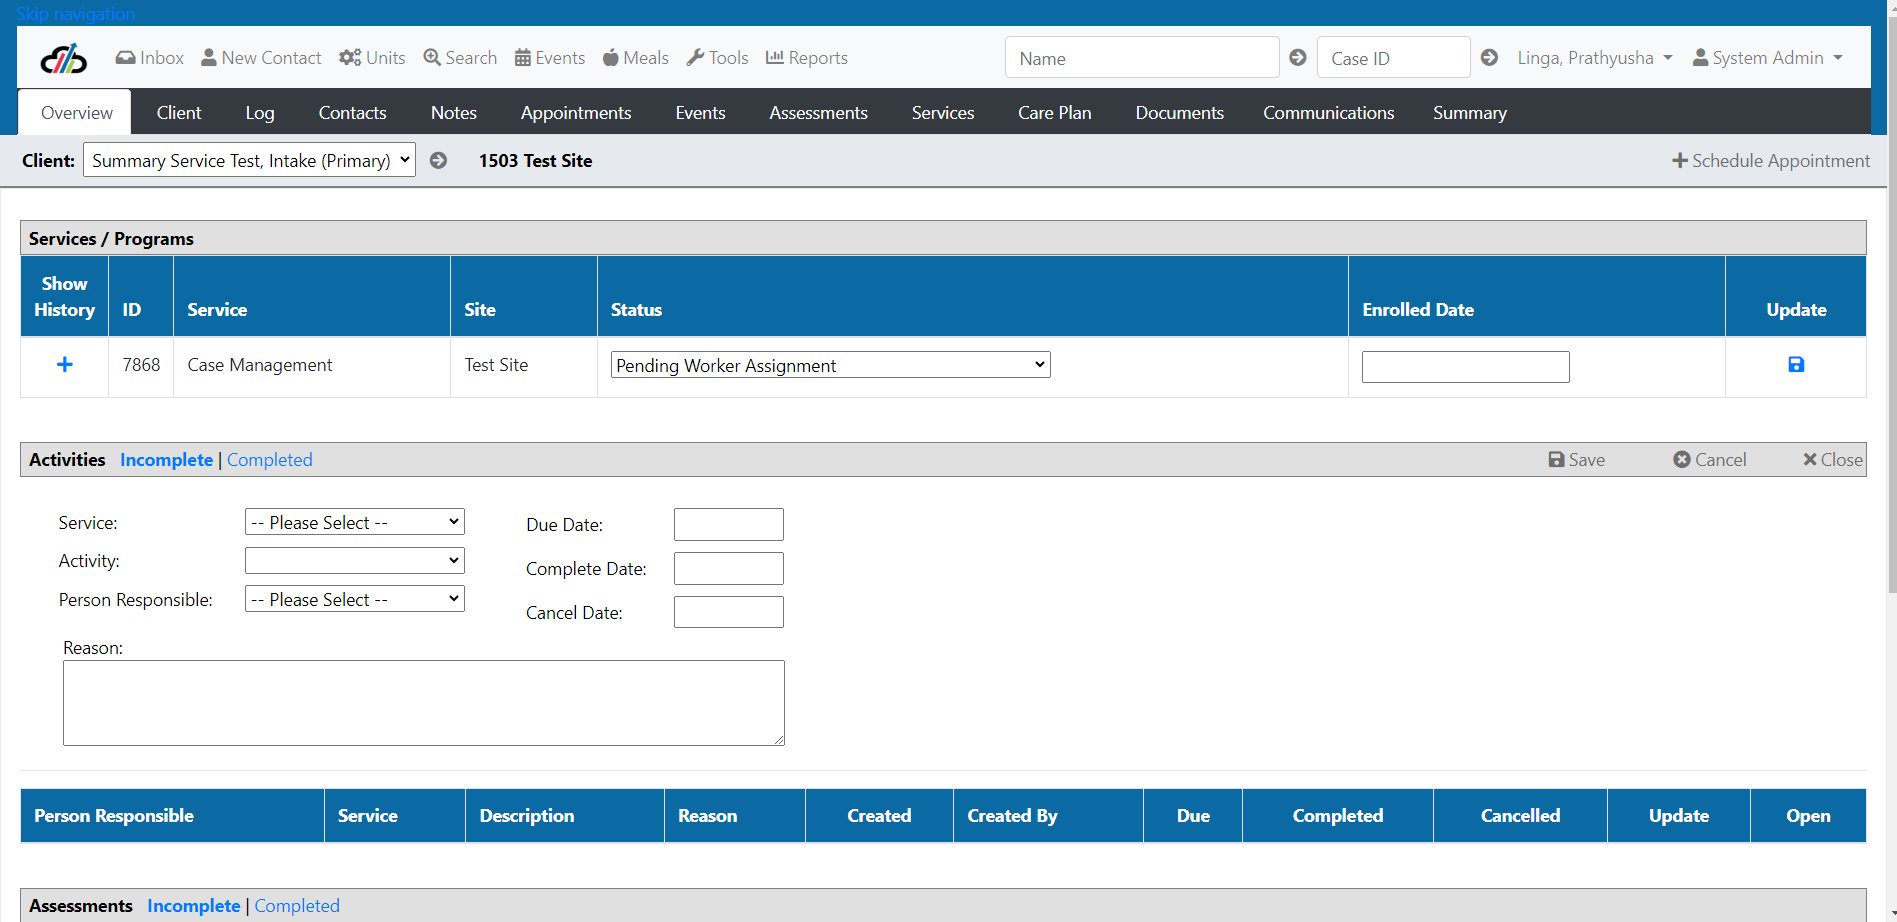
The system allows you to assign activities to another user within your site. If another user should make a call or perform an action based on the request of the client, you'll need to add an activity.
To create an activity
- With a Case open, click the Overview tab.
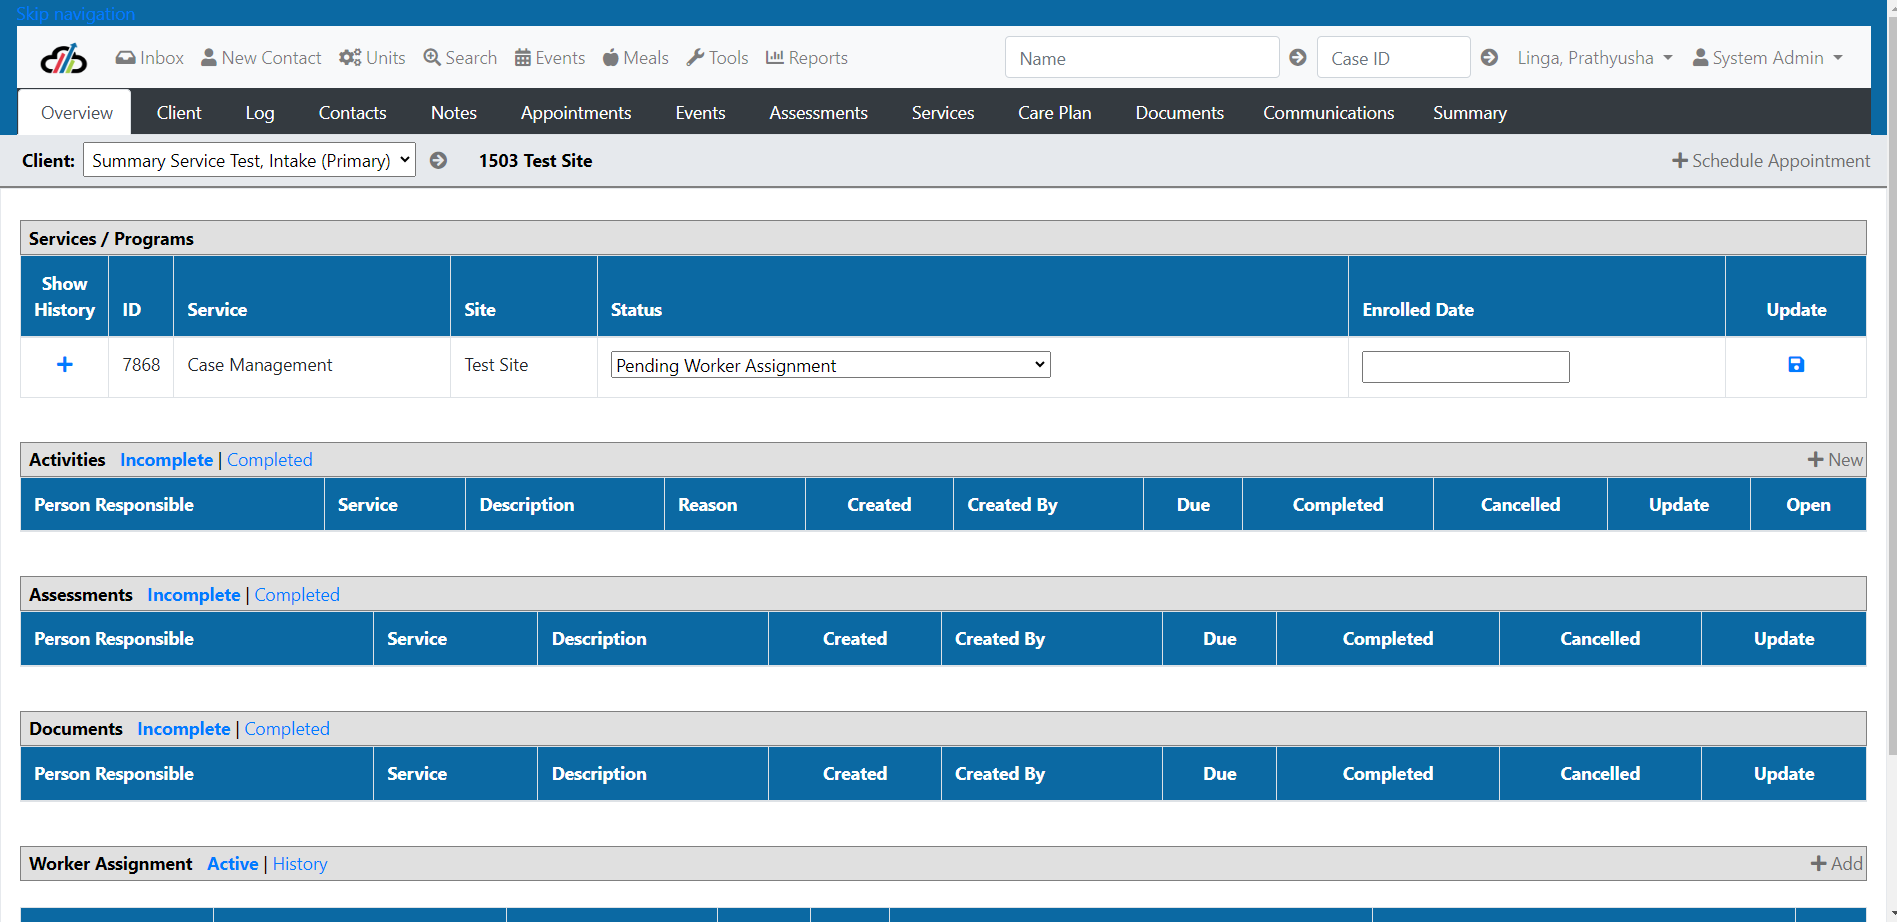
- Select the New button to the right on the Activities list.
- Select the Service from the list.
- Select the activity from the Activity list.
- Select the Person responsible.
- Enter the Due Date.
- Enter the Reason for the follow-up.
- Click Save.
Completing or Canceling an Activity
- Navigate to the Overview tab.
- Enter the Completed or Canceled date (not both).
- Click the Update button.
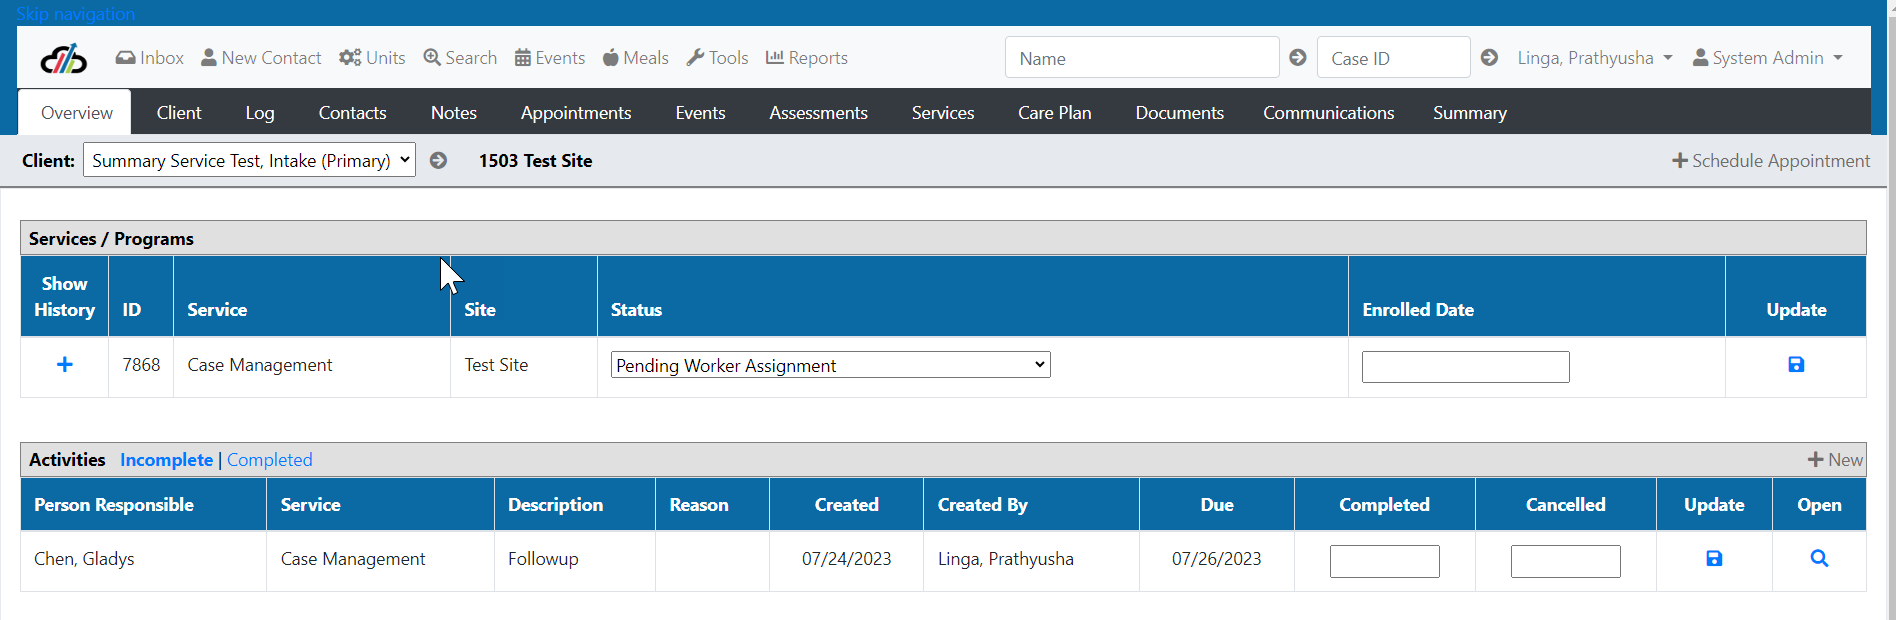
NOTE: You can view the Reason details by clicking the spyglass. You may also make changes inside this view.
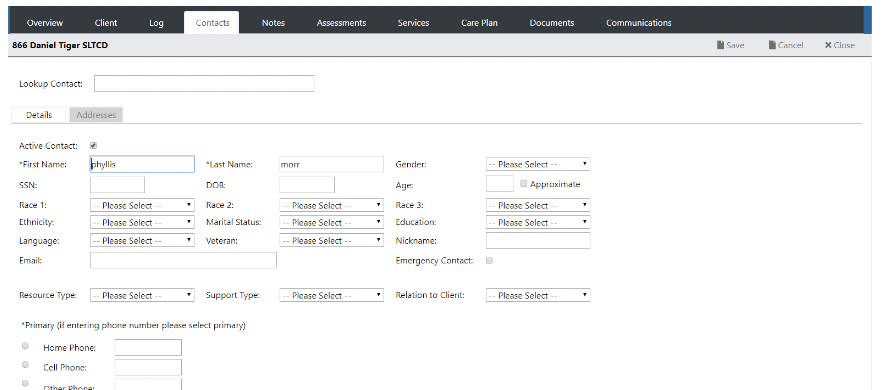
The system allows you to associate contacts for the clients by entering one or more contacts. Once a contact record is created, that person has a unique contact id and can be associated to multiple clients (such as an individual provider or physician, etc.). This association makes it possible to find all associations between clients and contacts even when the contact may be another client.
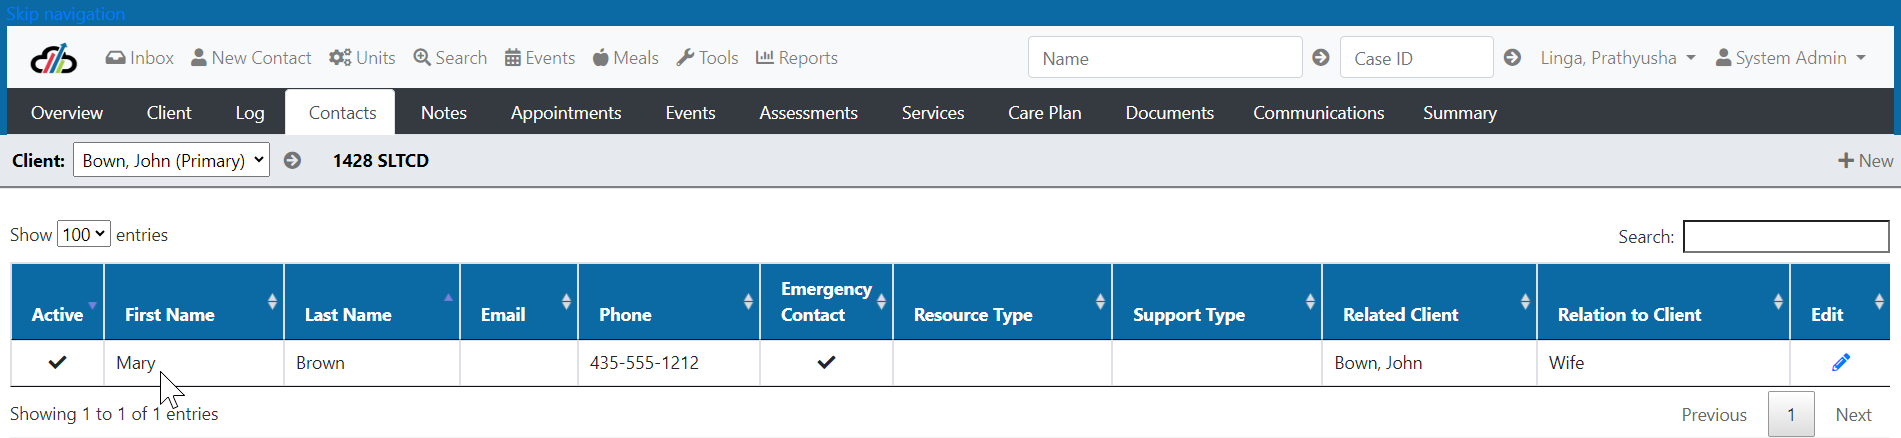
- Open a case record.
- Click Contacts.
- Click New.
- Type the contact's name in the Lookup Contact box. (NOTE: this tool does not work in Internet Explorer. You will experience errors and must use a different browser.)
- The system will display the matches to the name you have entered. If there is no match, you will have the option to select Add New. (This can be achieved by either using your mouse or arrow key and then hitting the enter key with the row selected.)

6. The system loads the details of the selected record. If this is a new contact you should complete the relevant information including relationship type, resource type, and collateral types.
7. Enter Phone Numbers and select only one number as the primary number.
8. Click Save.
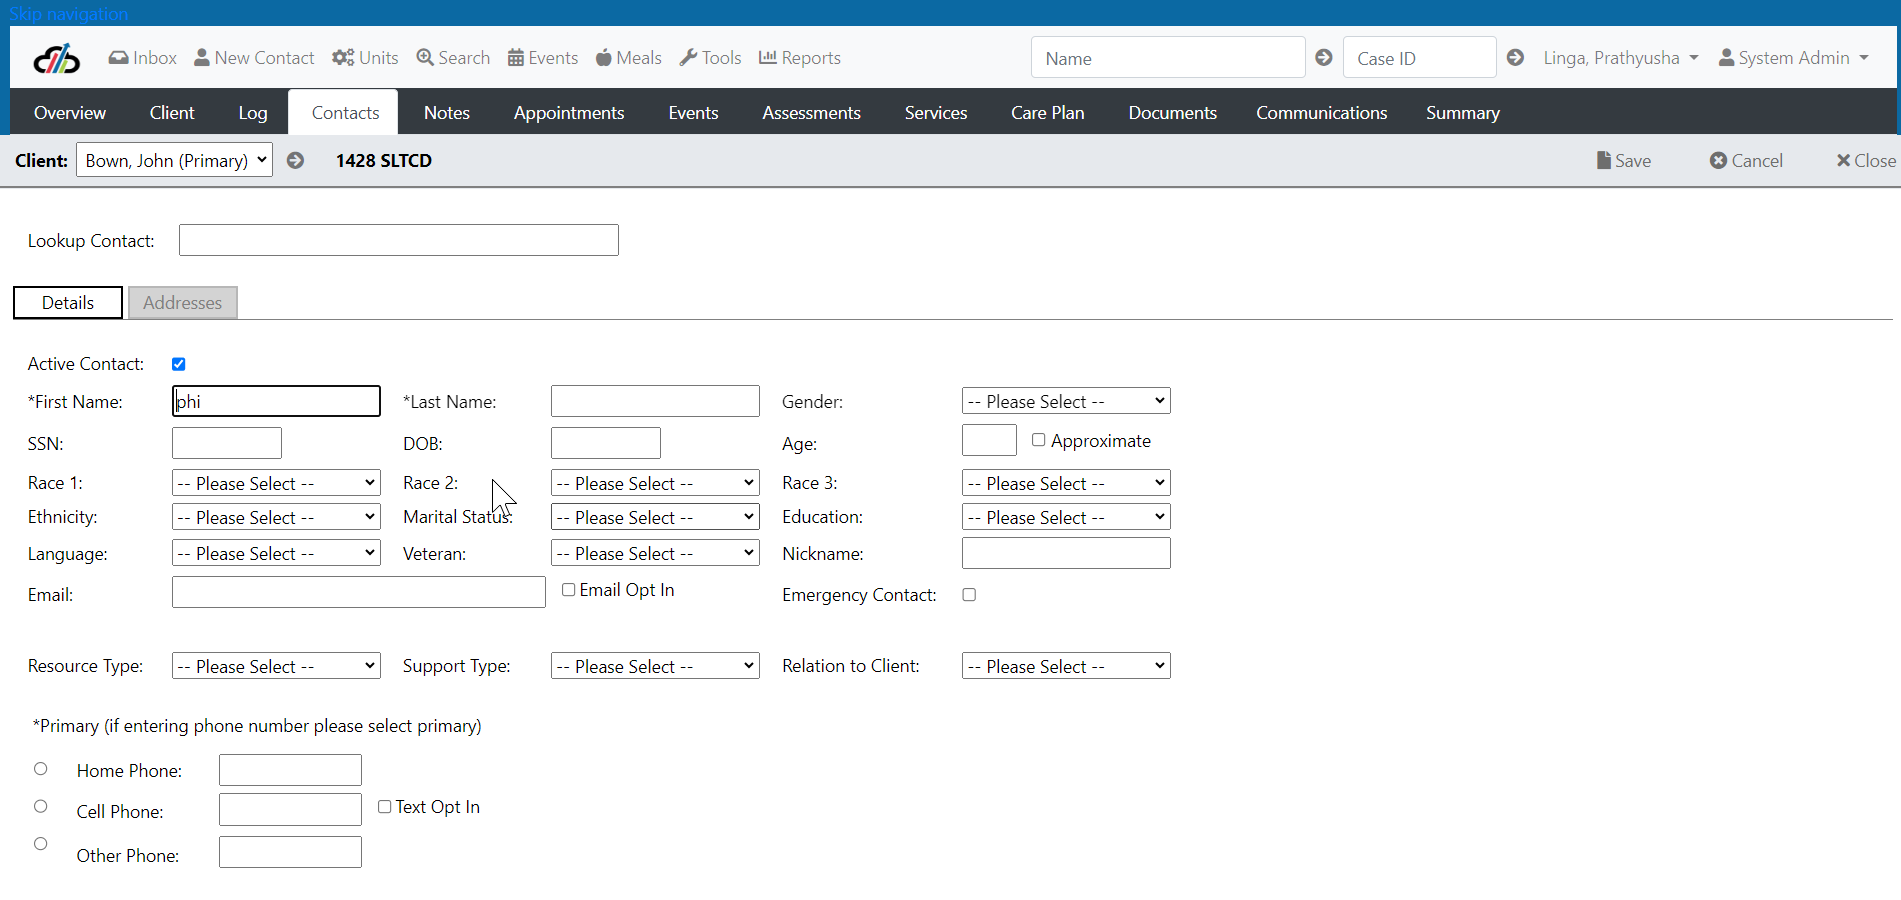
9. Click the address tab to enter the person's address information. You must enter a city or a zip code in order for many of the person search and matching functions to work properly.
10. Click Save.
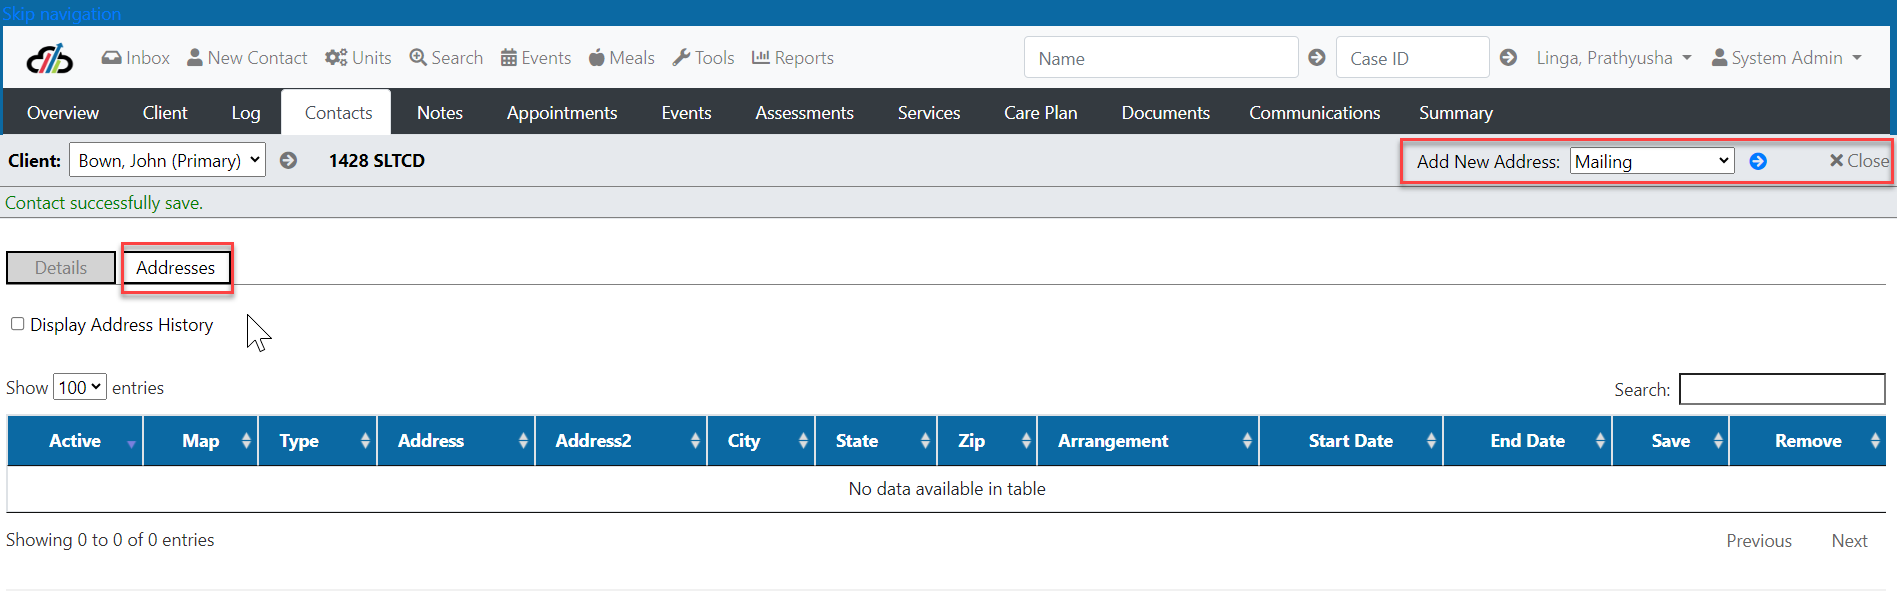
The system requires a physical address for every client. The system will not let you remove a physical address if it is the only physical address listed for the client. To update a client’s address, add the new physical address first and then delete the unwanted address. In addition to the physical address, you may add a mailing or temporary address as well.
*Note: You can mark an address as “inactive” without removing the address from the system. Simply uncheck the “active” box and click “Save” on the far right.
Add a Client Address
To add a physical, mailing, or temporary address for a client simply:
- Open the client you wish to edit
- Click the “Client” tab
- Click “Addresses”
- At the top right of the page next to Add New, select the type of address you are adding
- Click the blue “Go” button
- The system will ask if you are sure you wish to add a new address
- Click “OK”
- Enter your new address and click the “Save” file icon on the far right
*Note that the new address you’ve entered is automatically marked as “active”. If you ever wish to make the address inactive, simply uncheck the “active” box and click “Save”.

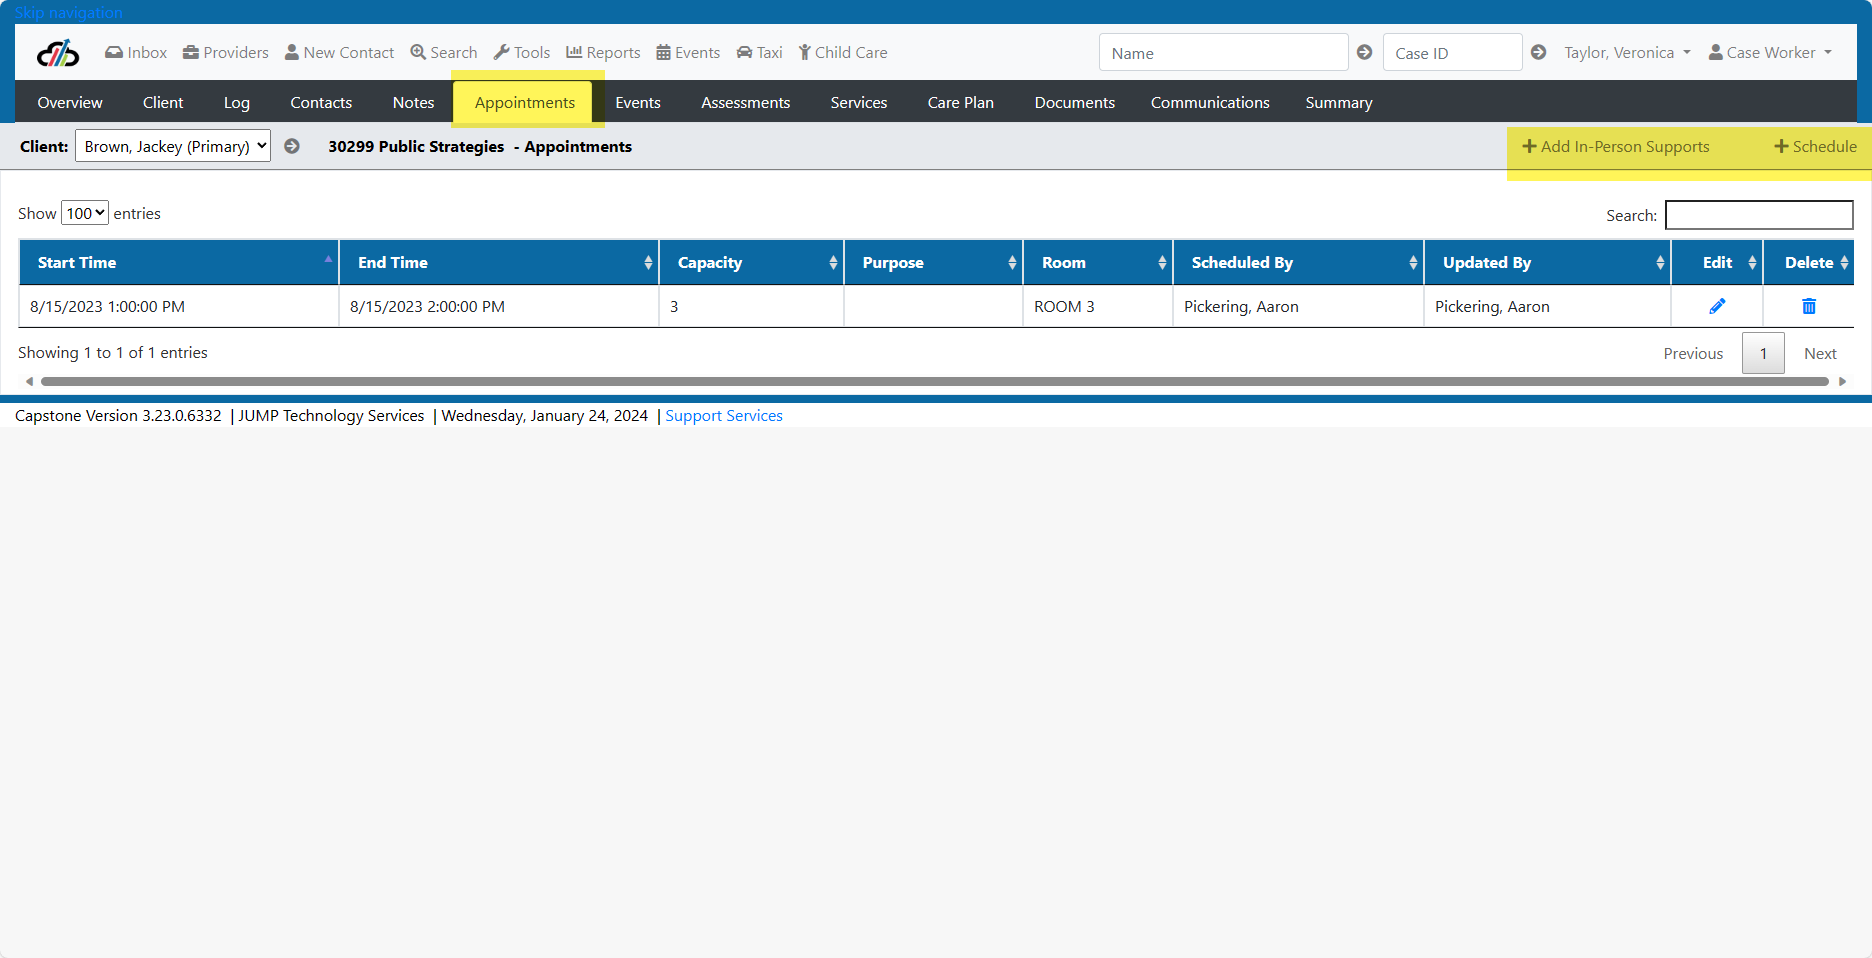
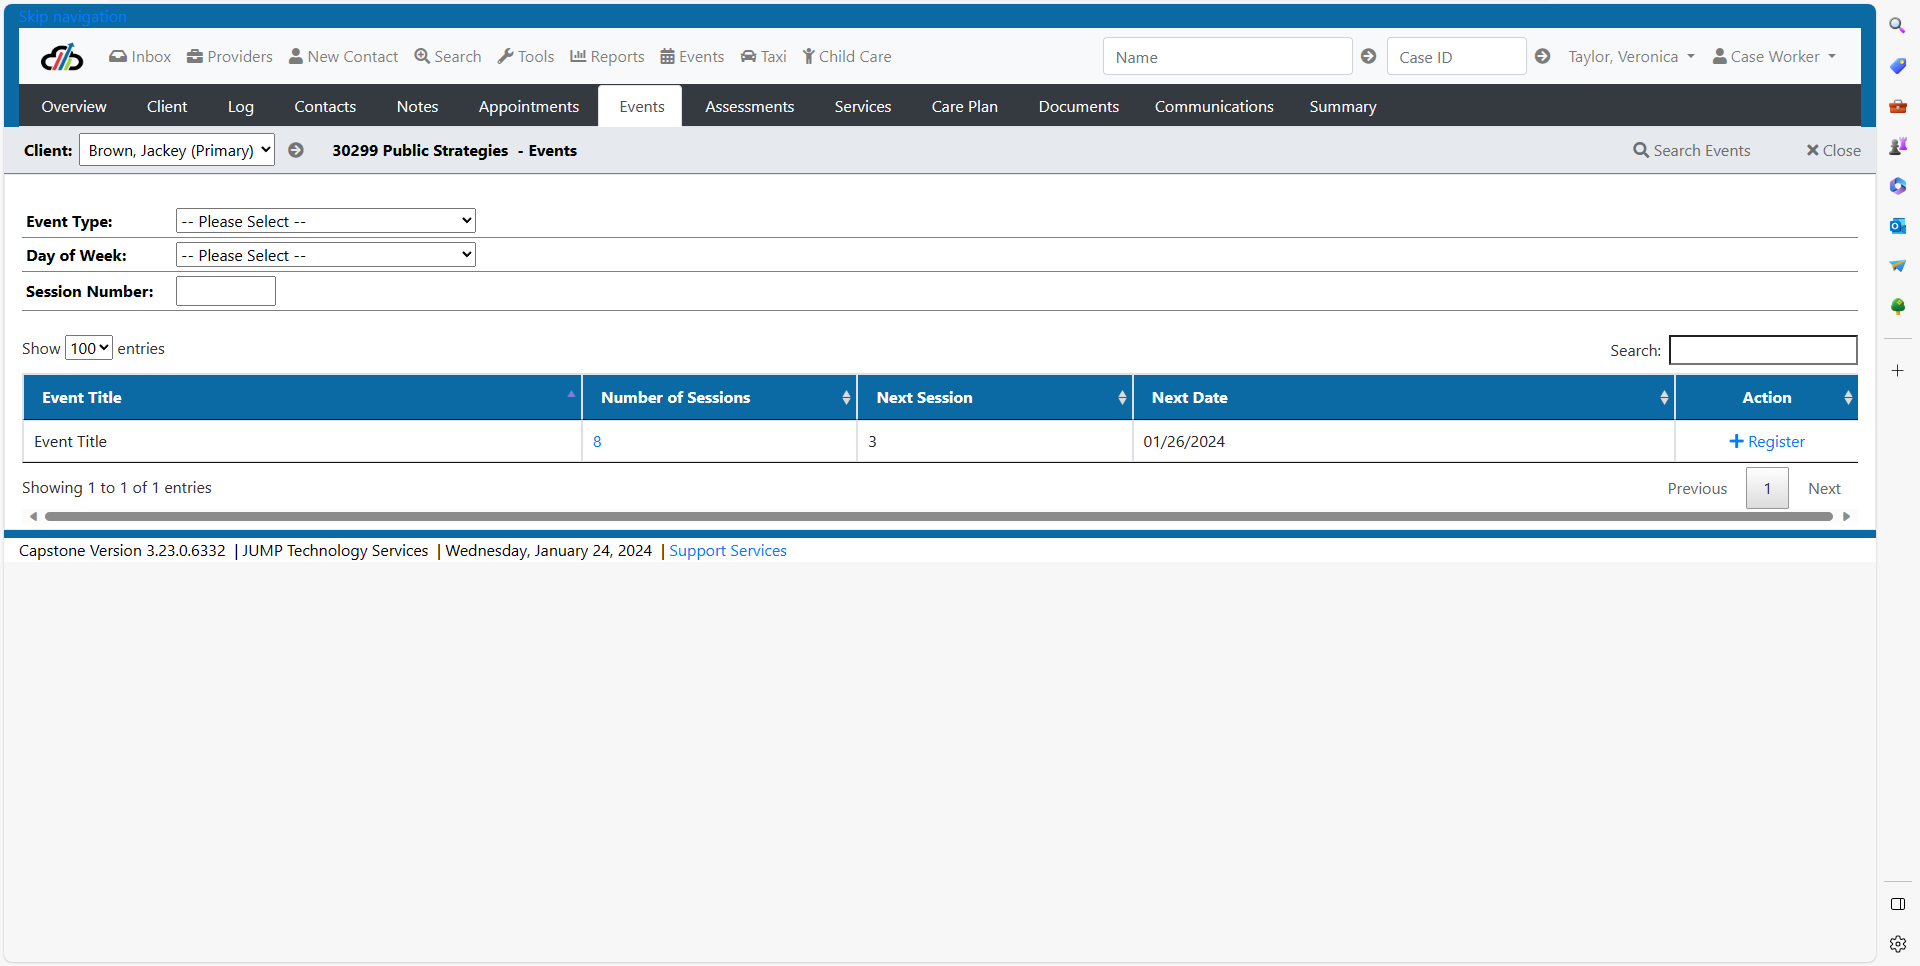
Appointments and In Person Supports can be added while in a case.
Event registration can be added from within a case.
Open a case, select Events from the case management tool bar, and select + New Registration.
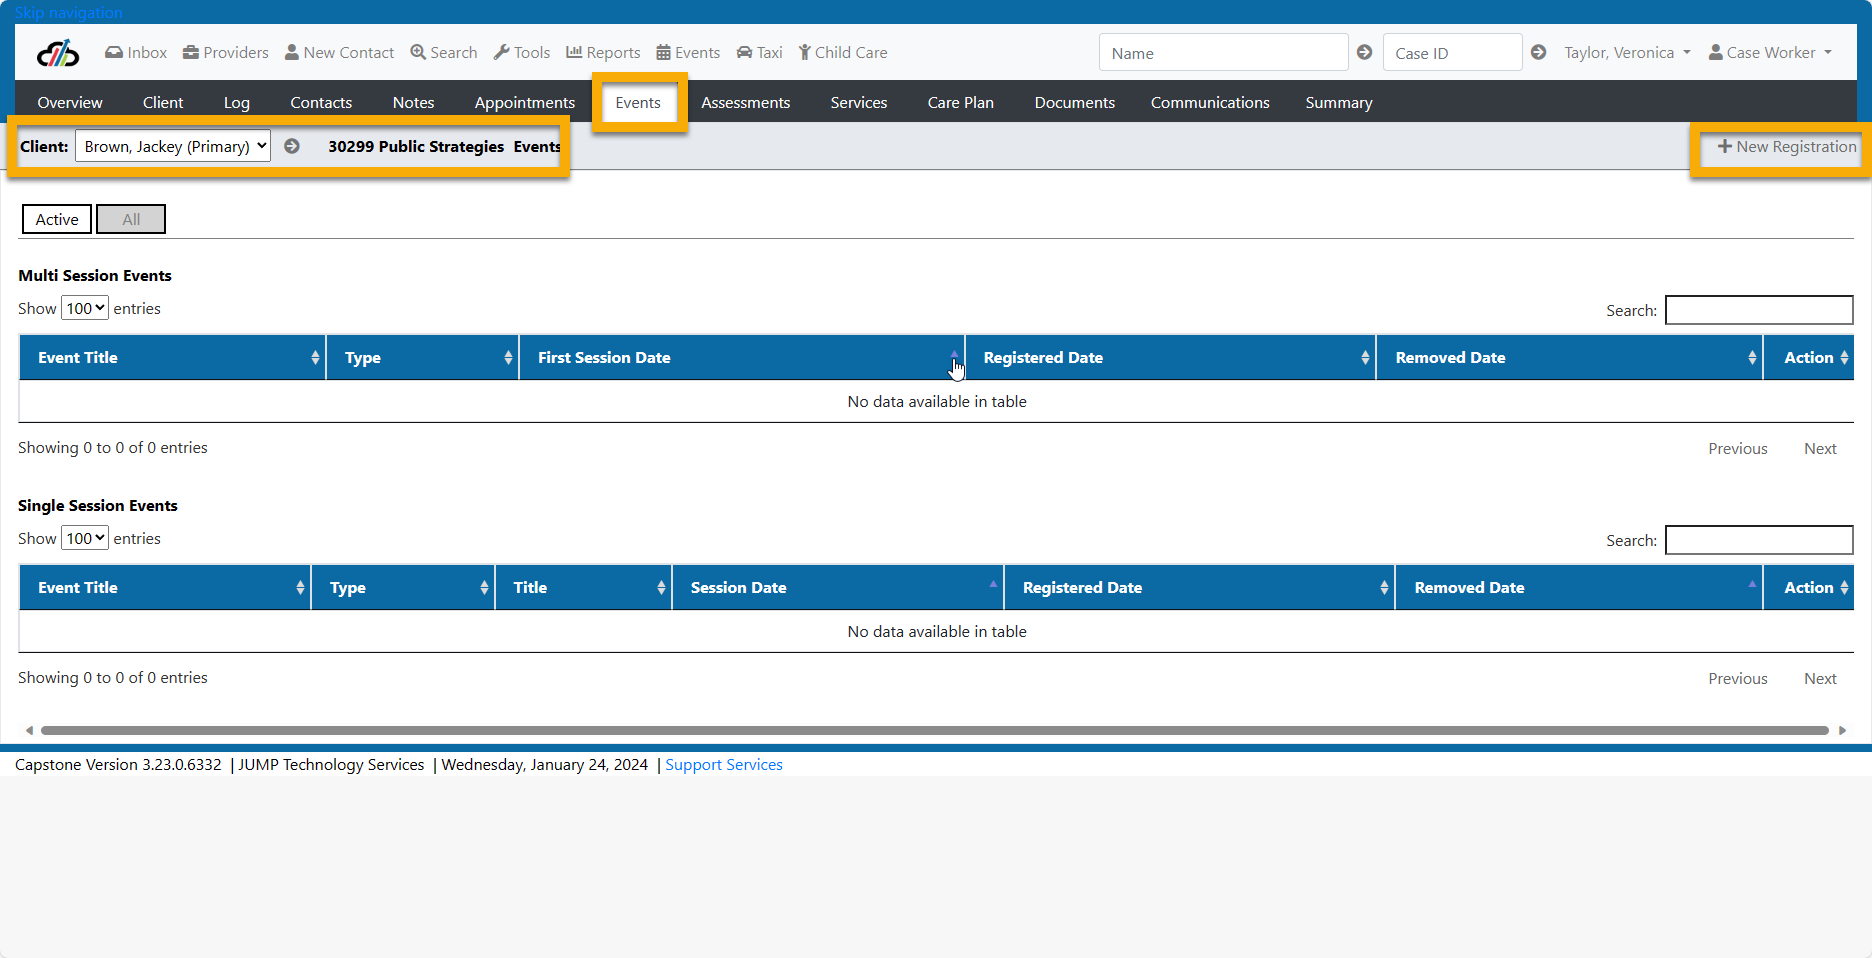
Here you can search for an existing Event and register the client.
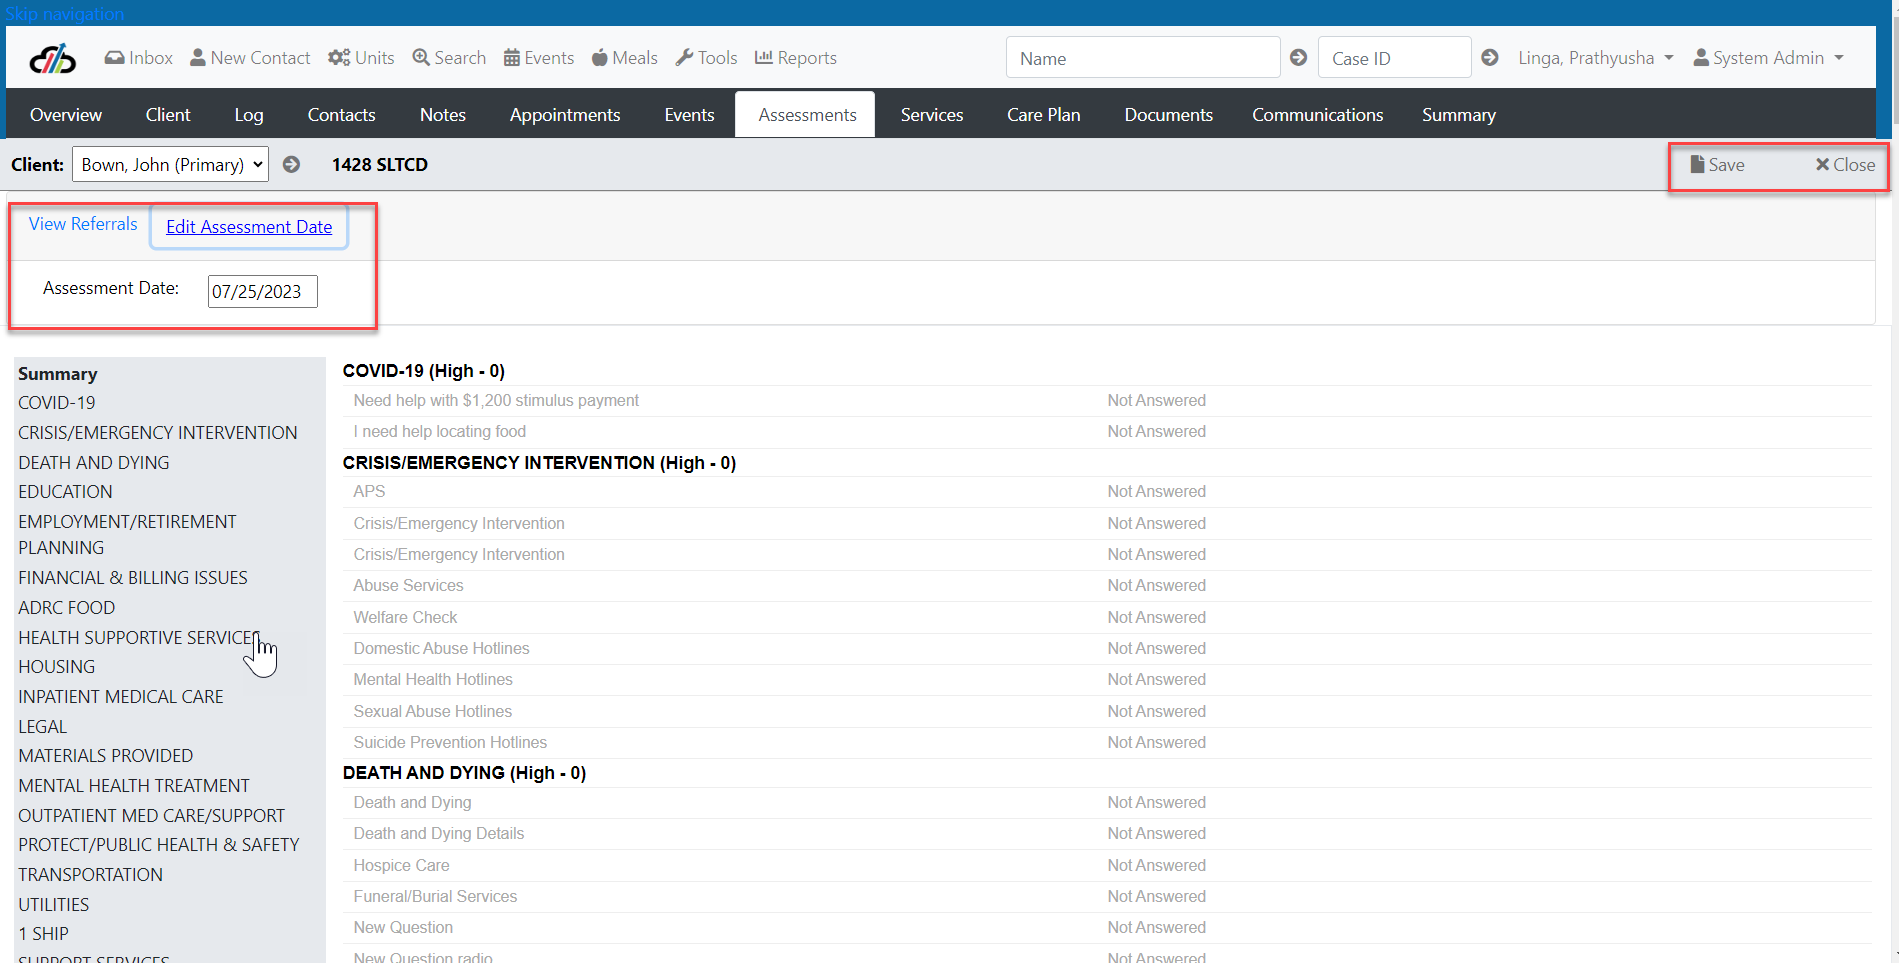
As your workflow moves from the intake process to the case management process you will use a lot of the same tools and some additional features as well. Like the log entries,only the user who created the assessment may complete the form.
Only the user who created the assessment may complete the form.
- Click the Assessment tab.
- Click the pencil icon next to the form you need to complete.
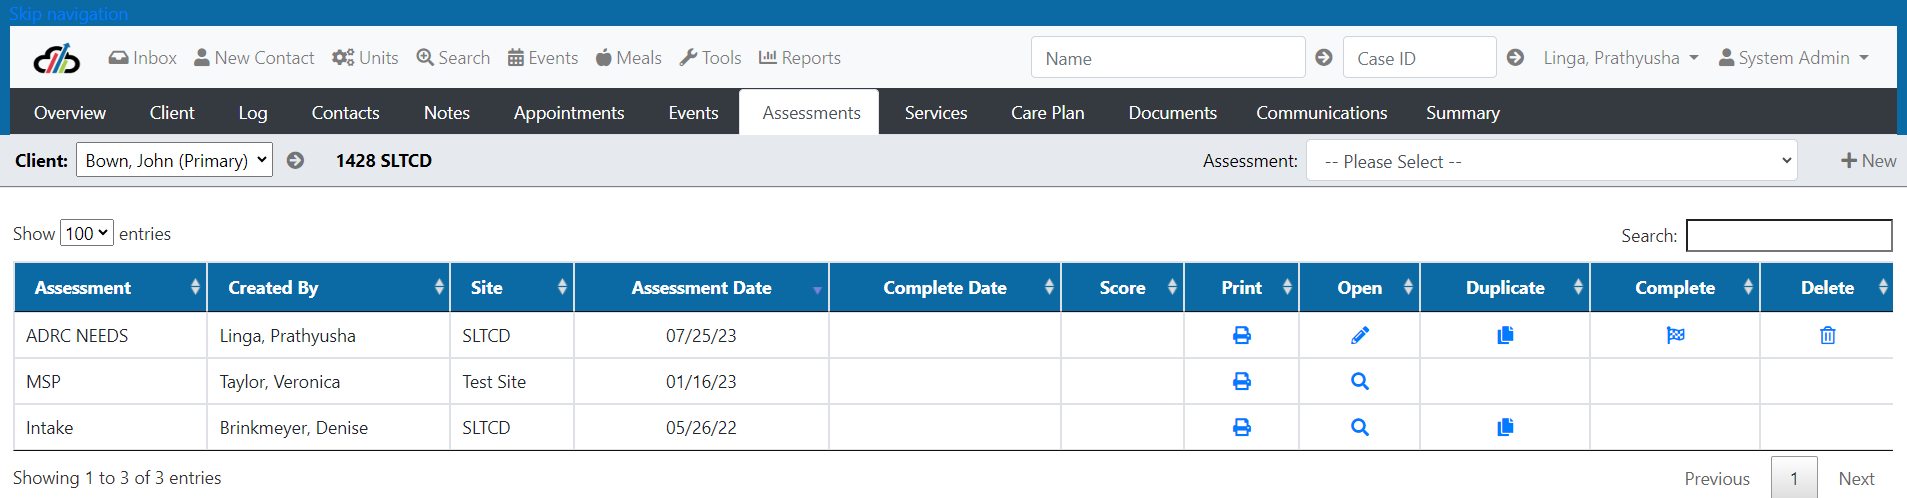
- The form will open to the Summary section. You'll notice that this is highlighted on the left. The summary lets you know where you left off in making entries on the form. It's easy to see sections that have not been completed.
- Note that the system will create the assessment date for you when it inserts the forms. If the actual date the information was collected was on a previous date, click Edit Assessment Date and change the date to the date when the information was collected.
- (Note: due to reporting timeliness, the system will not allow you to enter a date that is more than 15 days in the past.)
- Use the navigation on the left below the Summary to move through all the pages on the form. Be sure to click Save before moving on to the next tab.
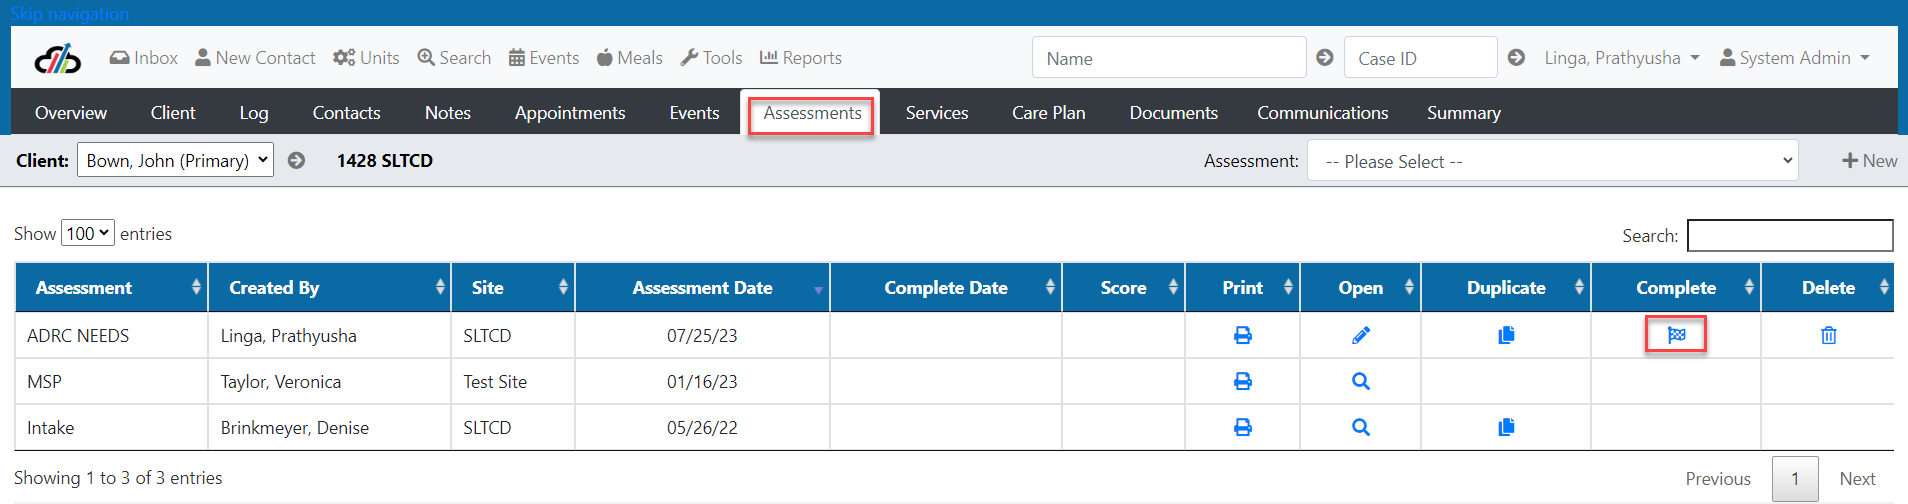
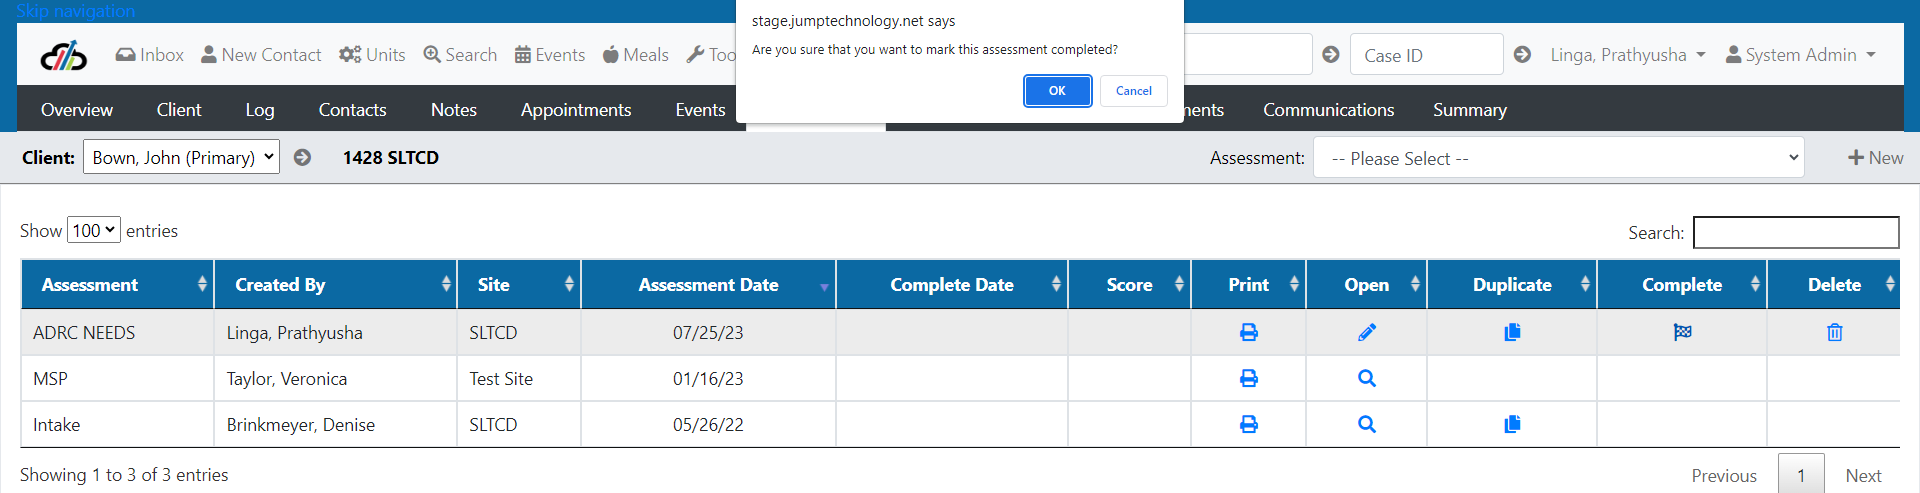
- When you have completed the form, return to the forms list page by clicking Close or clicking the Assessments tab. Click the complete button to mark the form finished. If the form is required for programs that report data from the archive, you must mark it complete or the data will not be counted.
*NOTE: Assessment forms that are not completed will appear on the user's Pending Forms list
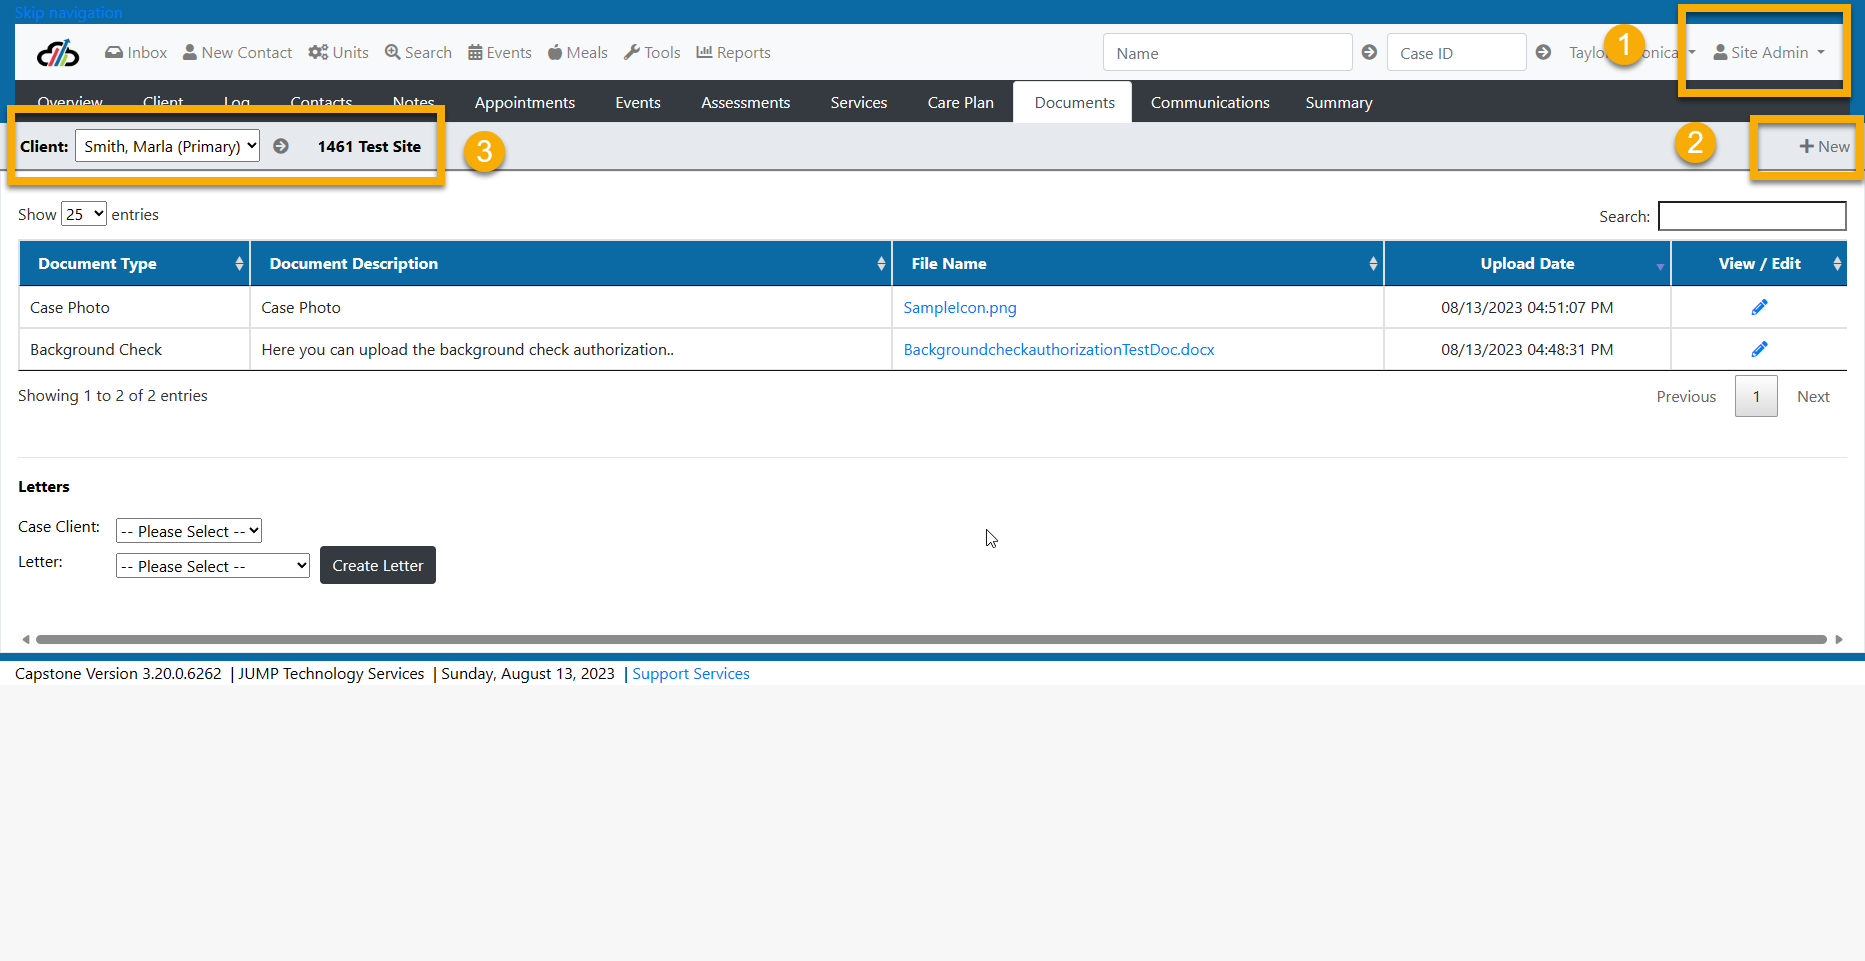
If the workflow requires documents (such as signature documents or consent forms), you can upload the documents at any time by clicking the documents tab under the case.
NOTE: When uploading the participant photos be sure to select MOB Photo, FOB Photo, or Case Photo.
- Open the case. Click the Documents tab.
- Click the New button on the right side of the page.

- Notice that your site is auto-selected. Select the document type and enter a useful description for others who may view the record. (If you do not find the appropriate document type, please contact your system administrator.)
- Click Choose File.
- Select the electronic file from your hard drive that you wish to upload.
NOTE: The system will only accept .pdf, .docx, .xlsx, .jpg, and .png files. If you have another file type, you will have to convert it before uploading it to the system.
ABOUT FILE SIZES: The system will generally accept files up to 8 MB in size. If you are getting a timeout error message, the issue is likely due to a slow internet connection that is preventing your file from uploading quickly enough to keep the system processing active. You will need to split your file into multiple files. Sometimes printing to .pdf can resolve file size issues.
1. Create the Complete to Submit assessment
2. Select the program that the participant is attending
3. Complete the assessment
Documenting Deceased Consumer Data
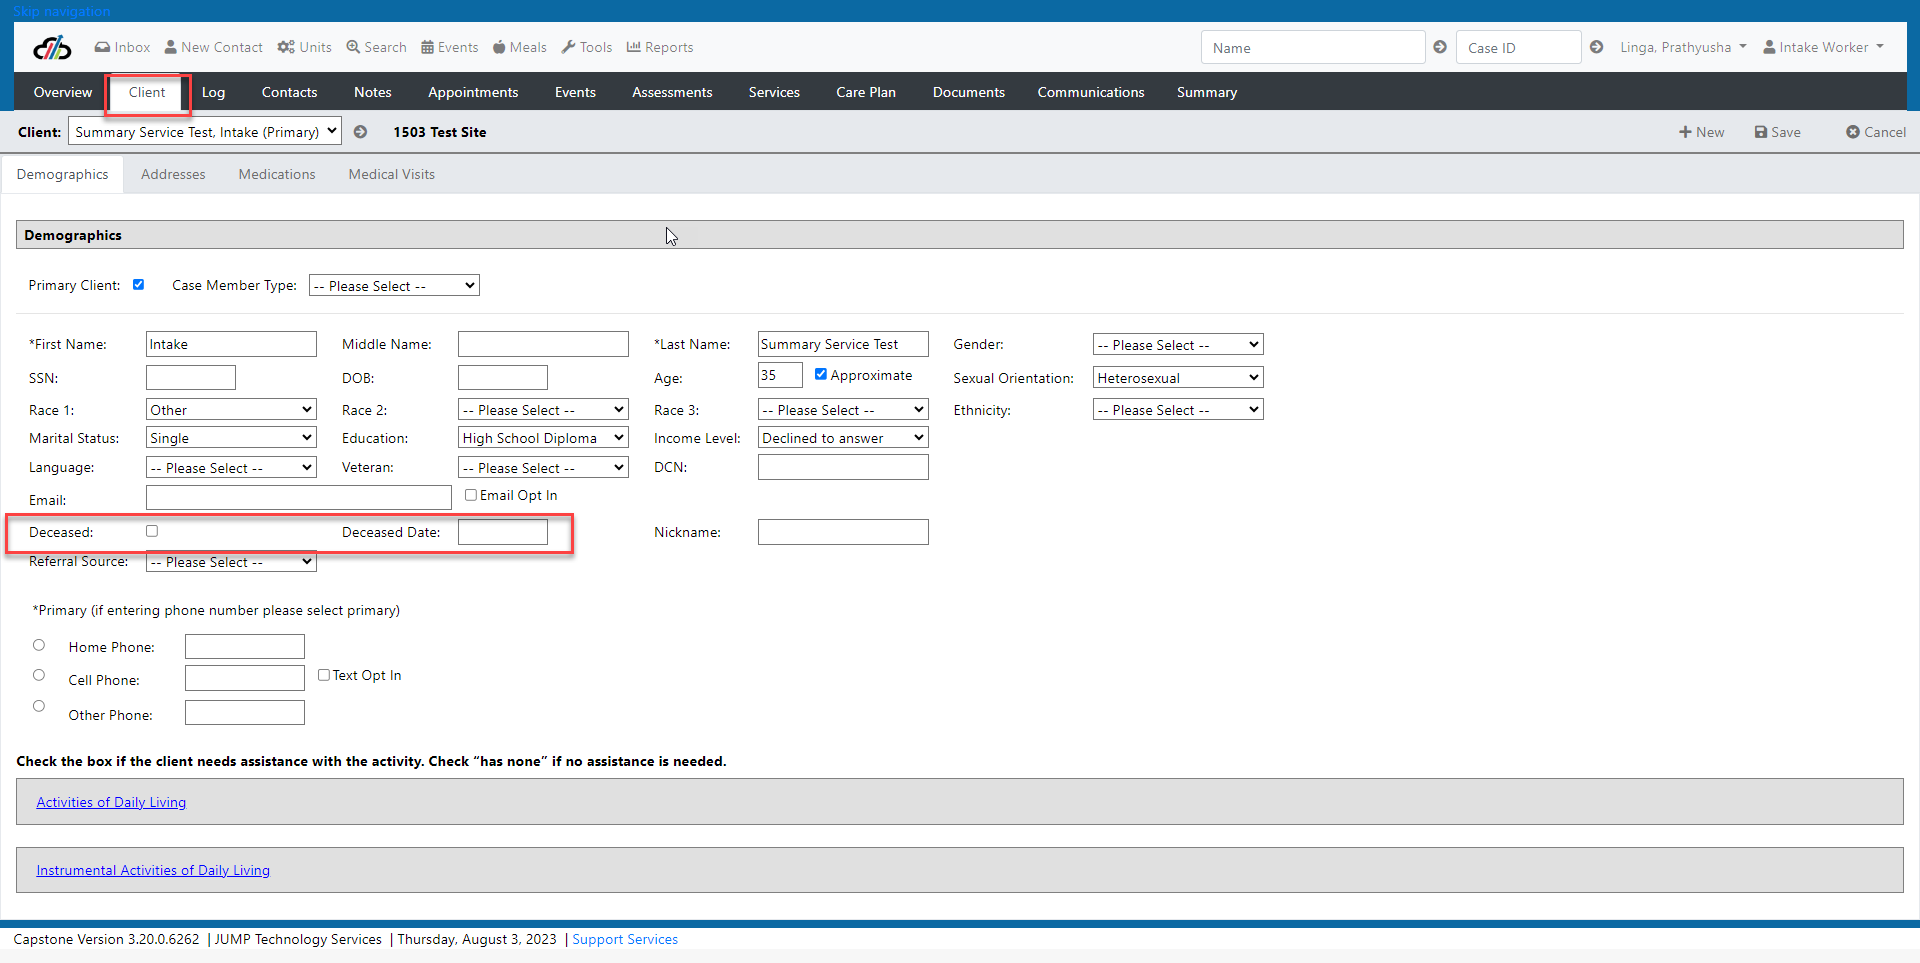
When a client or consumer is deceased the client record is marked with a checkmark in the deceased box and a date placed in the deceased date field.
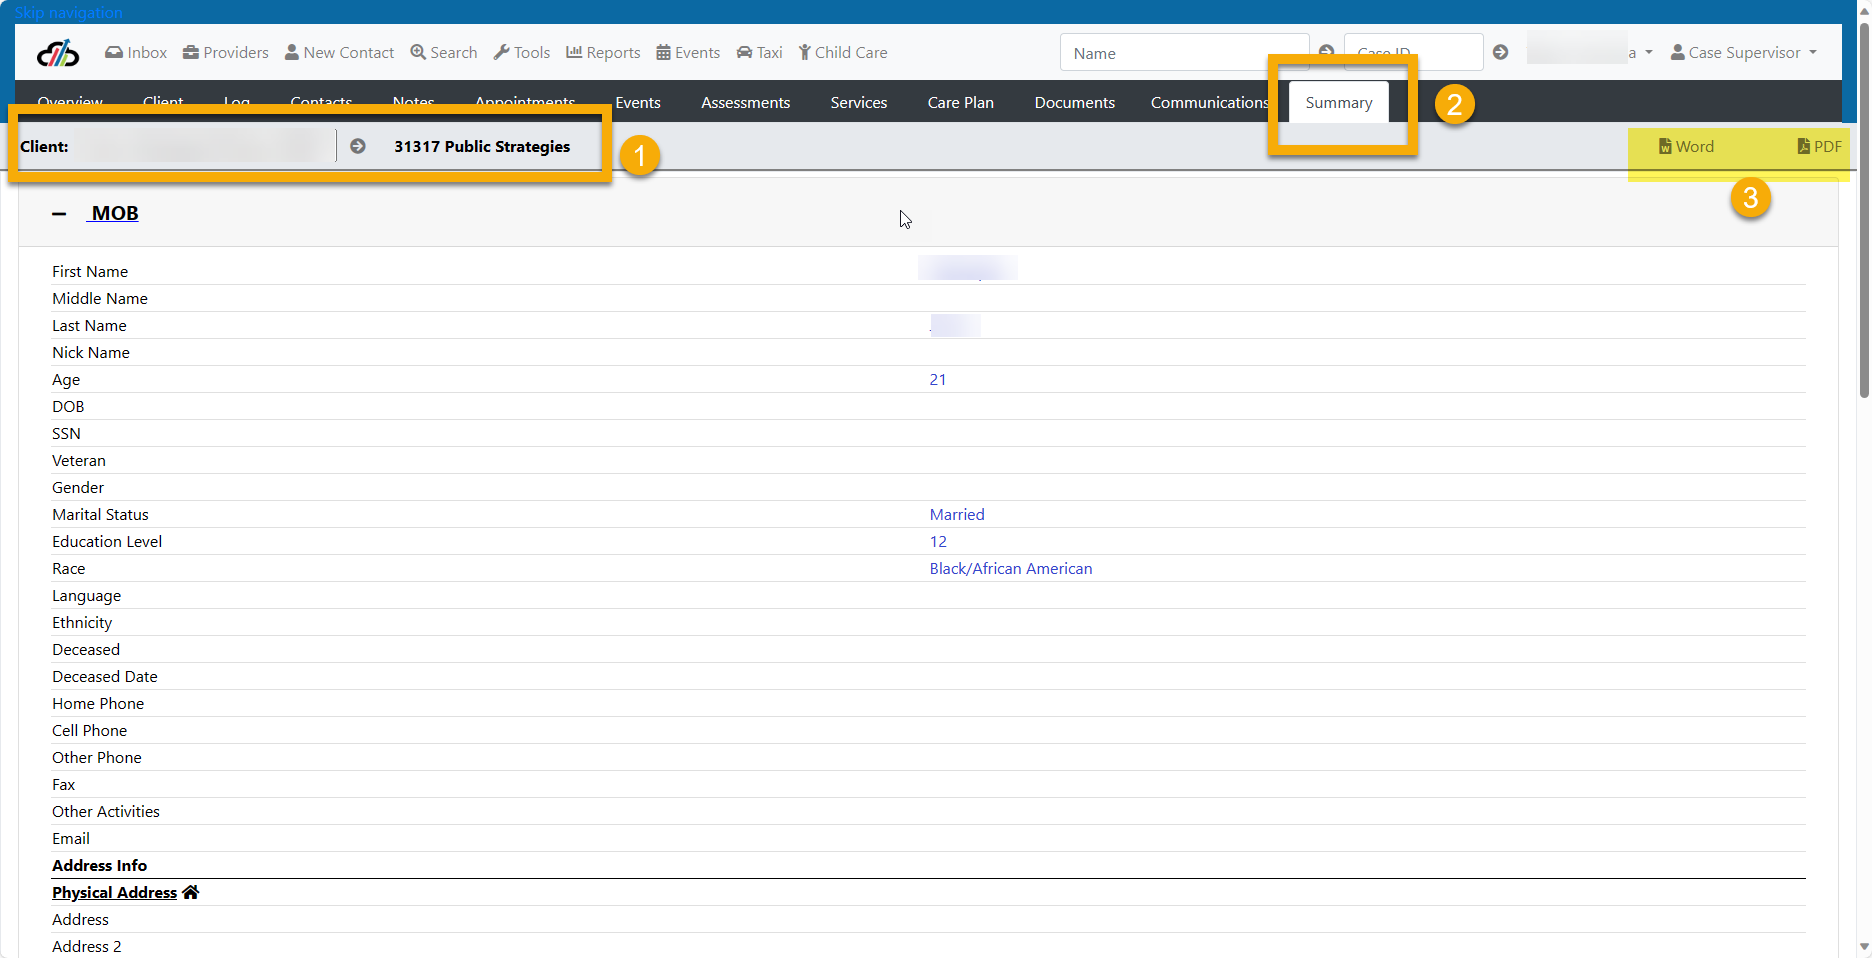
The Case Summary can be viewed from within a case and exported as a Word Document or PDF.
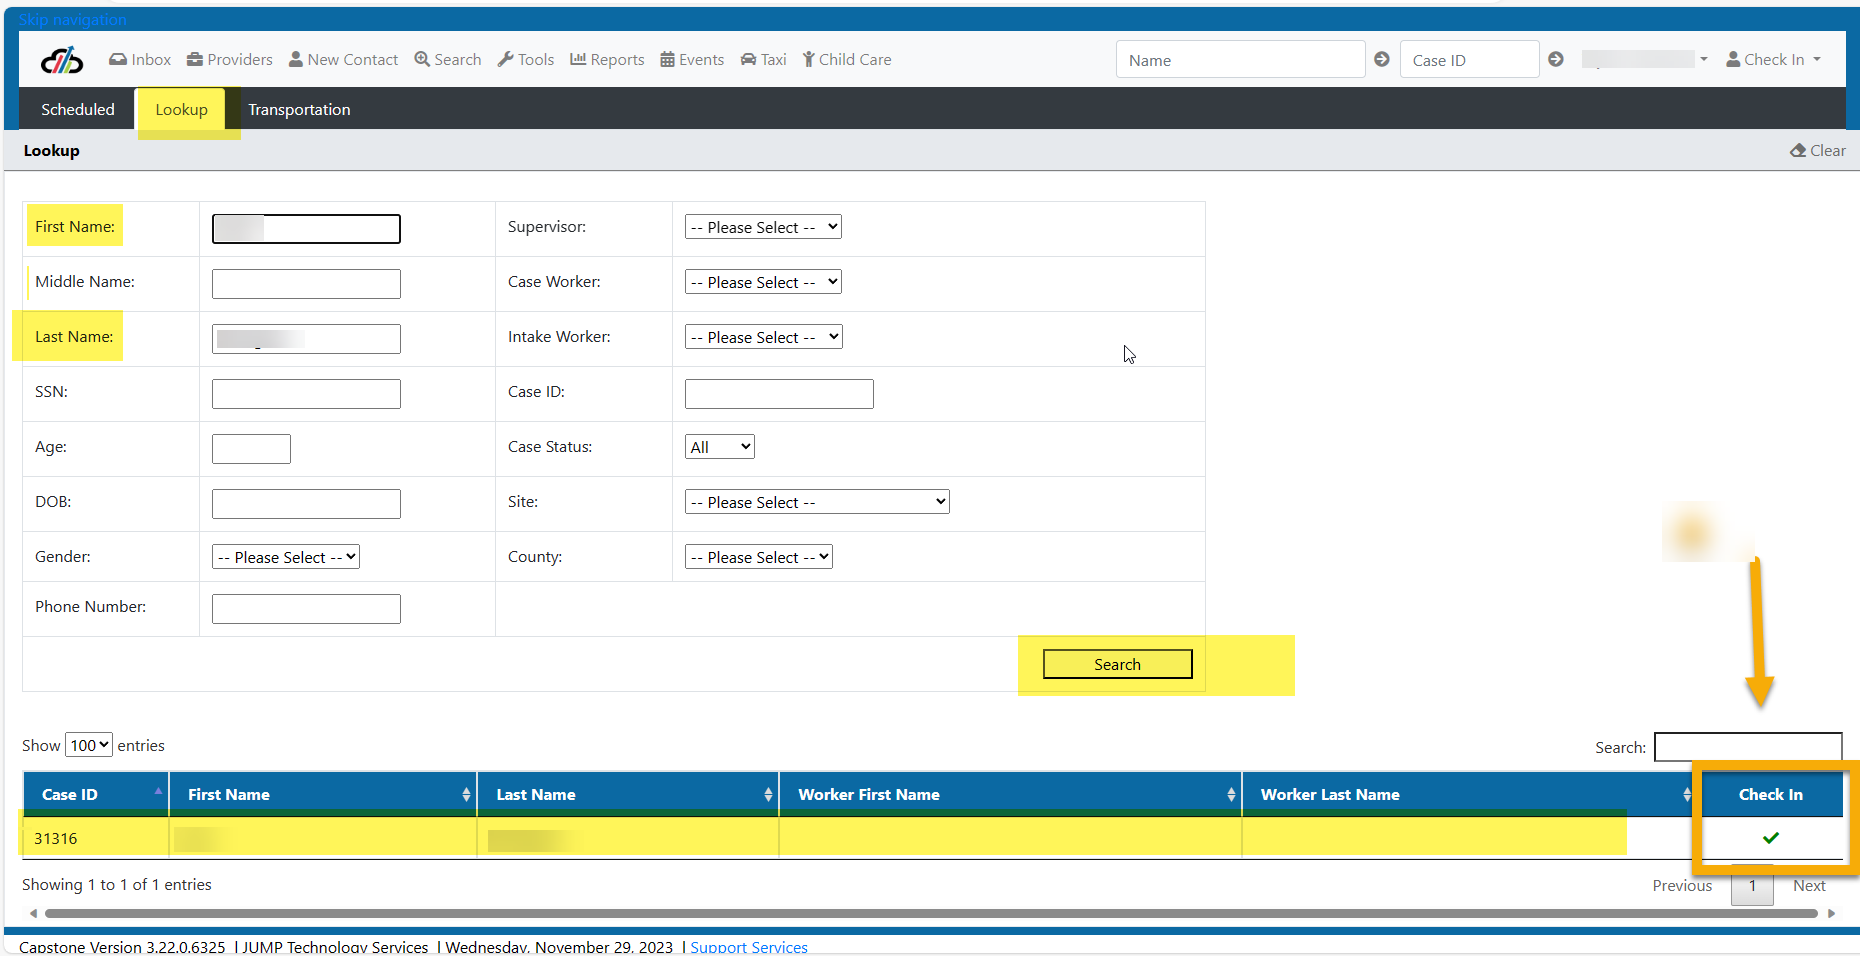
The Check-In screen shows appointments that have been scheduled from the Scheduled tab. On this page and many other pages, you have a search box on the right side to search the grid.
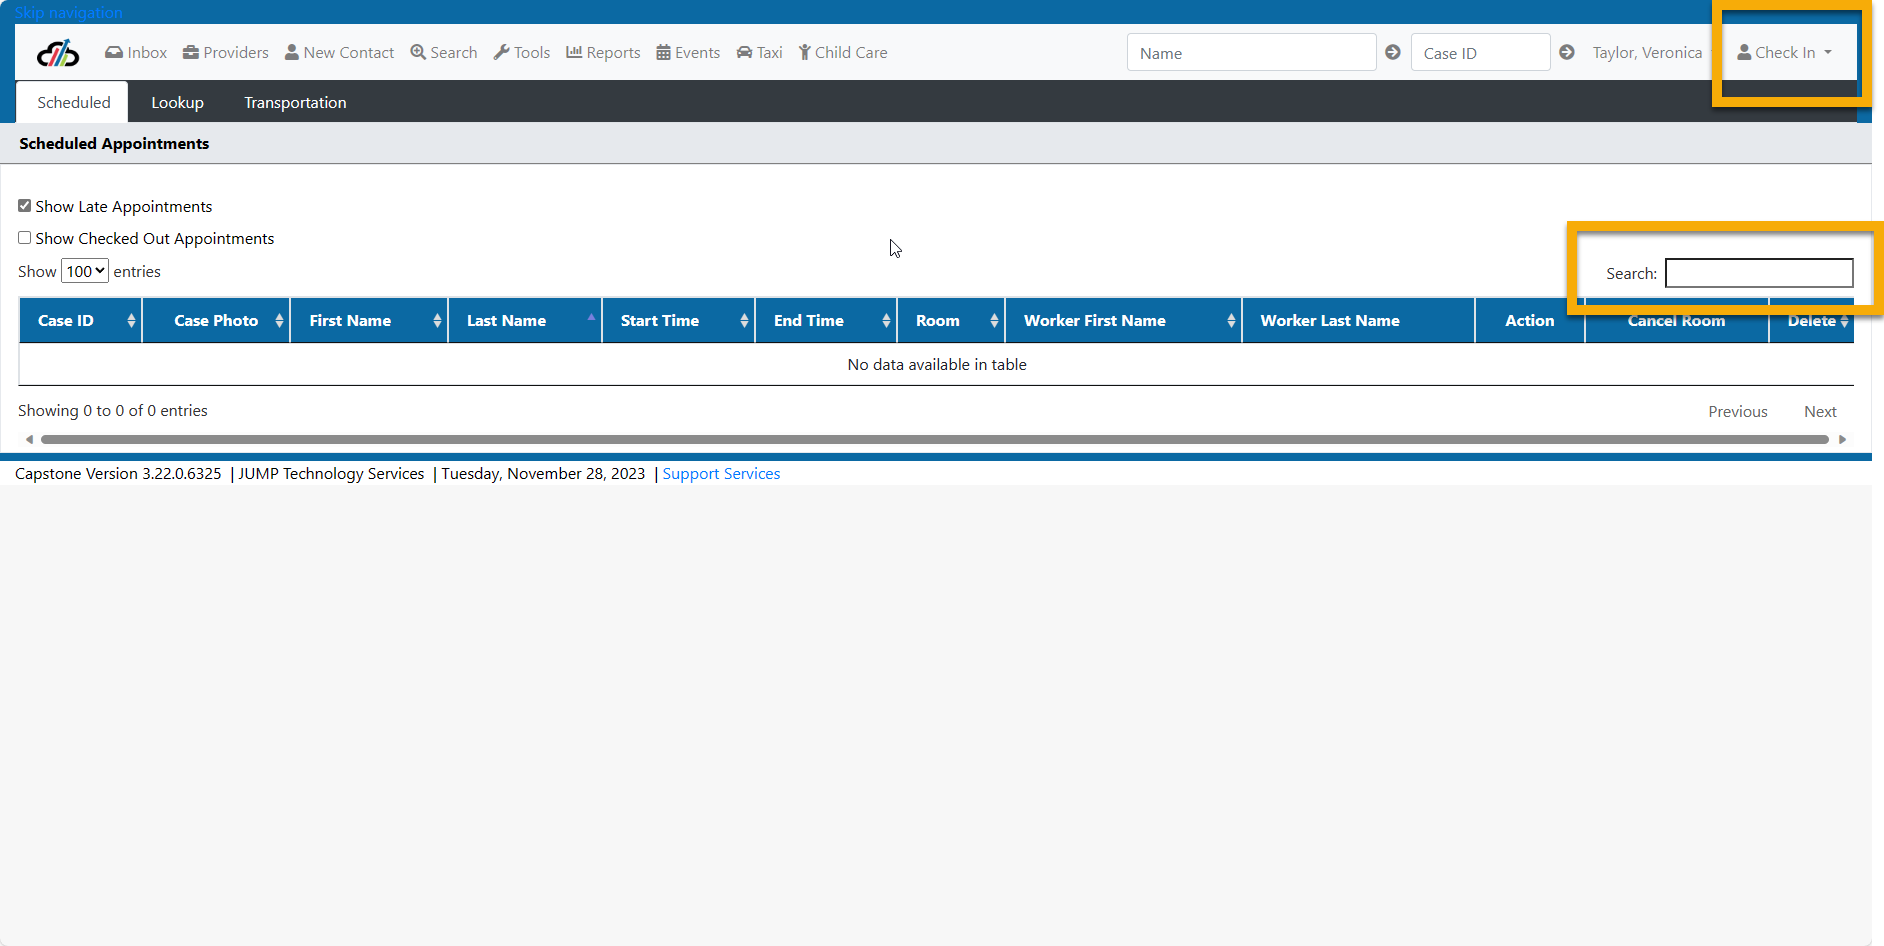
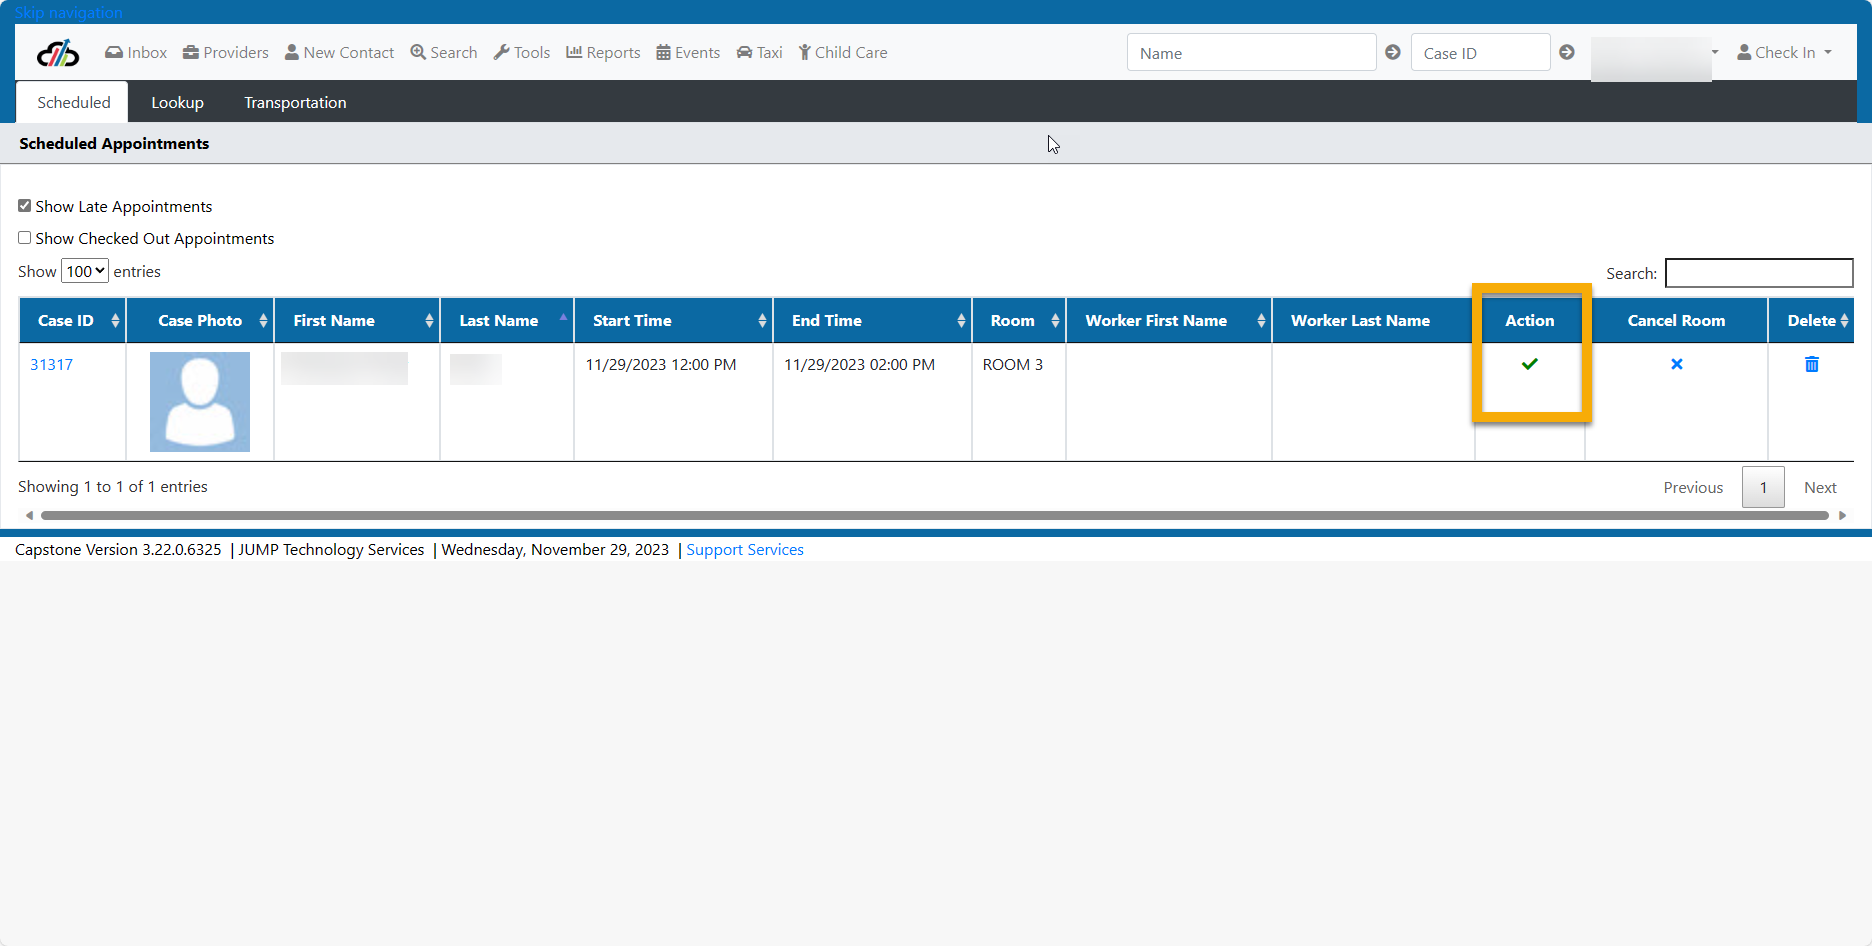
Scheduled Tab - The Scheduled Tab shows appointments that have been scheduled for the current day. You can check in and check out participants that are scheduled for a workshop or an appointment from this page using the green check mark. Scheduled appointments will show in a grid.
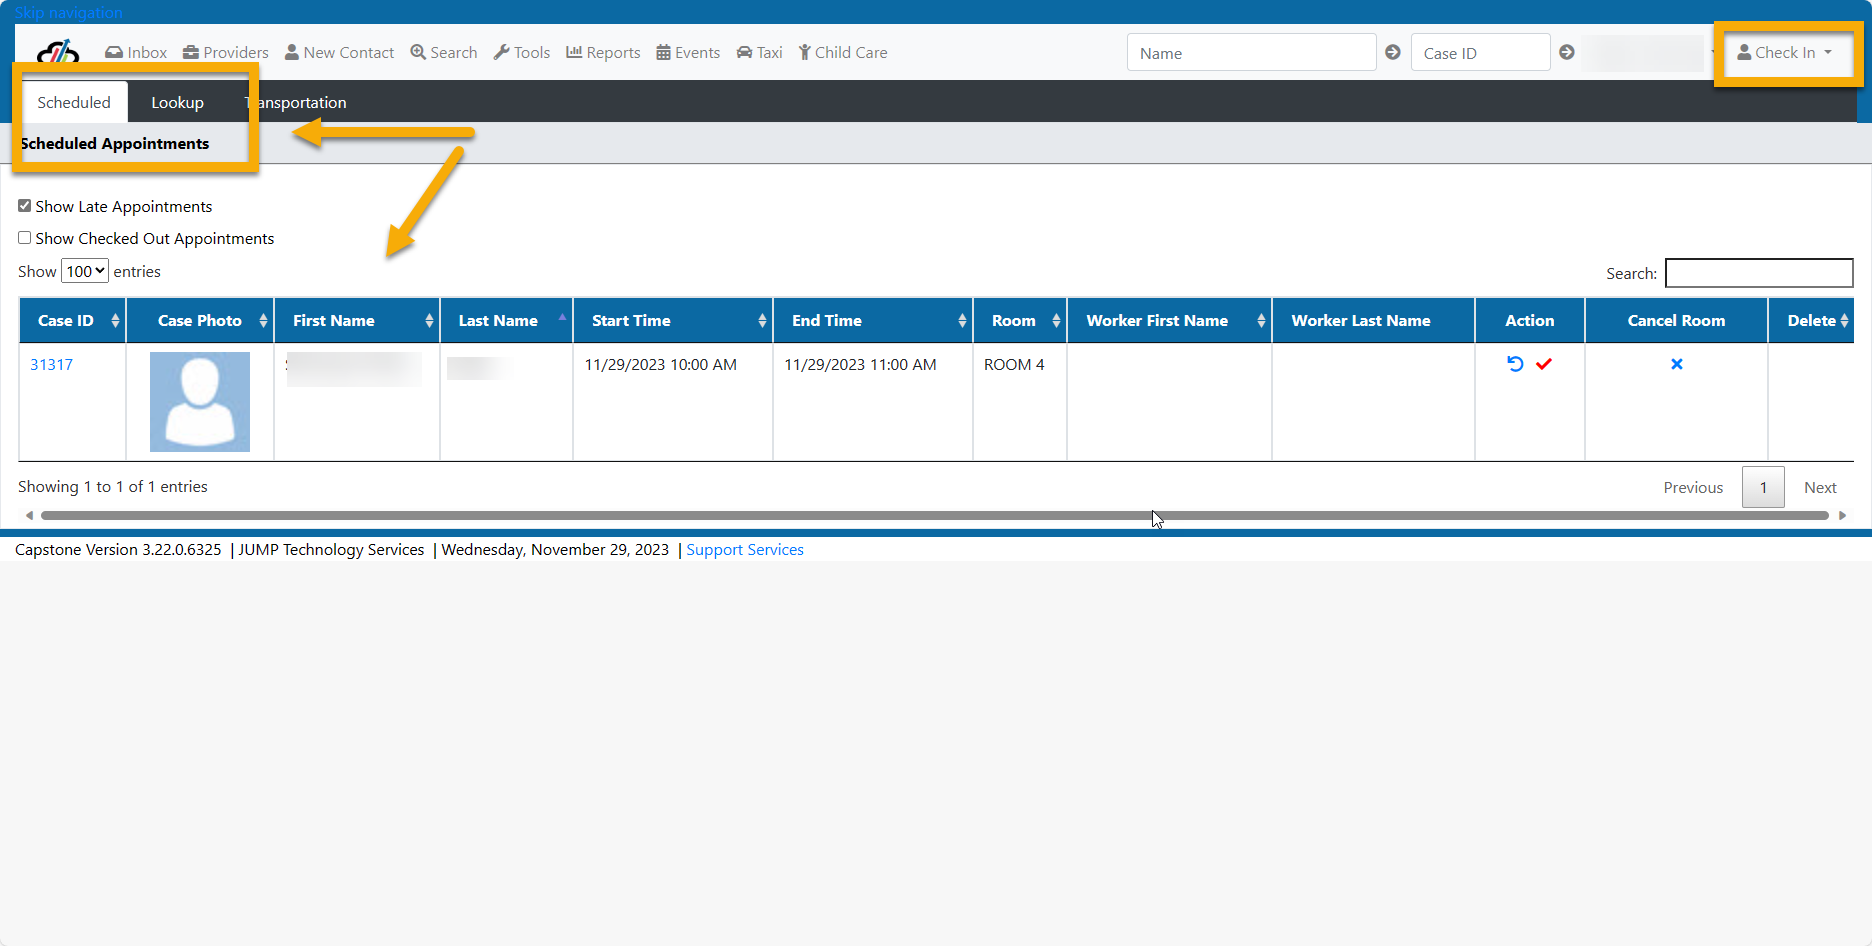
The Check In Role allows you to Check In, Check Out or Undo the previous action.
Select the green "Check In" checkmark to "Check In" the couple.
Lookup Tab - The lookup tab allows you to search for and check in participants that aren’t showing up on the Check-In tab.
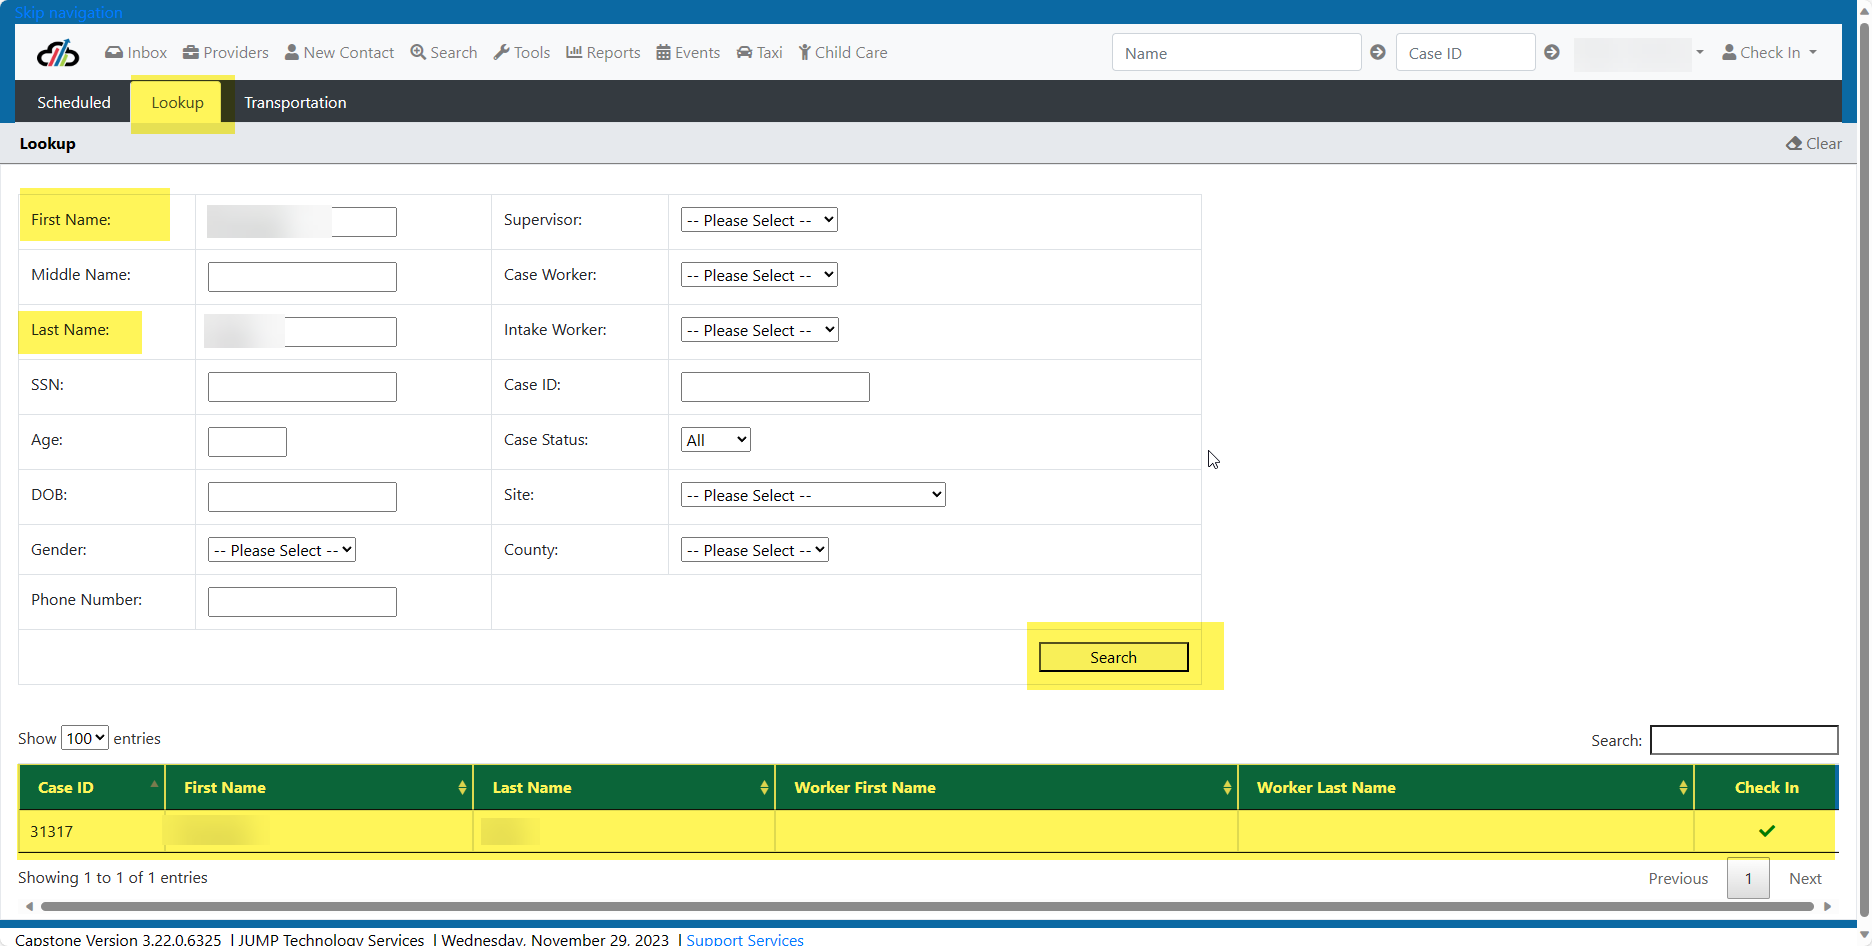
Once you locate the couple via the lookup screen, select the geen checkmark to "check in" the couple.
#CreateSingleSessionEvent #MultiSessionEvent #ManagingEvents #CommunityOutreach #ChildcareEvents #Return Received
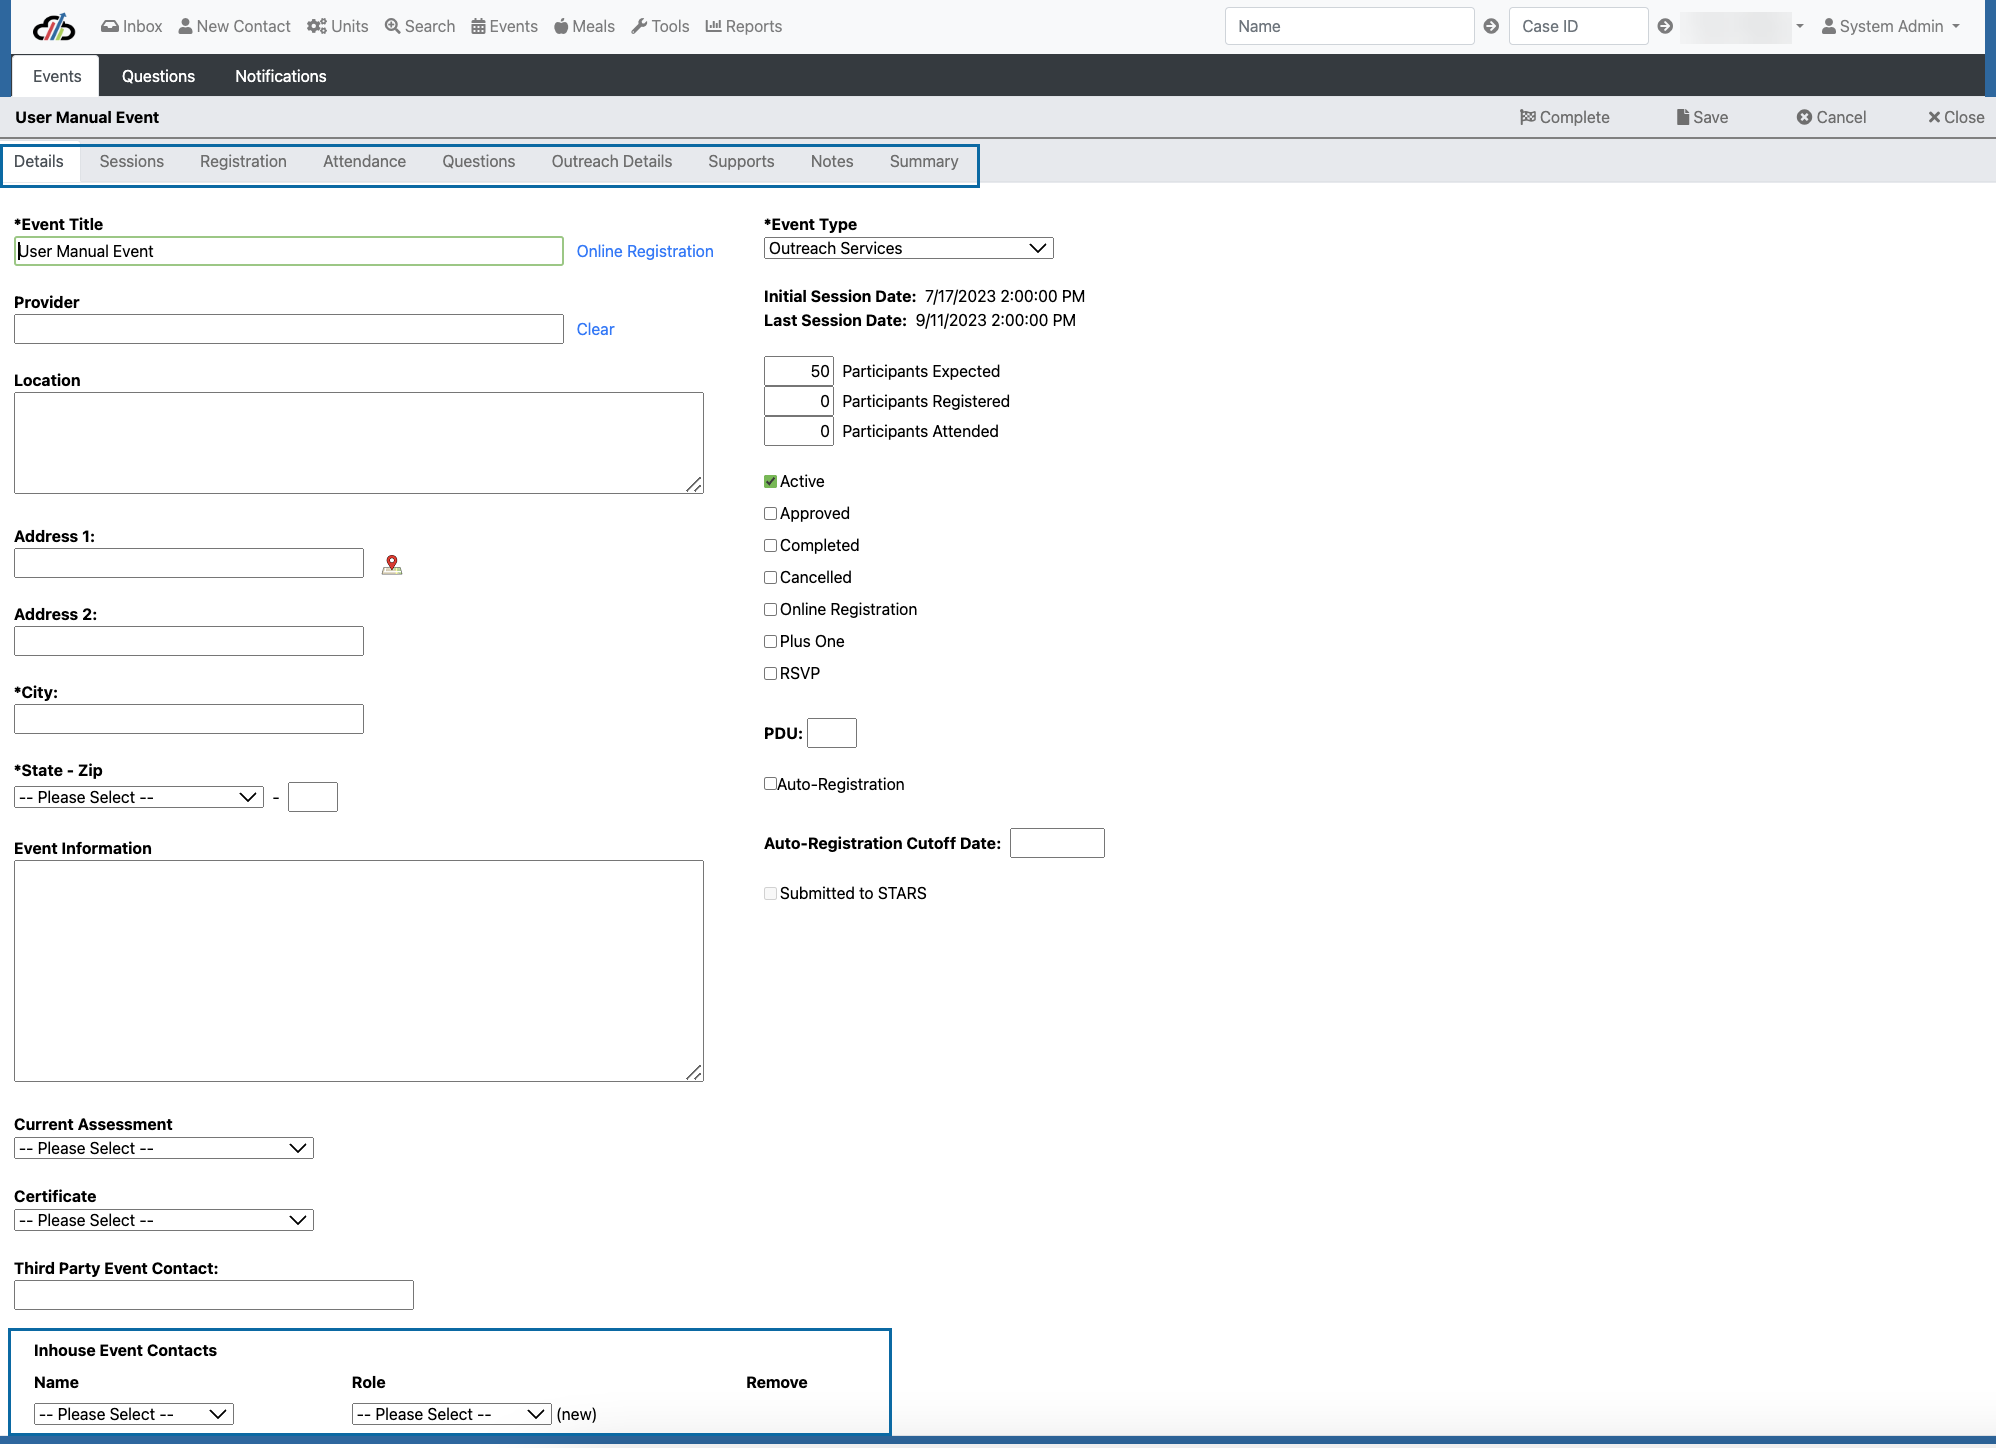
Creating and Managing an Event
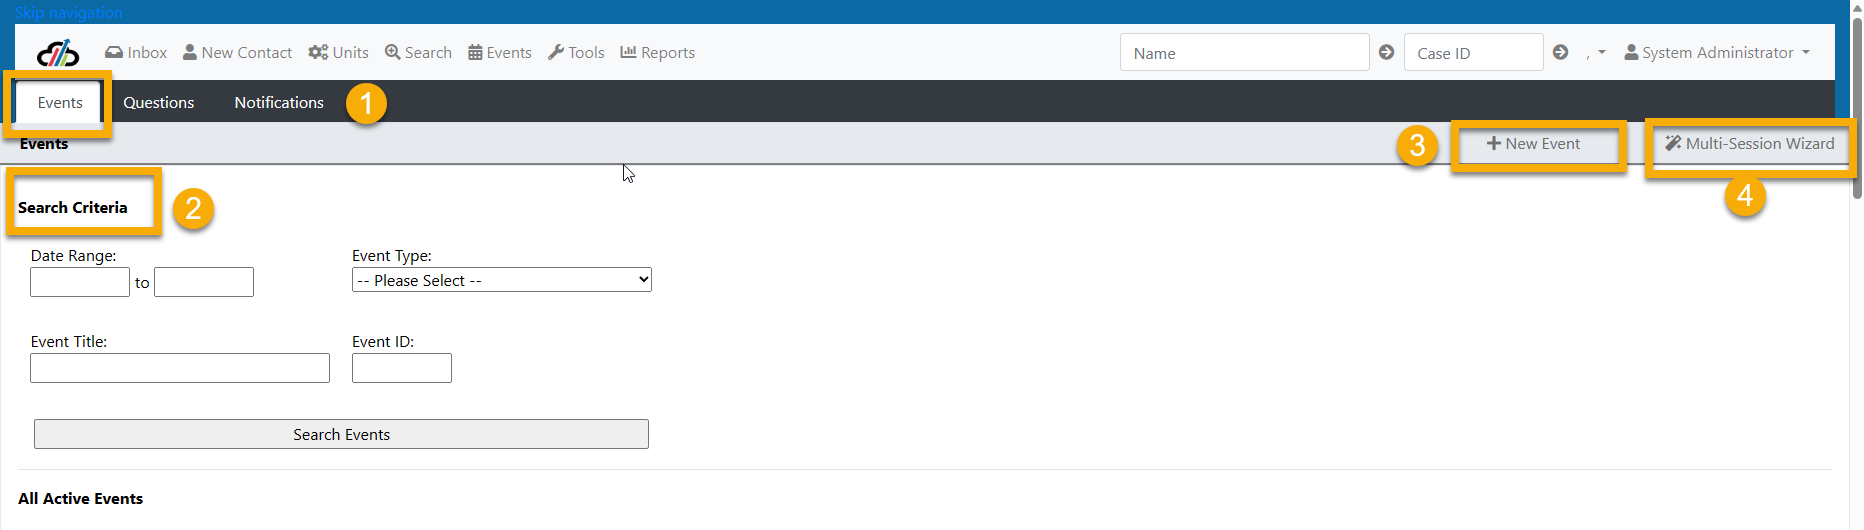
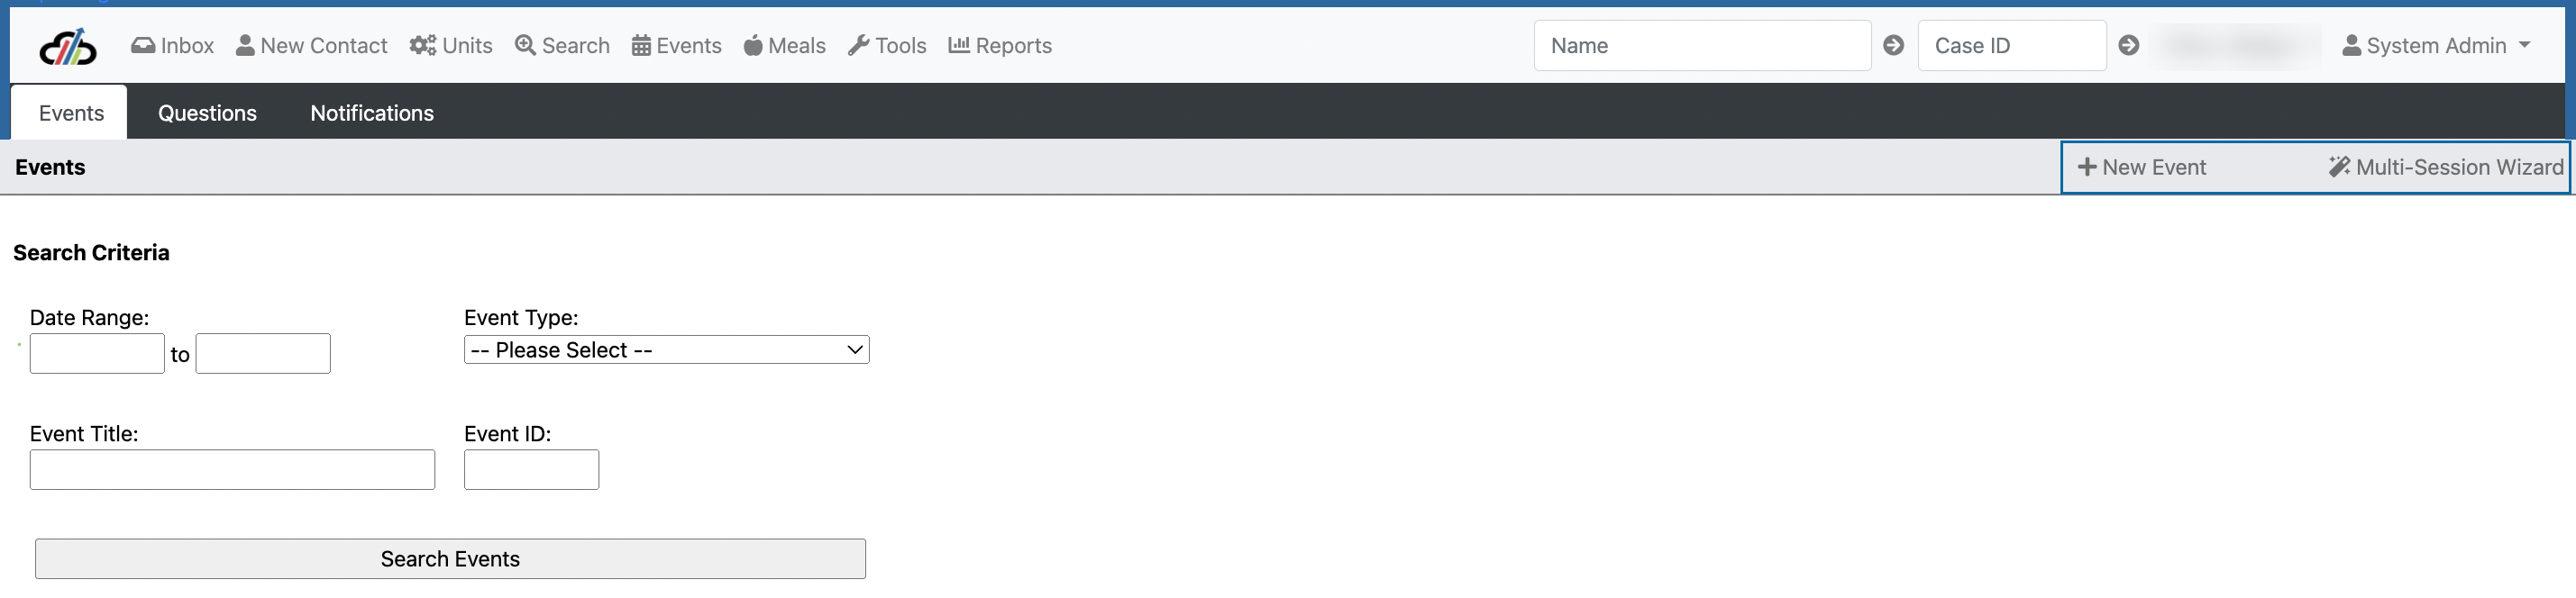
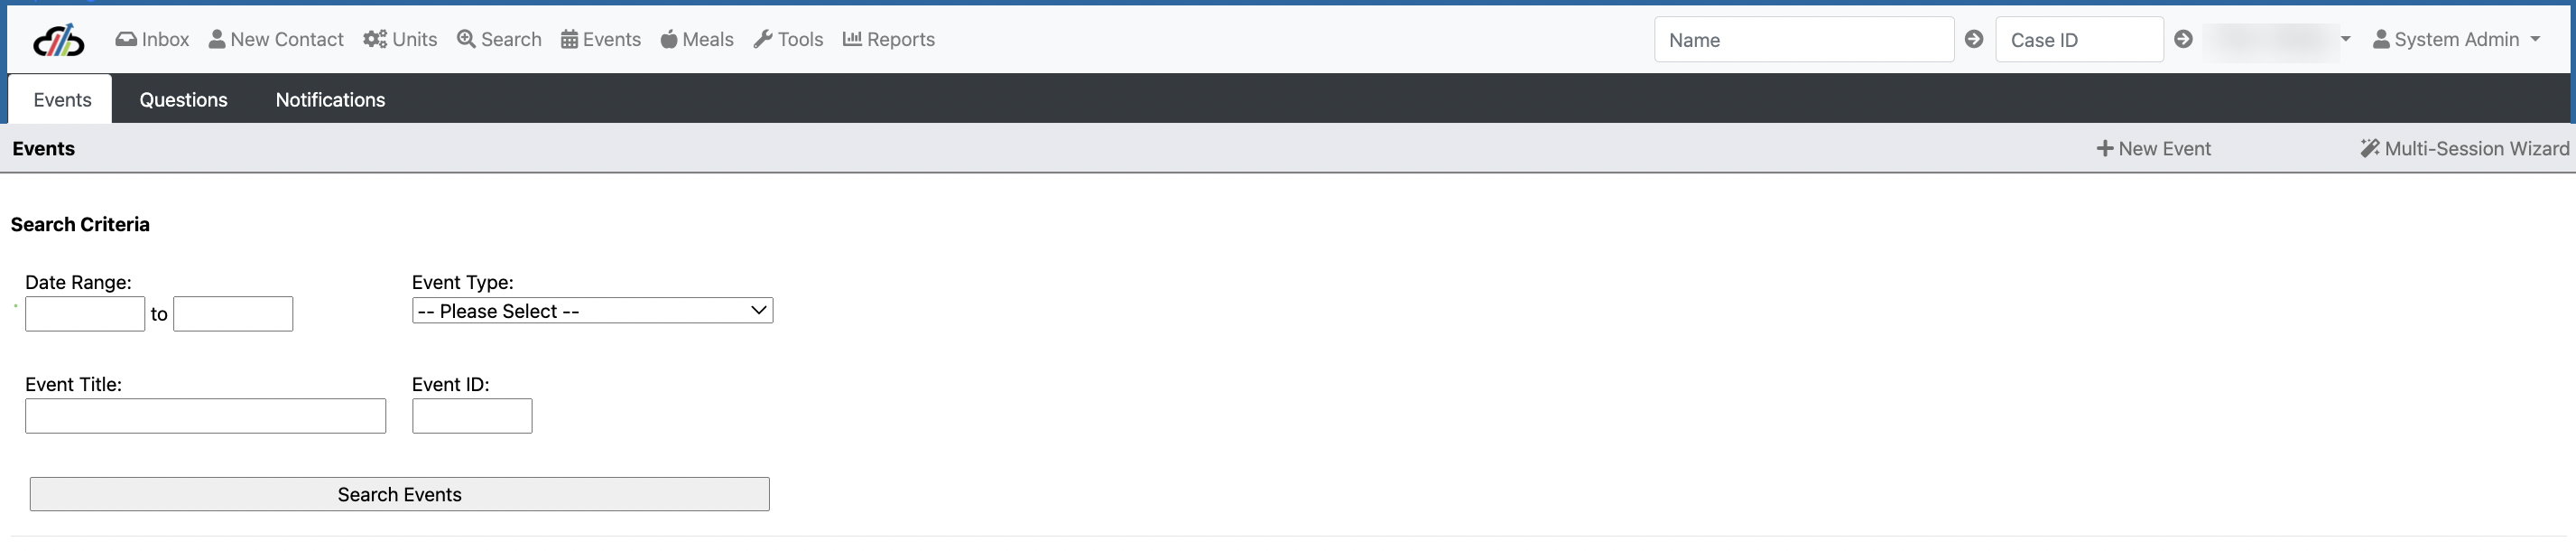
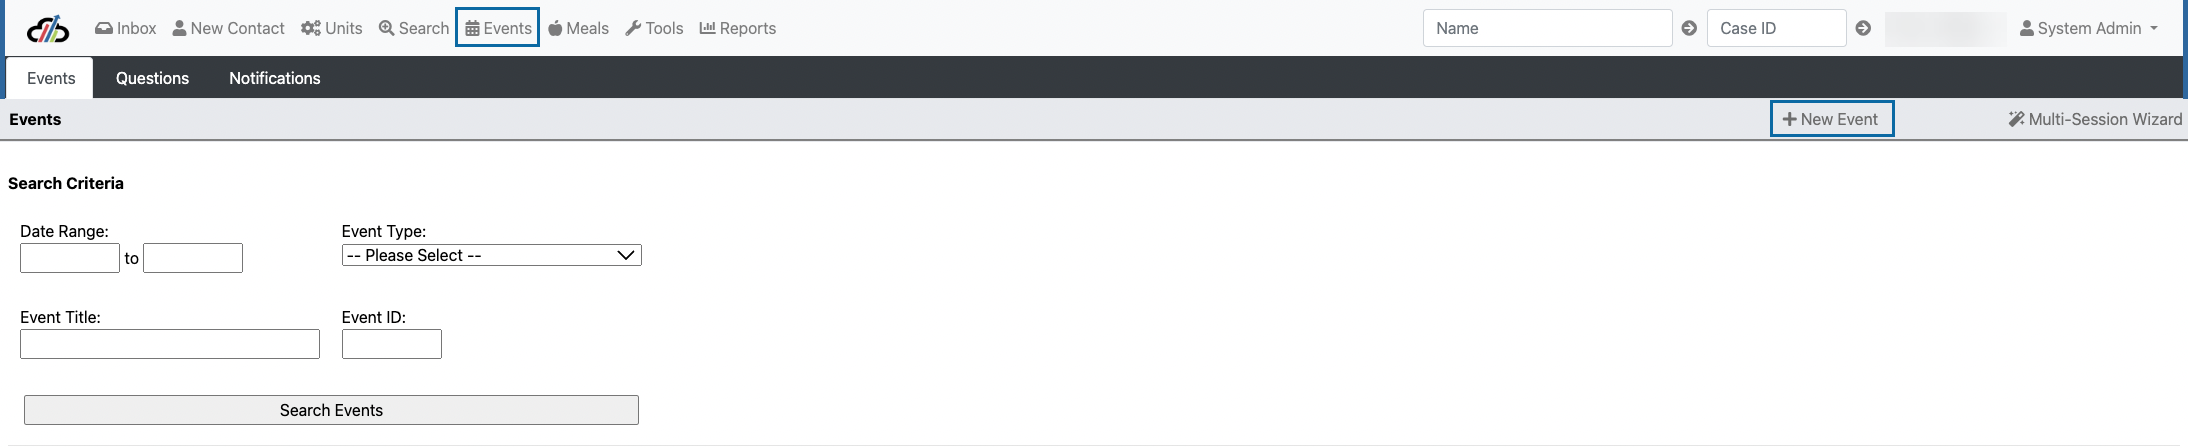
Capstone has a robust event management system that can be accessed through the Events Tab. There are several important parts of the Events Tab that help you create an manage events. The top section is for searching for events. Using these fields, you can search for a specific event or search for completed events.
The Events button stays at the top of the screen no matter what role you are in.

1 Clicking once on the Events Tab will open up to the Event List where you will see three tabs: Events, Questions and Notifications
2. You will also see a Search Grid where you can search by Date Range, Event Type, Event Title and Event ID
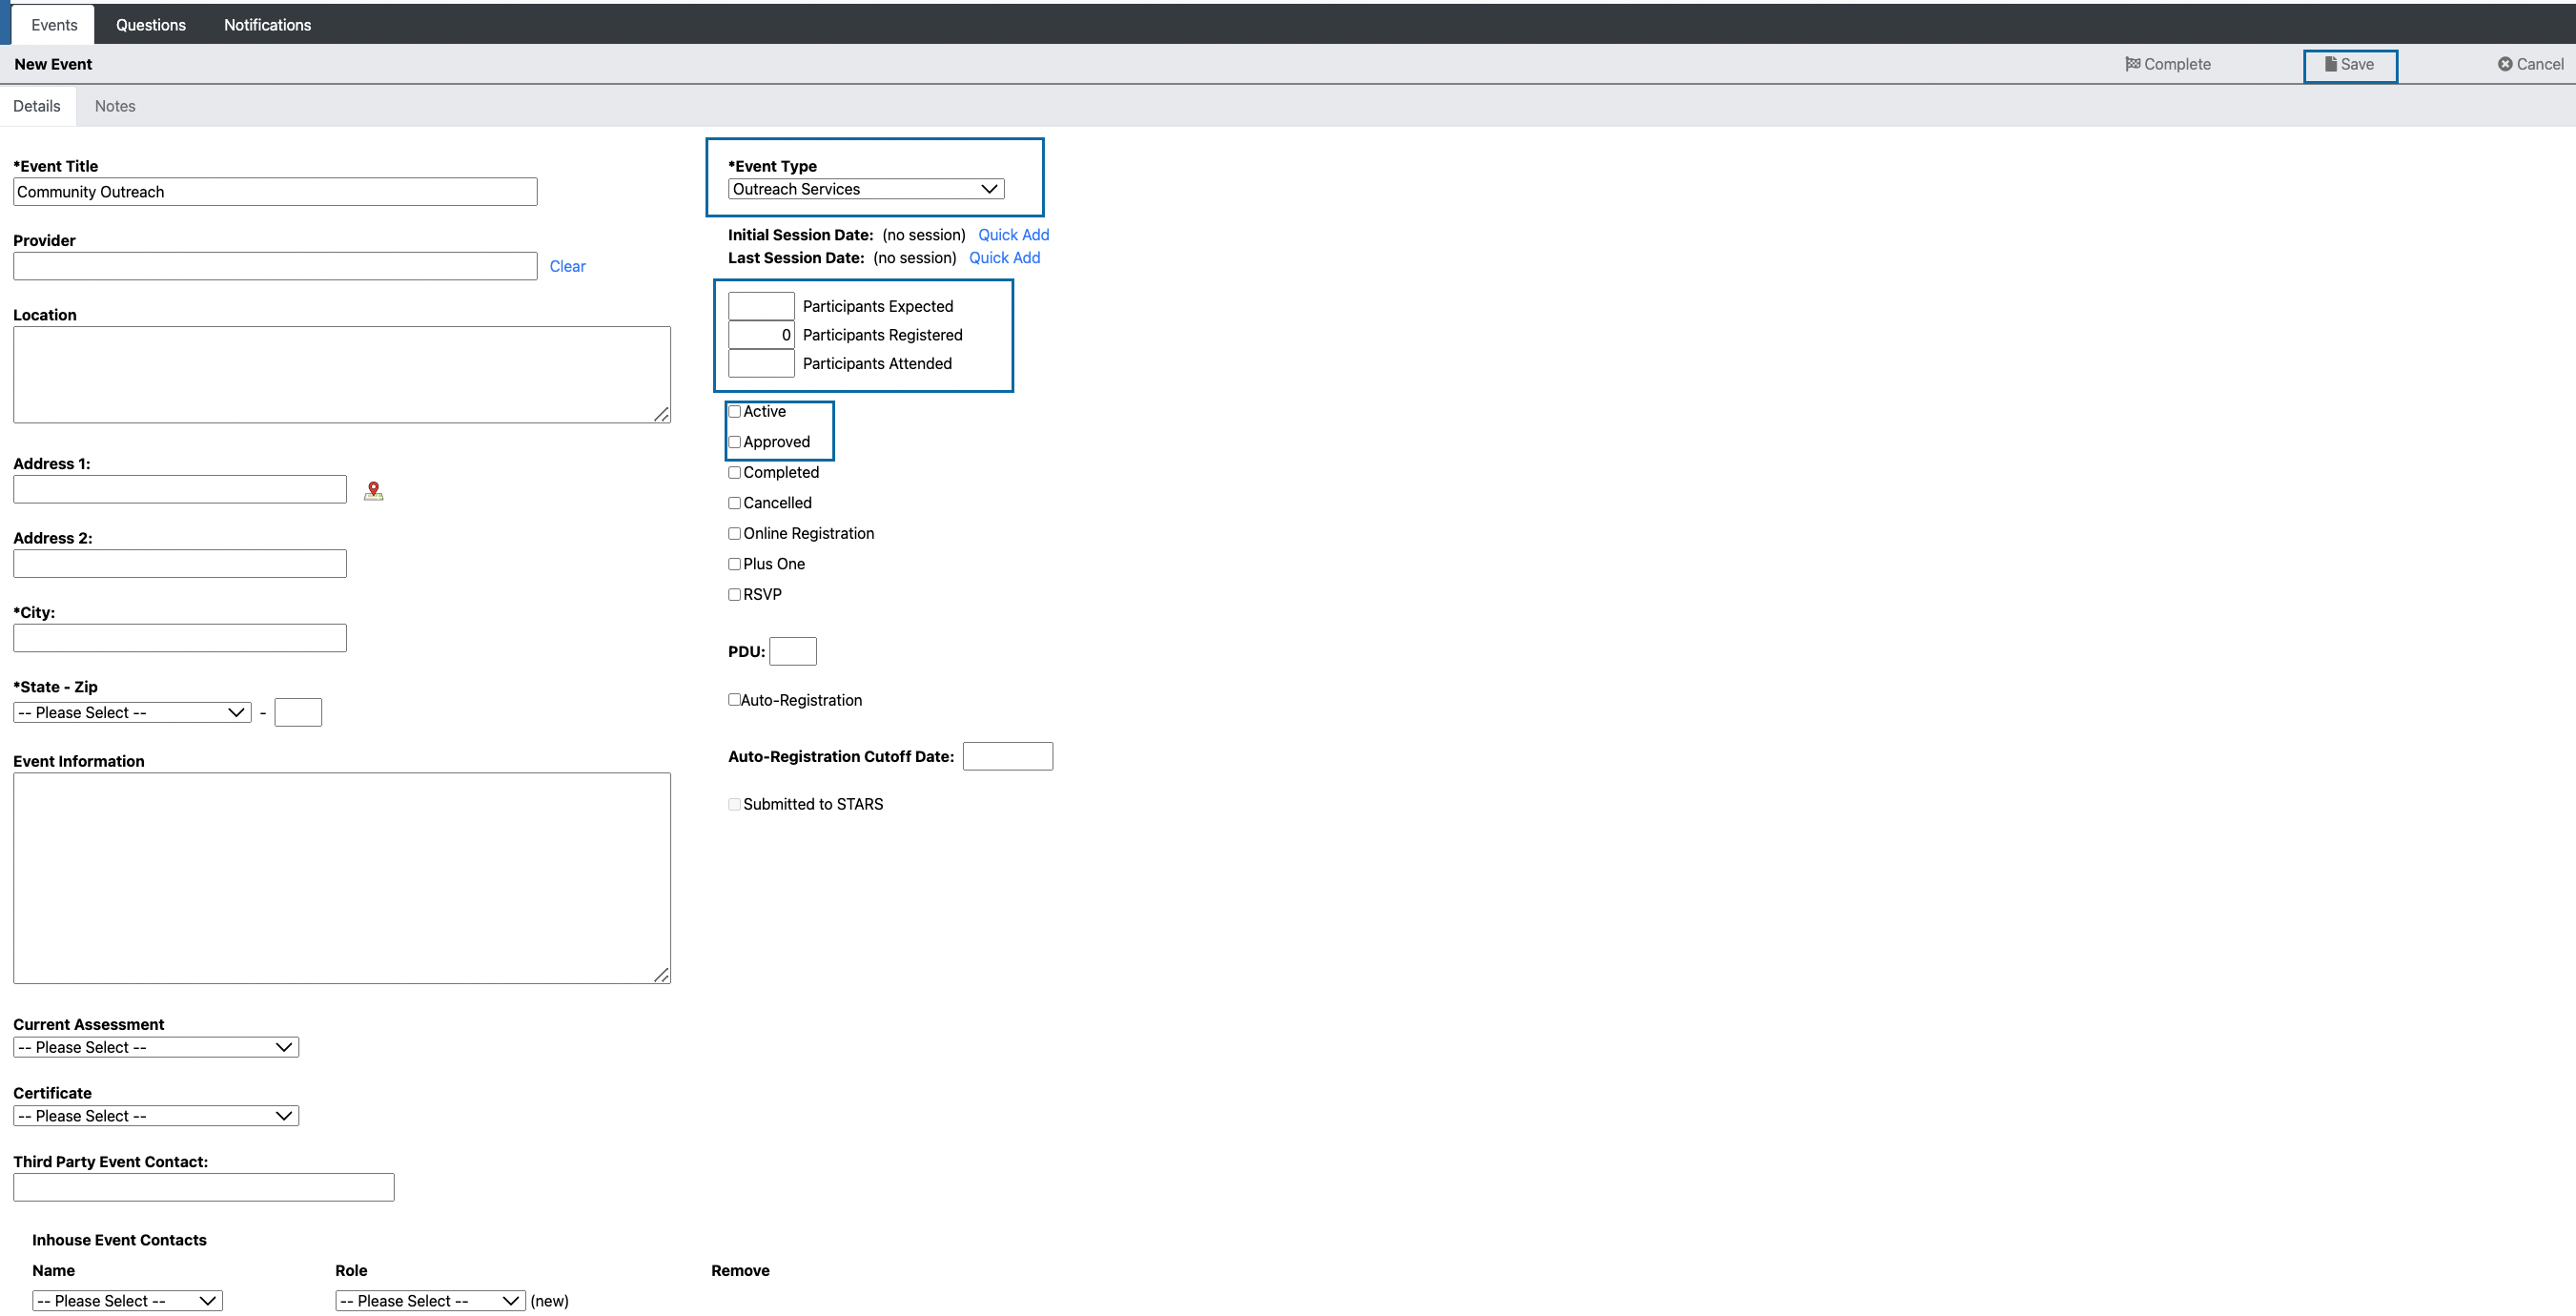
3. To create a single session event select the +New Event in the top right-hand corner of the screen.
4. To create a multi-session event select the Multi-Session Wizard which is located in the top right-hand corner of the screen.
Select the +New in the top right-hand corner of the screen (See screenshot Capstone Events - List)
Enter your session details and be sure to mark Active and Approved. Enter the Participants Expected to create a cap for the event.
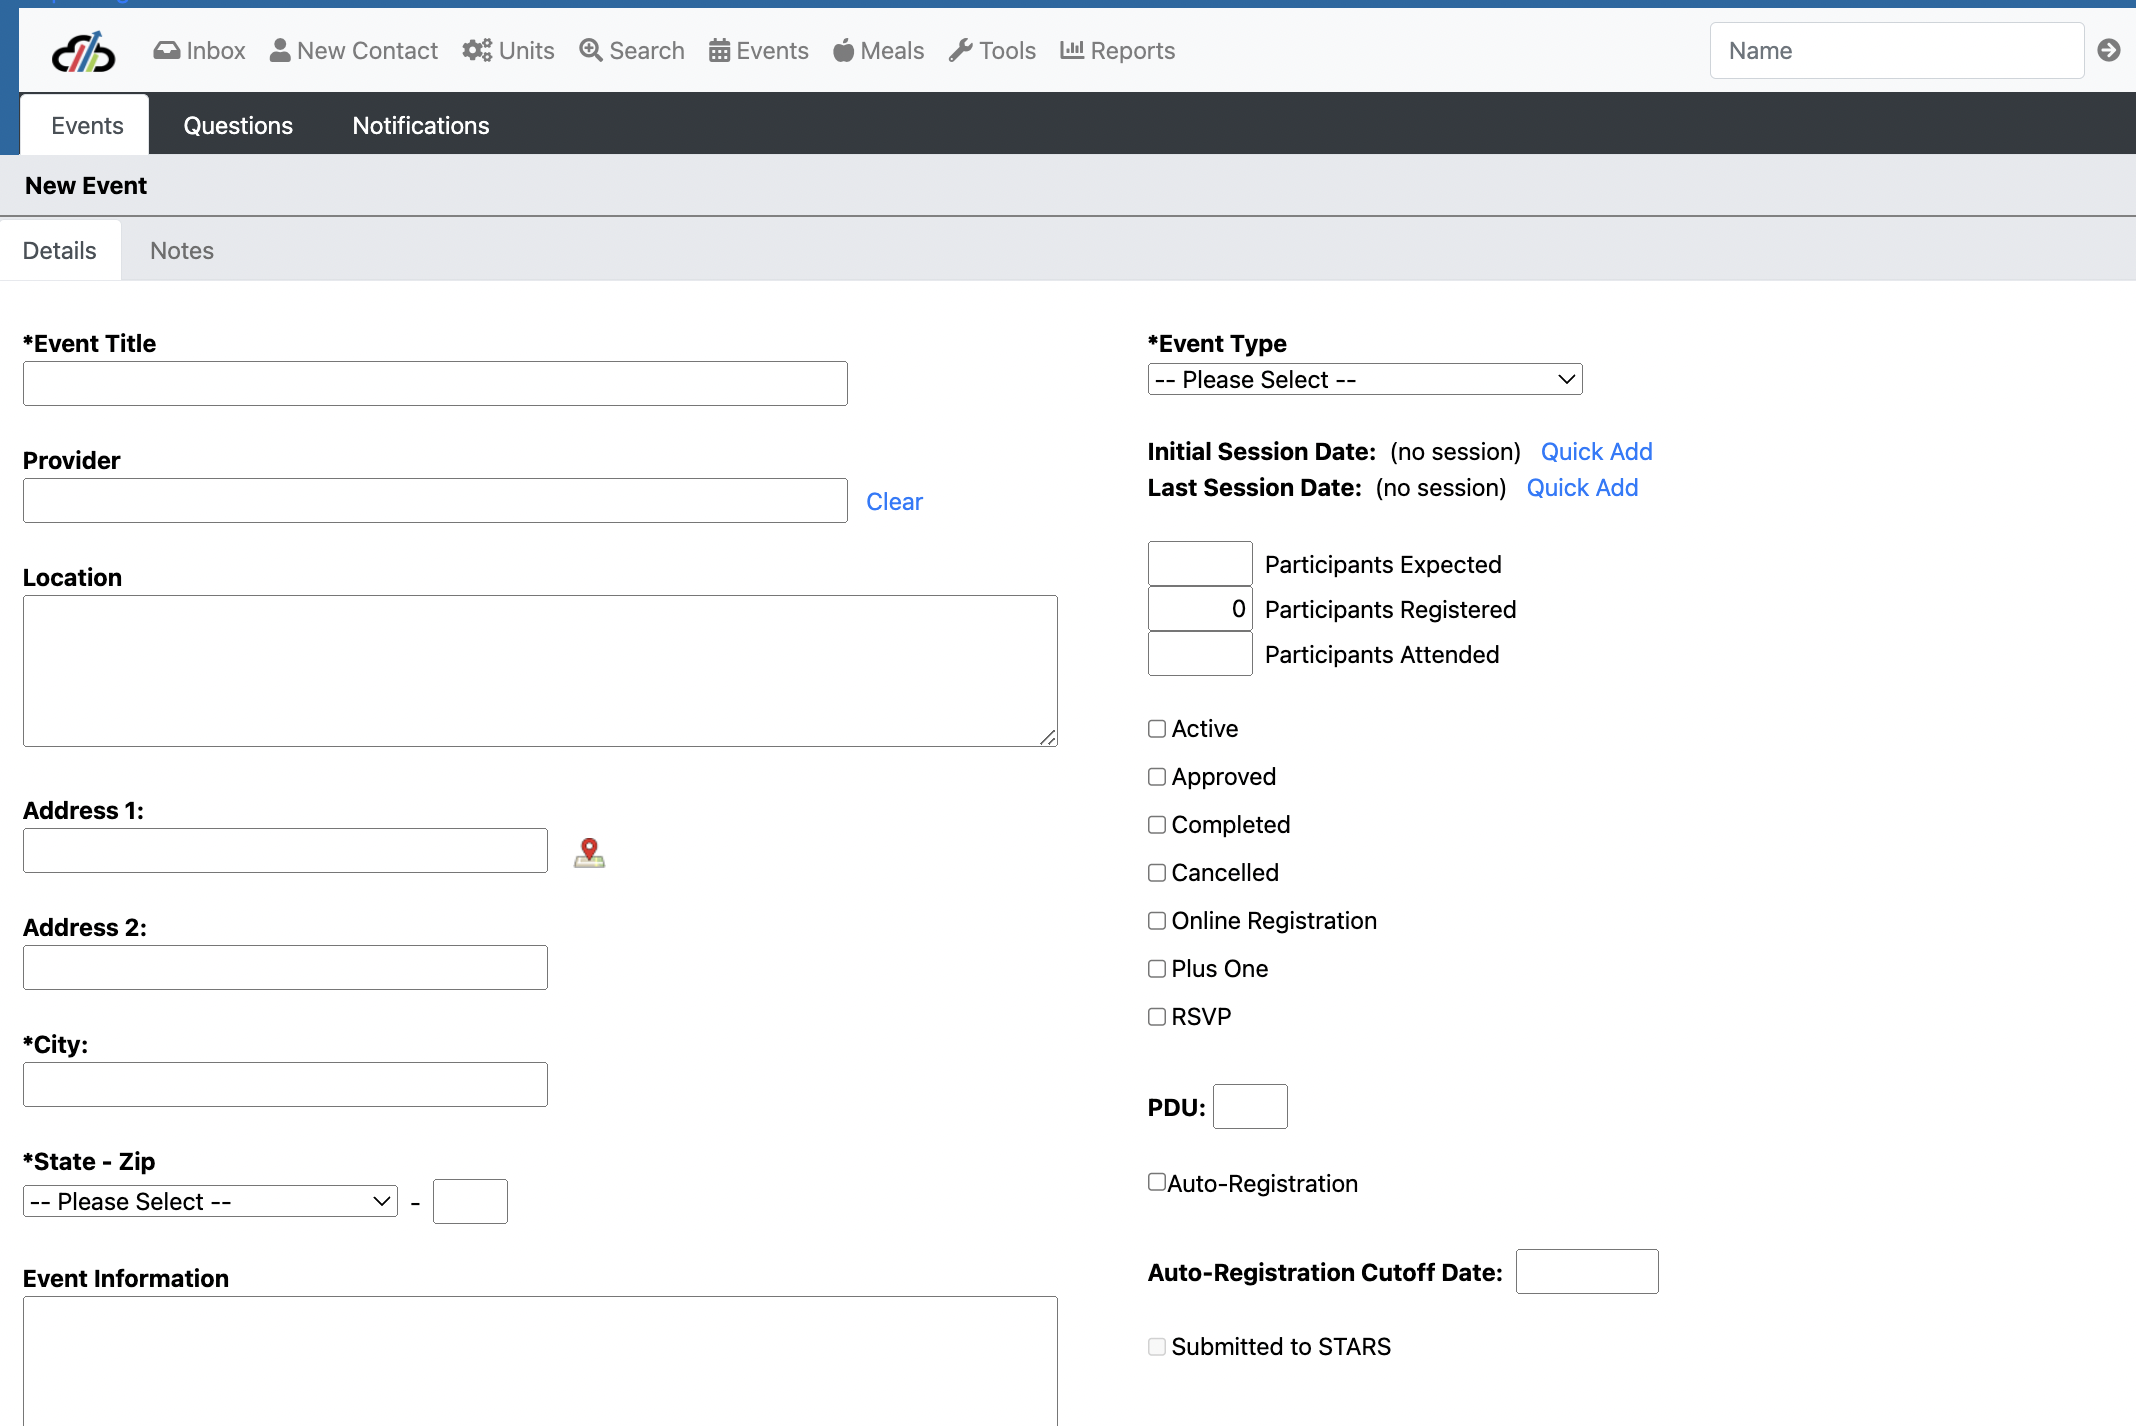
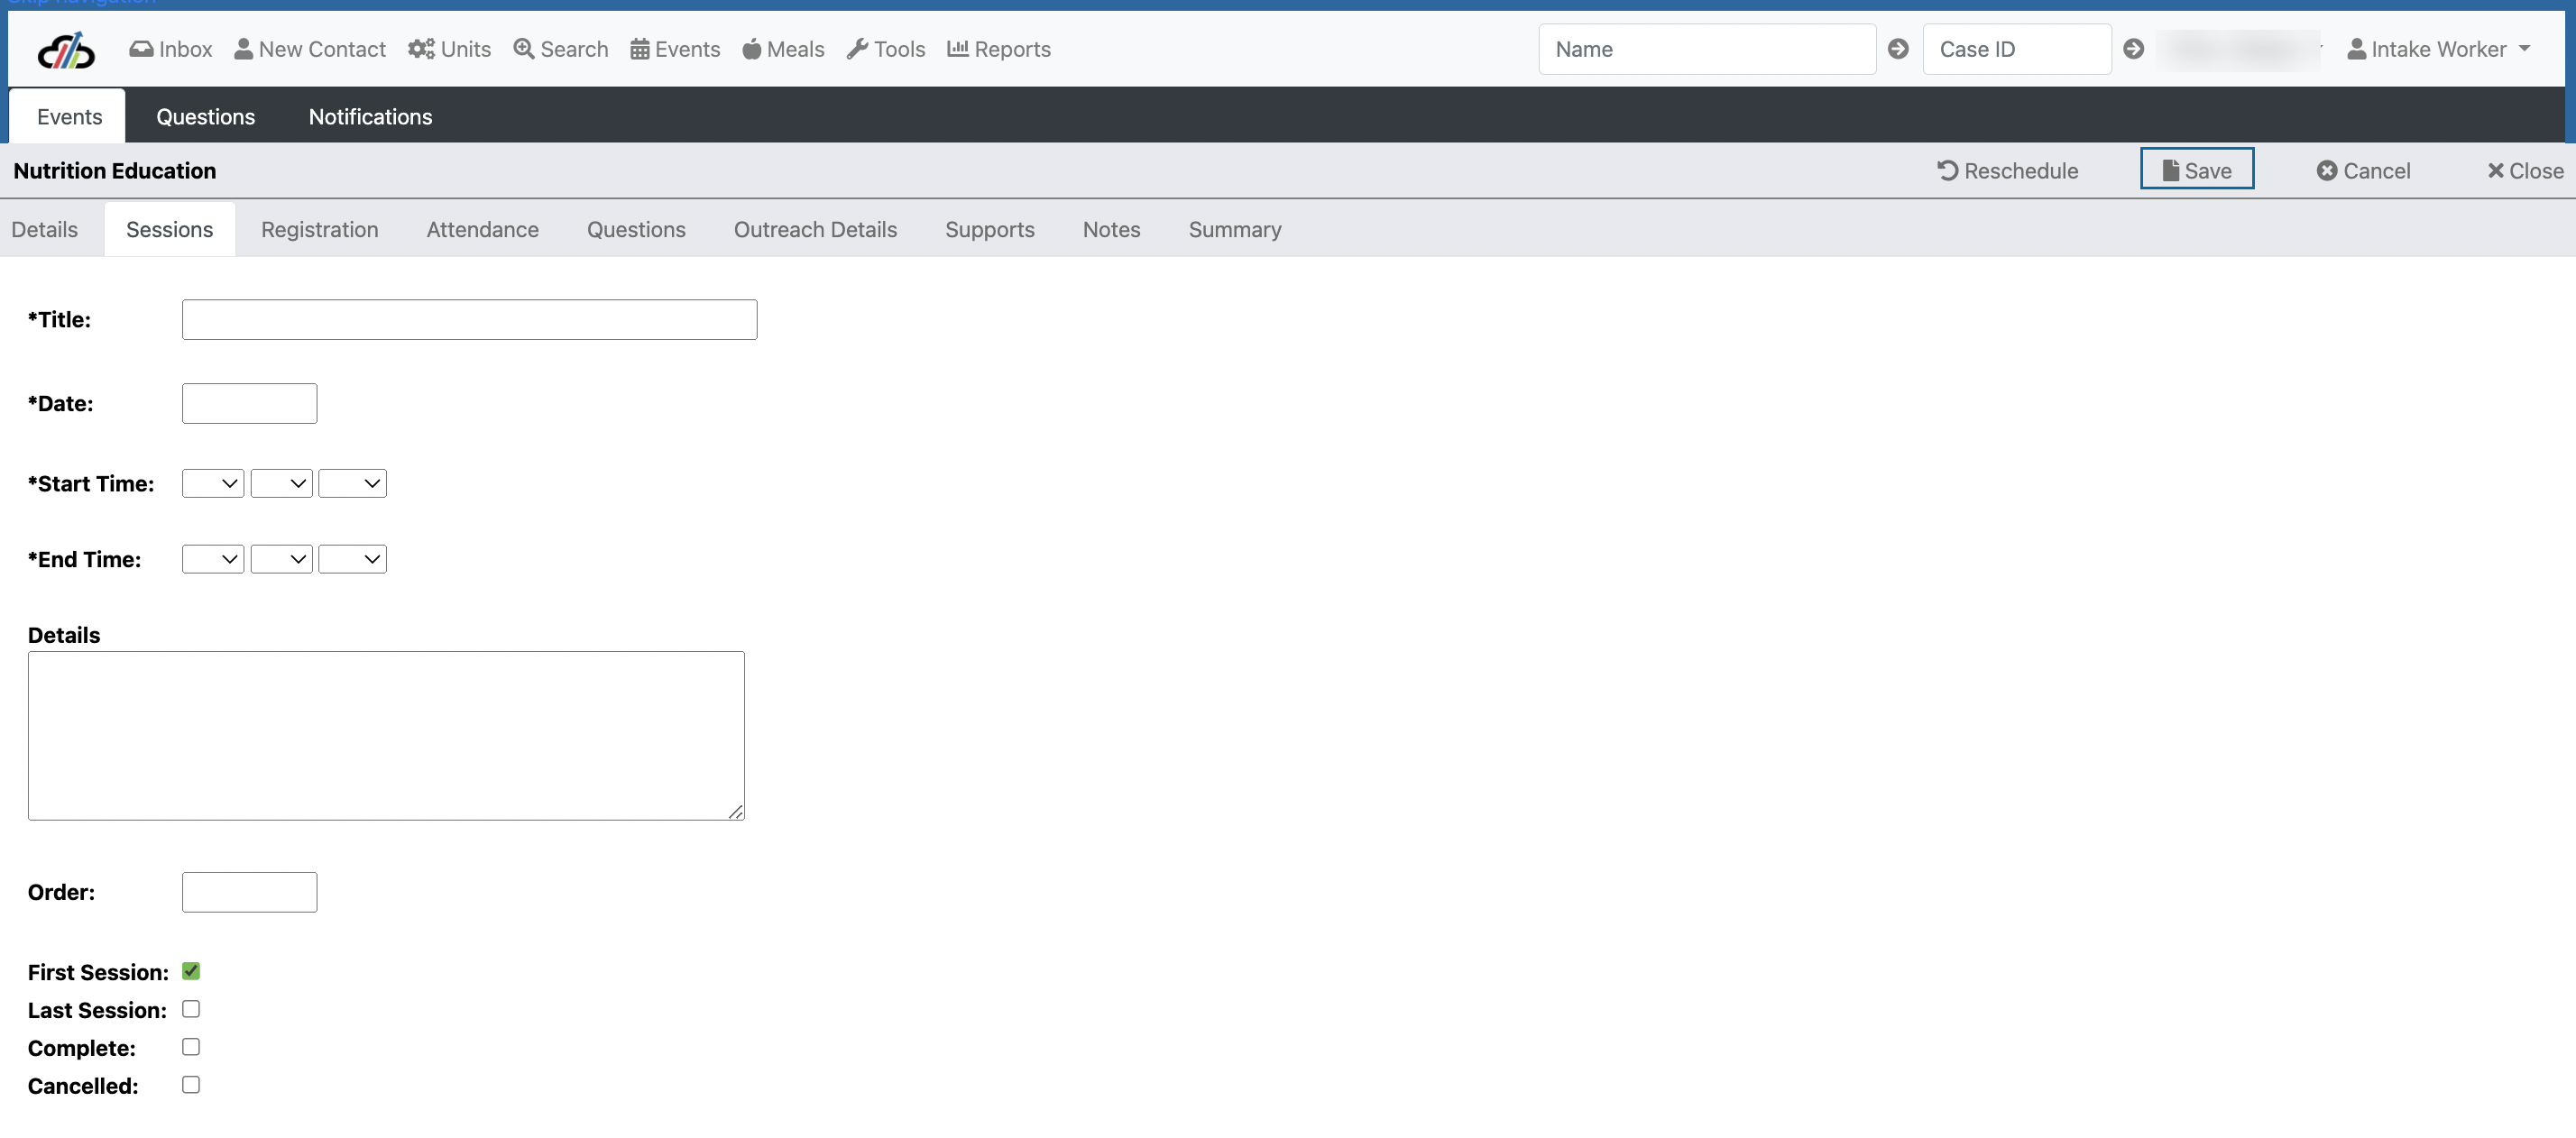
You must enter a session for every single event, select New Session on the session tab.

Enter the session details, you MUST select the First session on the initial session.
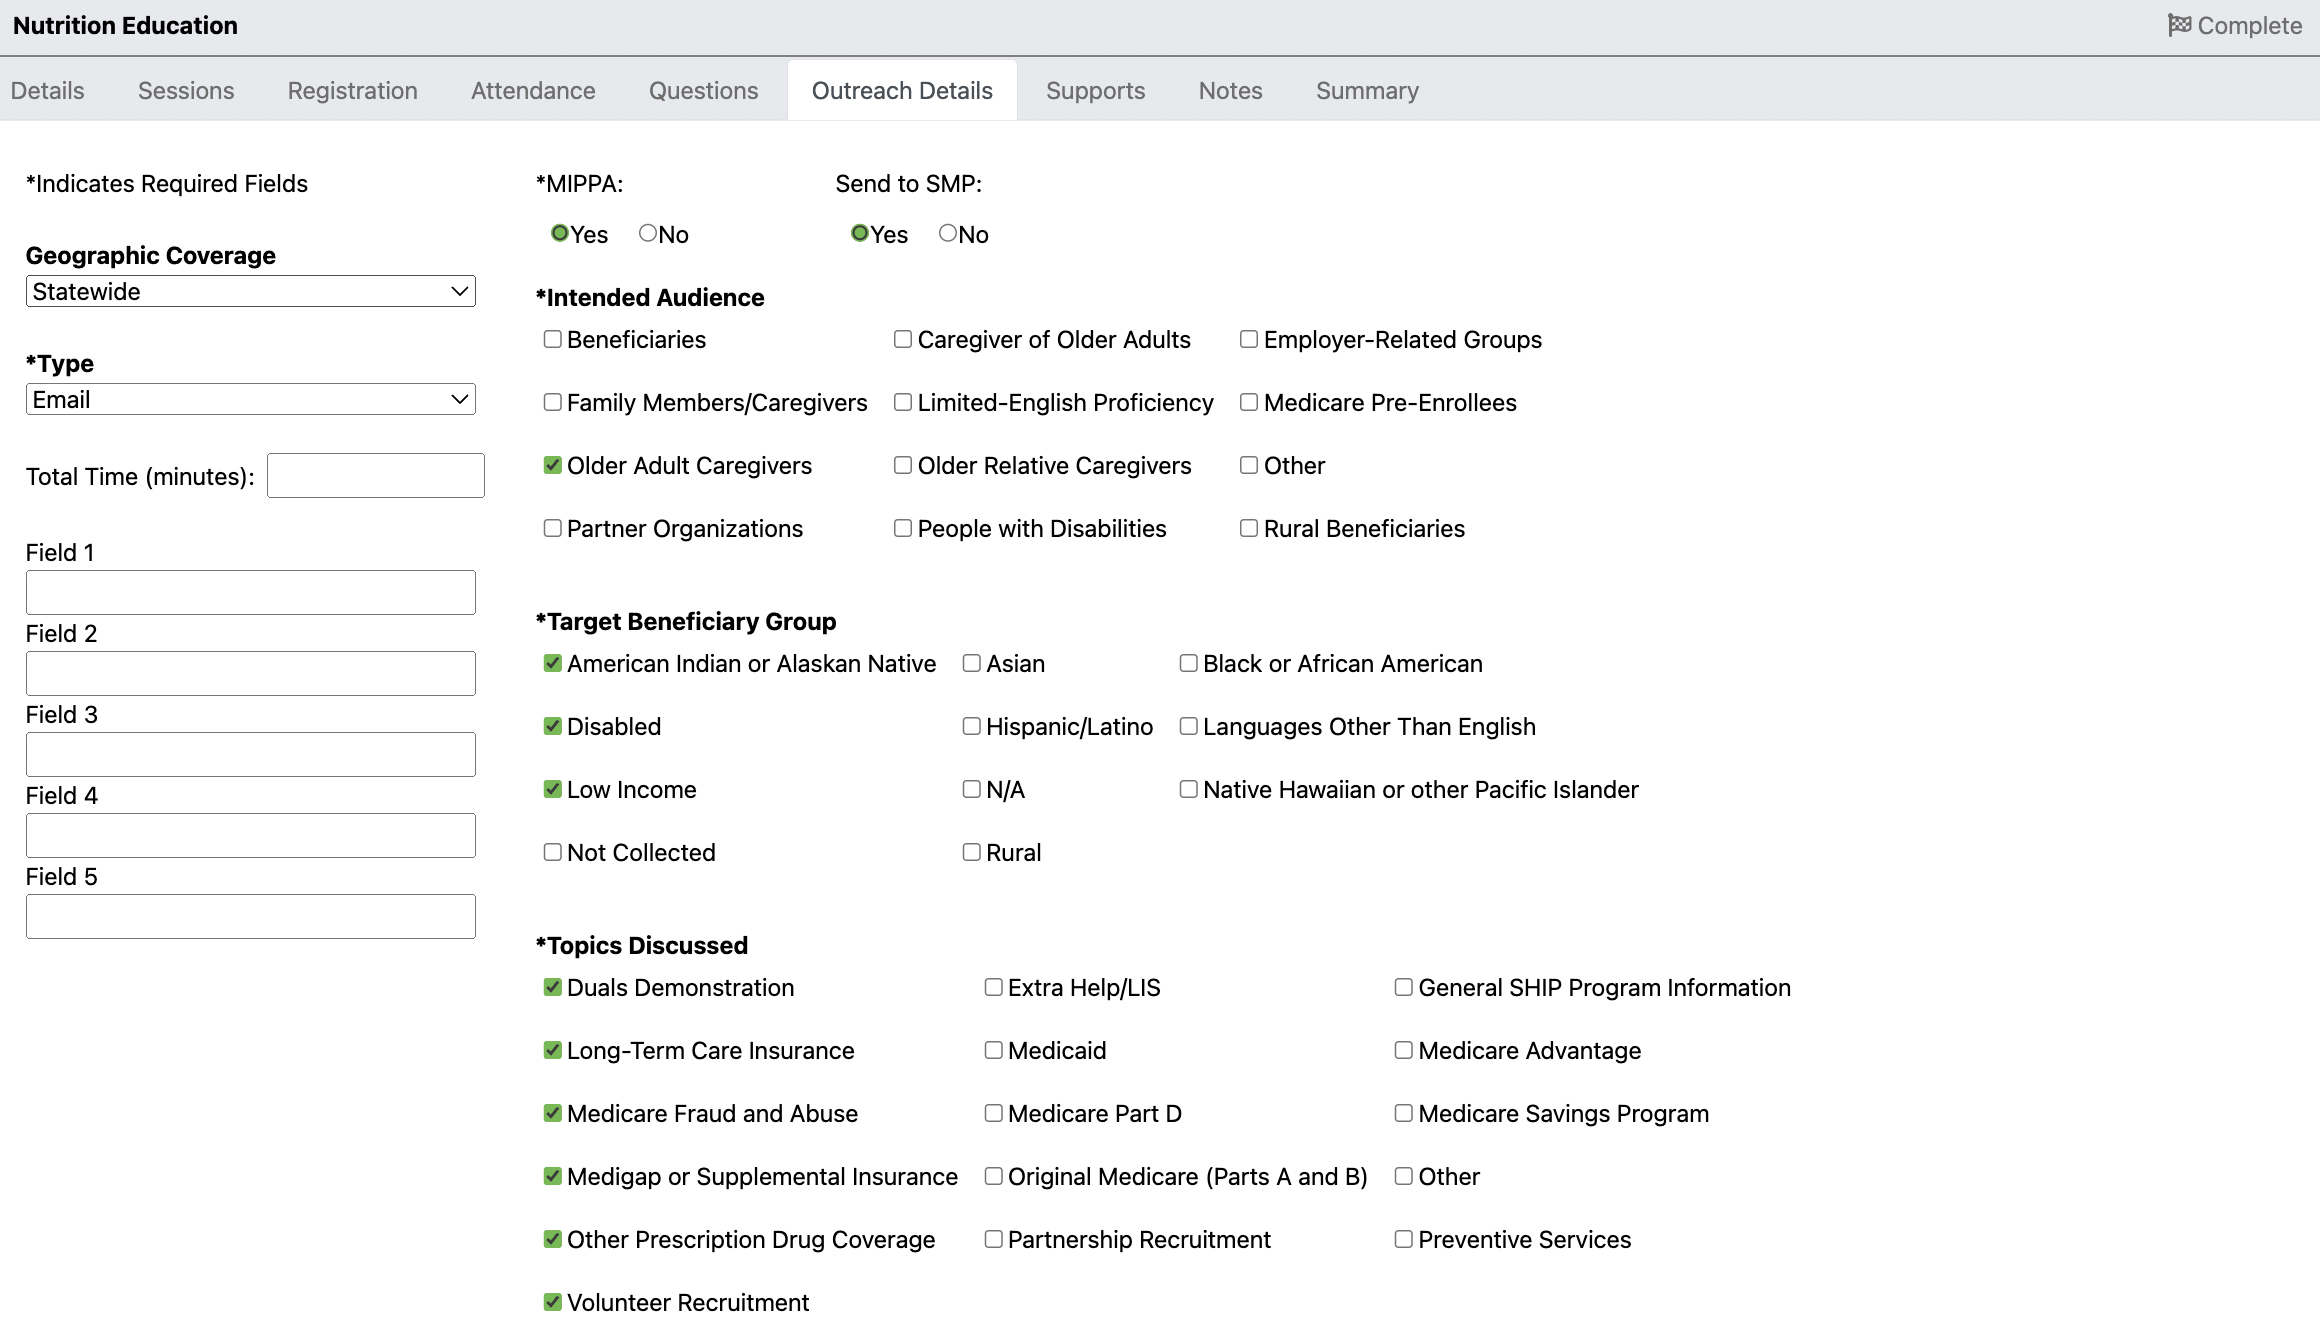
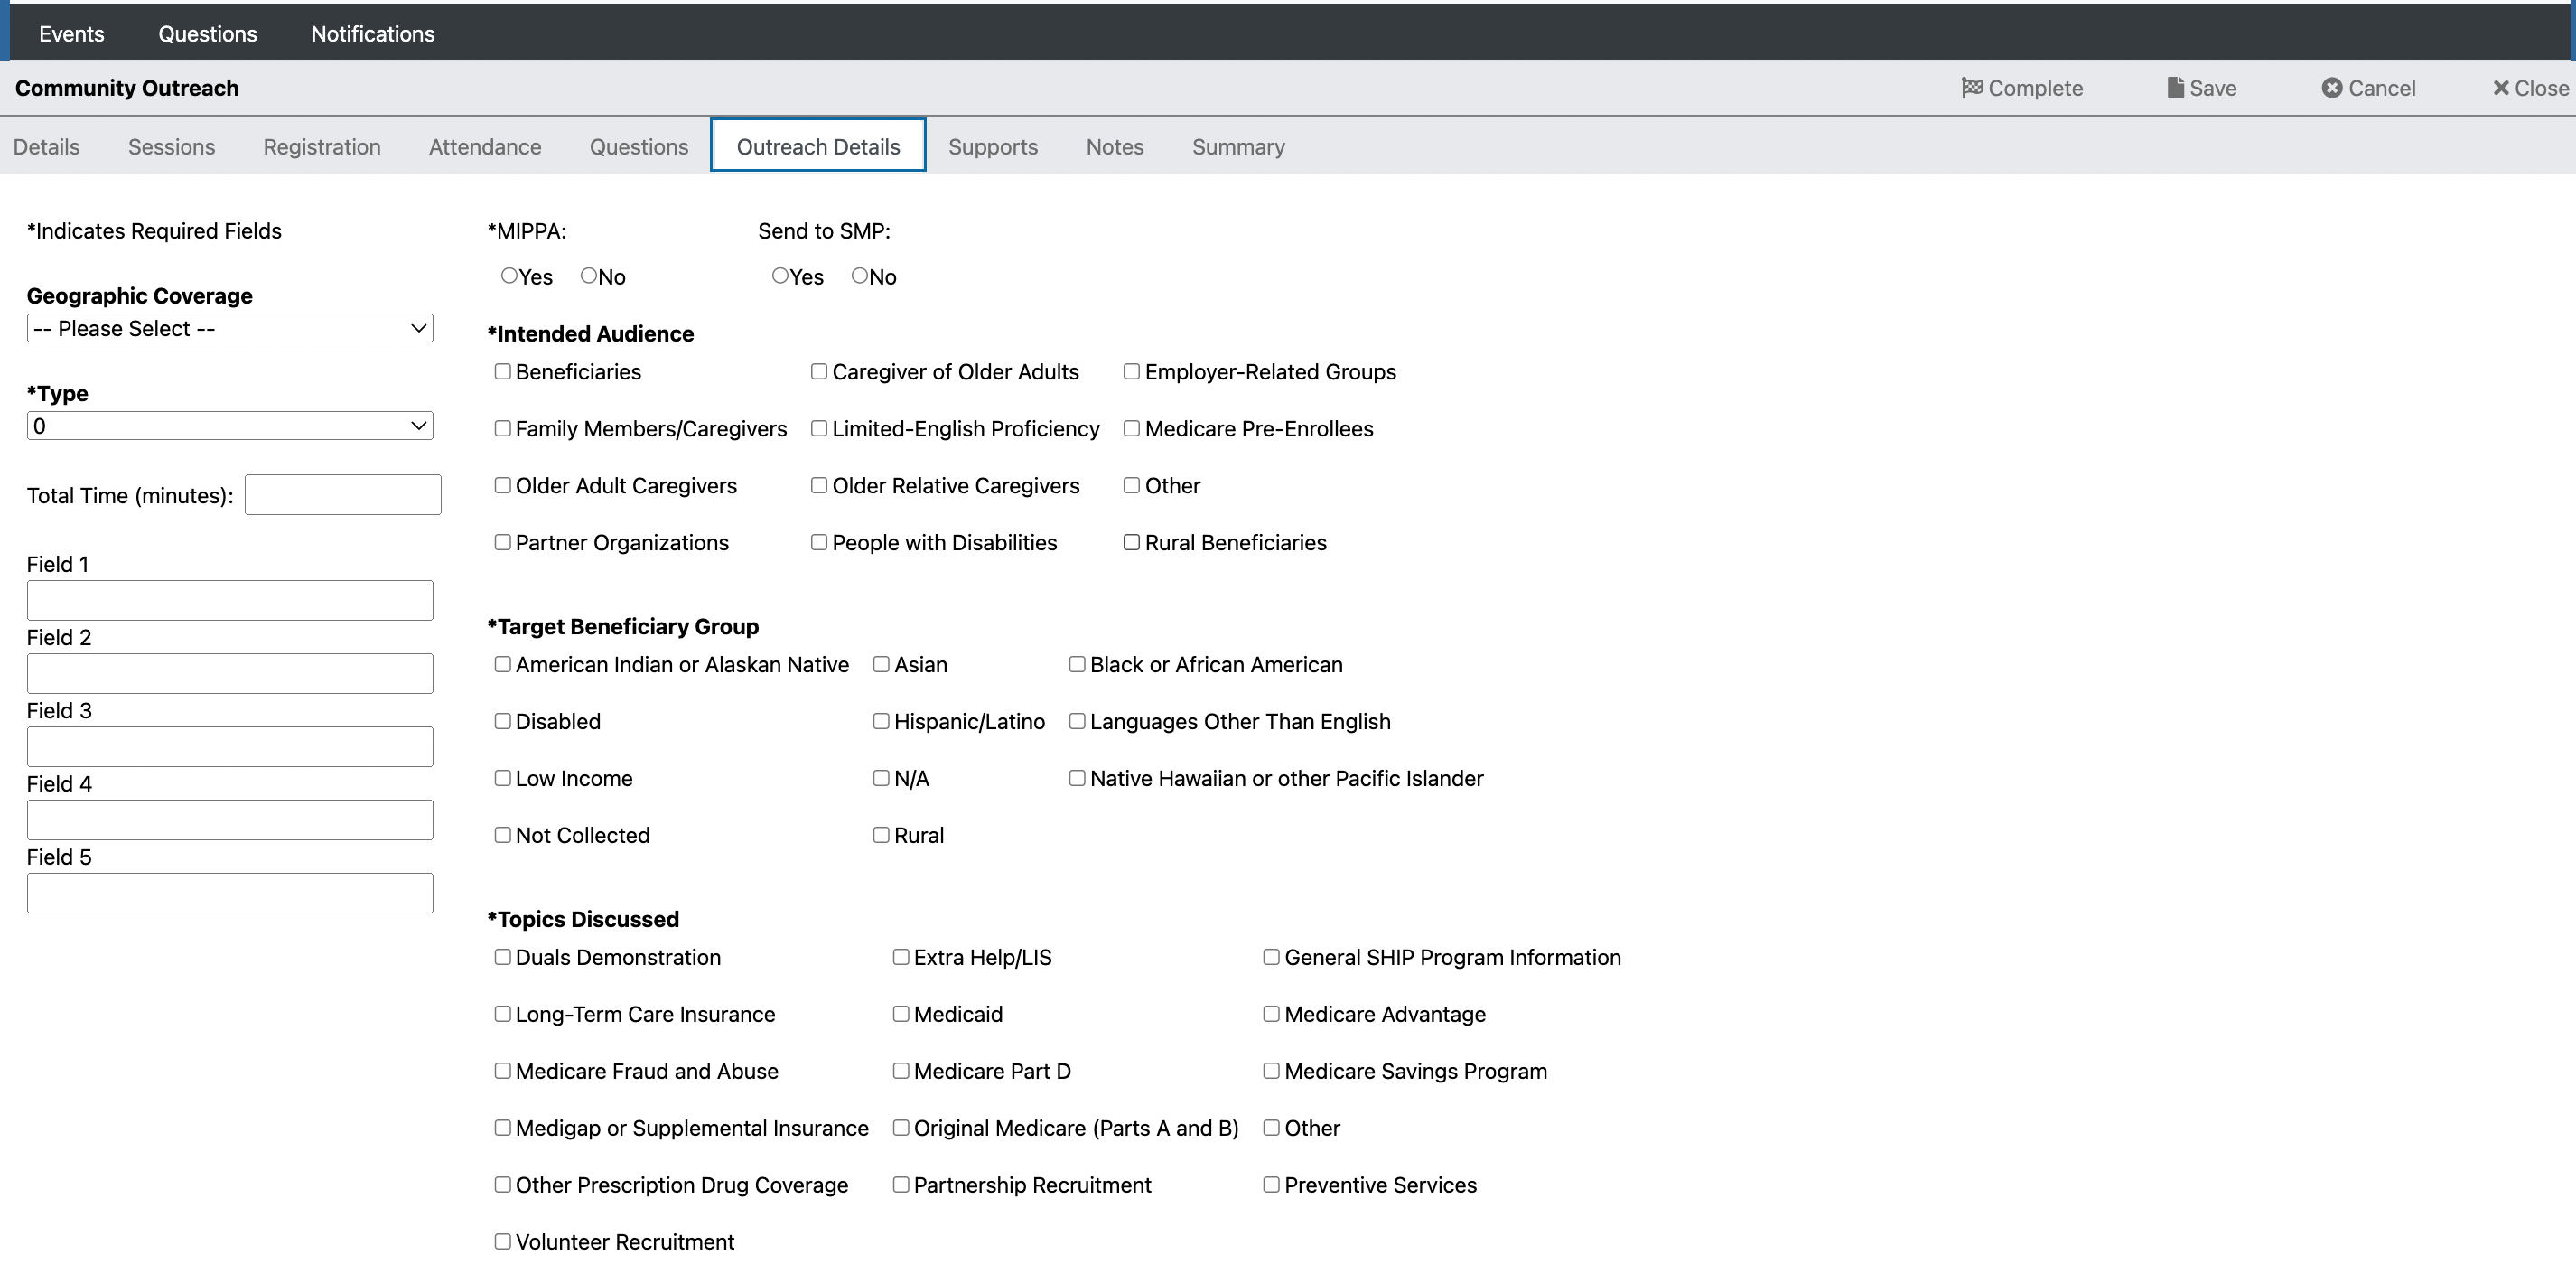
On Outreach Details, you can document the audience details for the event.
Select Multi-Session Wizard to create a multi-session event.
In this example, I selected Multi-Session Wizard. Fill in each of the fields and select Next.
*Important Note for Family Expectation Capstone Customers, to enroll both primary clients on the case, you will need to select Plus One. If the event is intended for just mother or father, do not select Plus One.
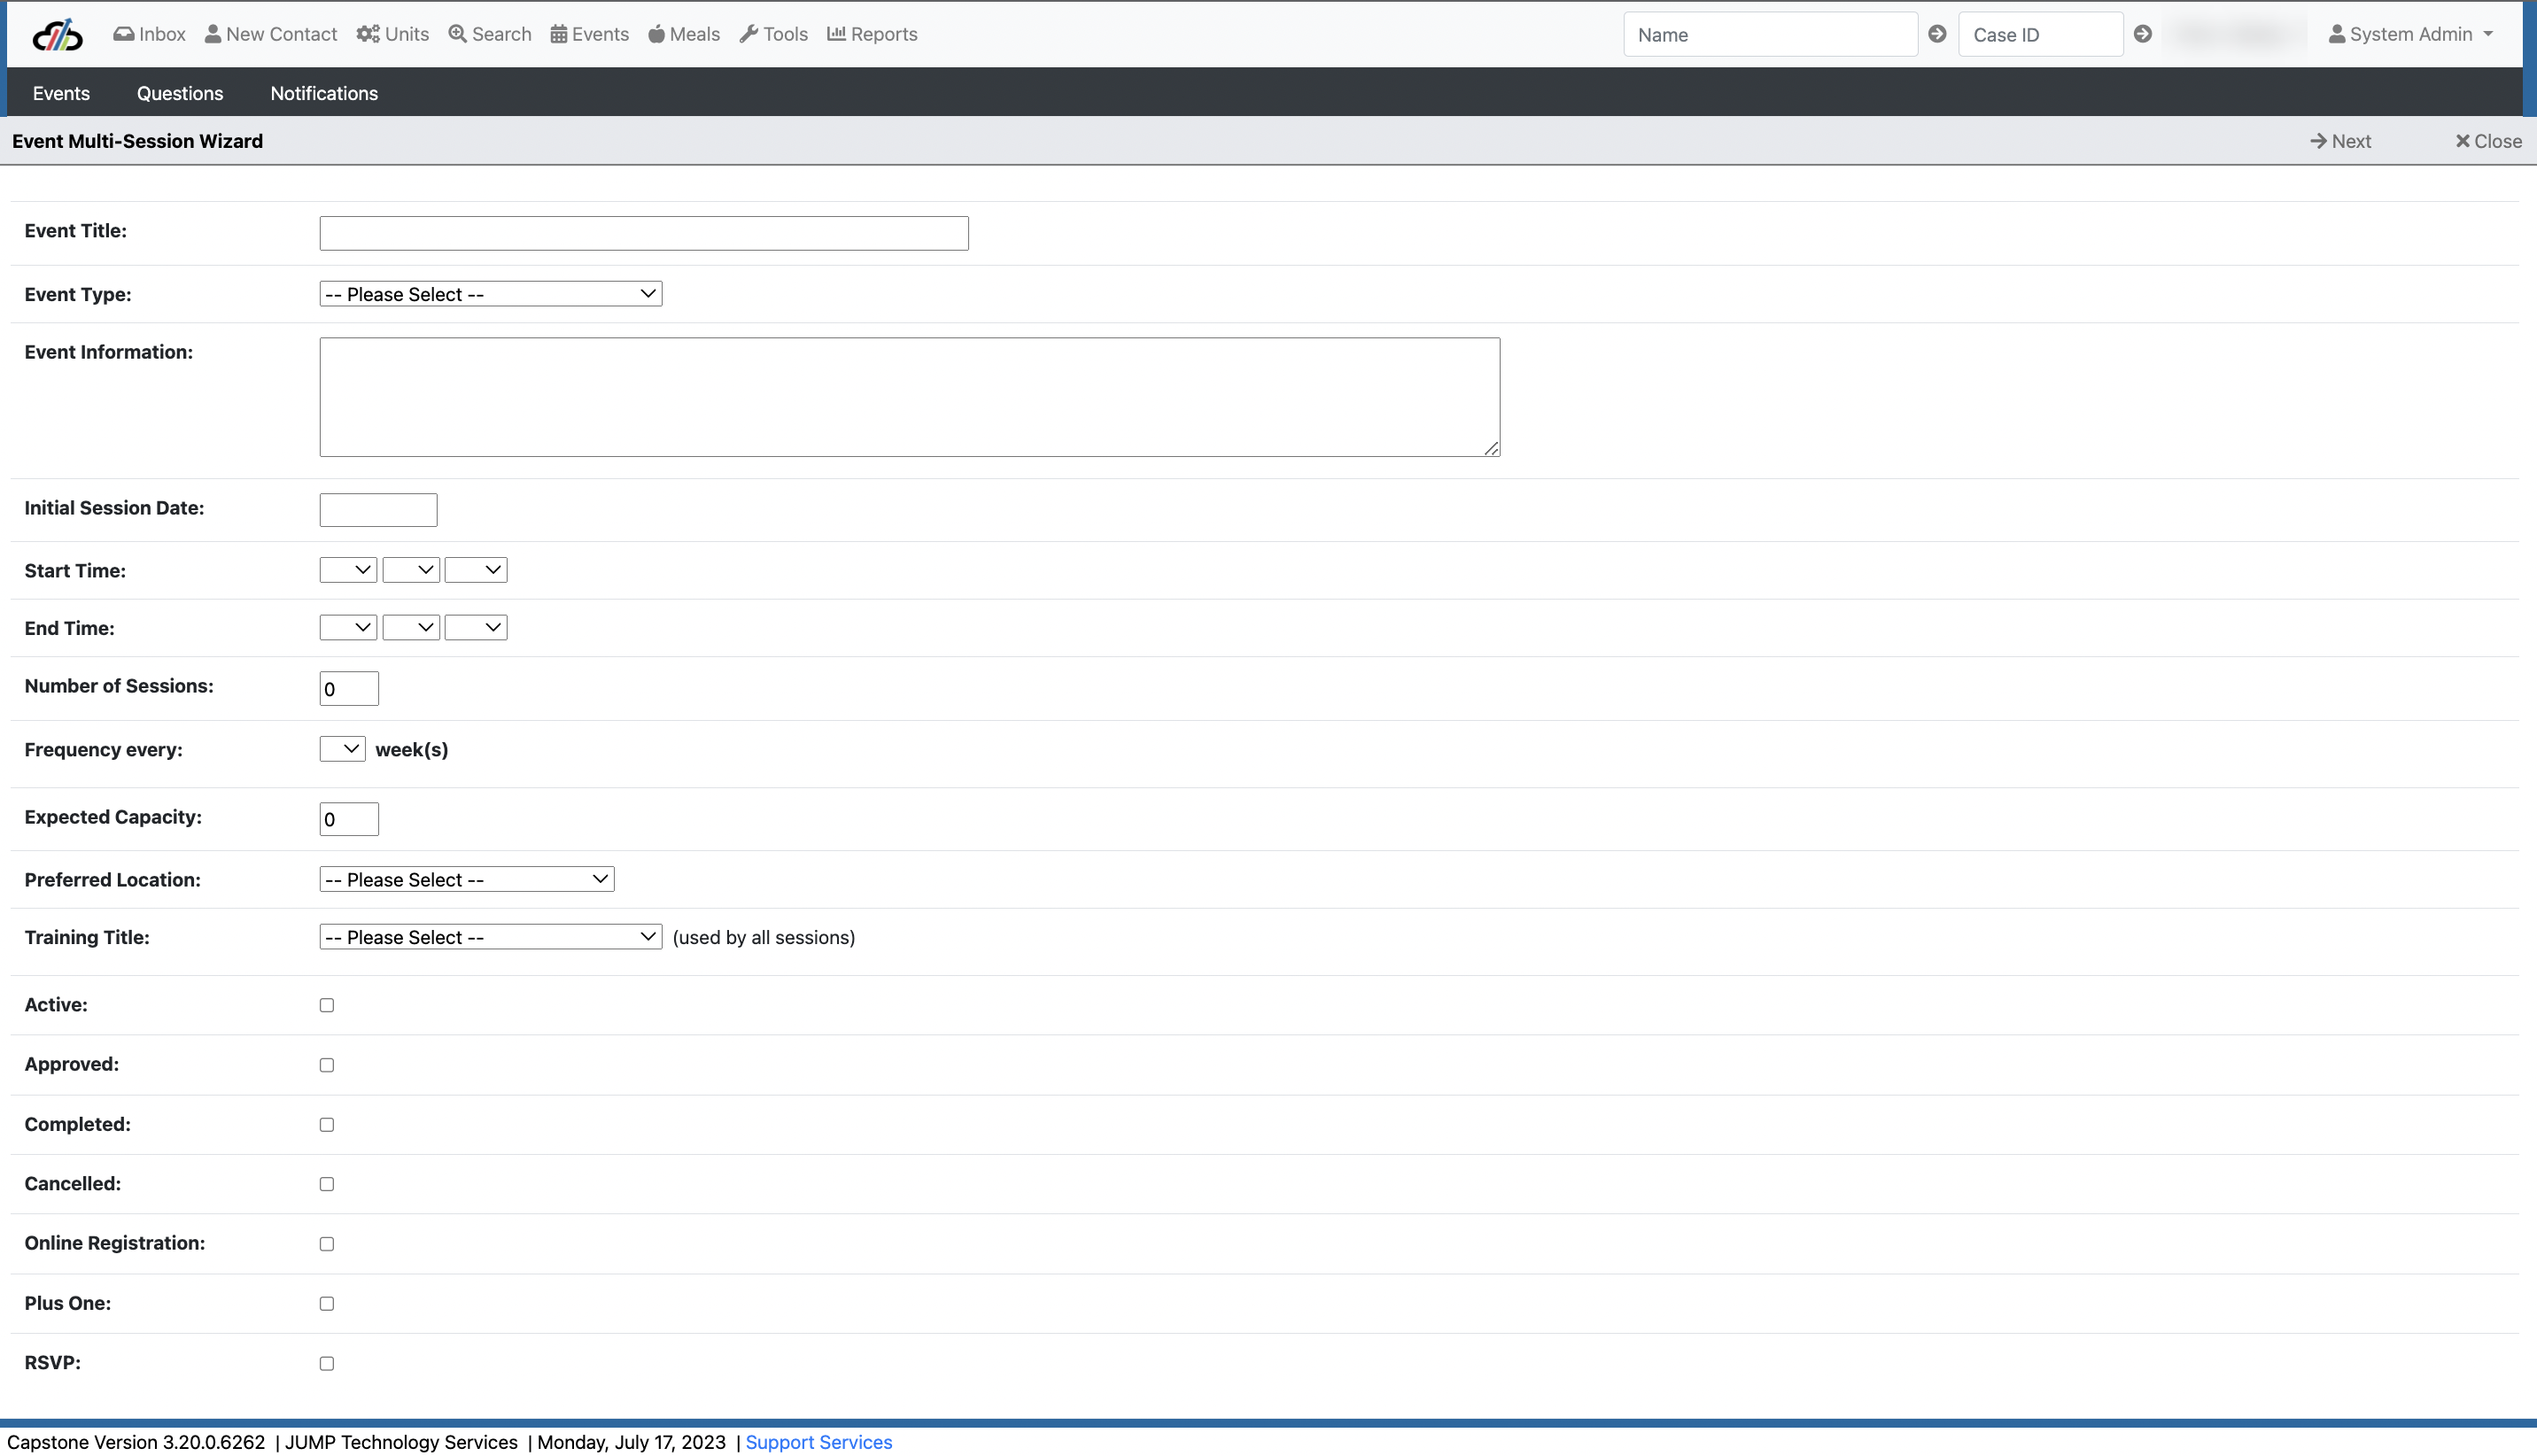
When creating a multi-session event, the system will assign the preferred location to the event if the location is available. You can change the available location by selecting the pencil.
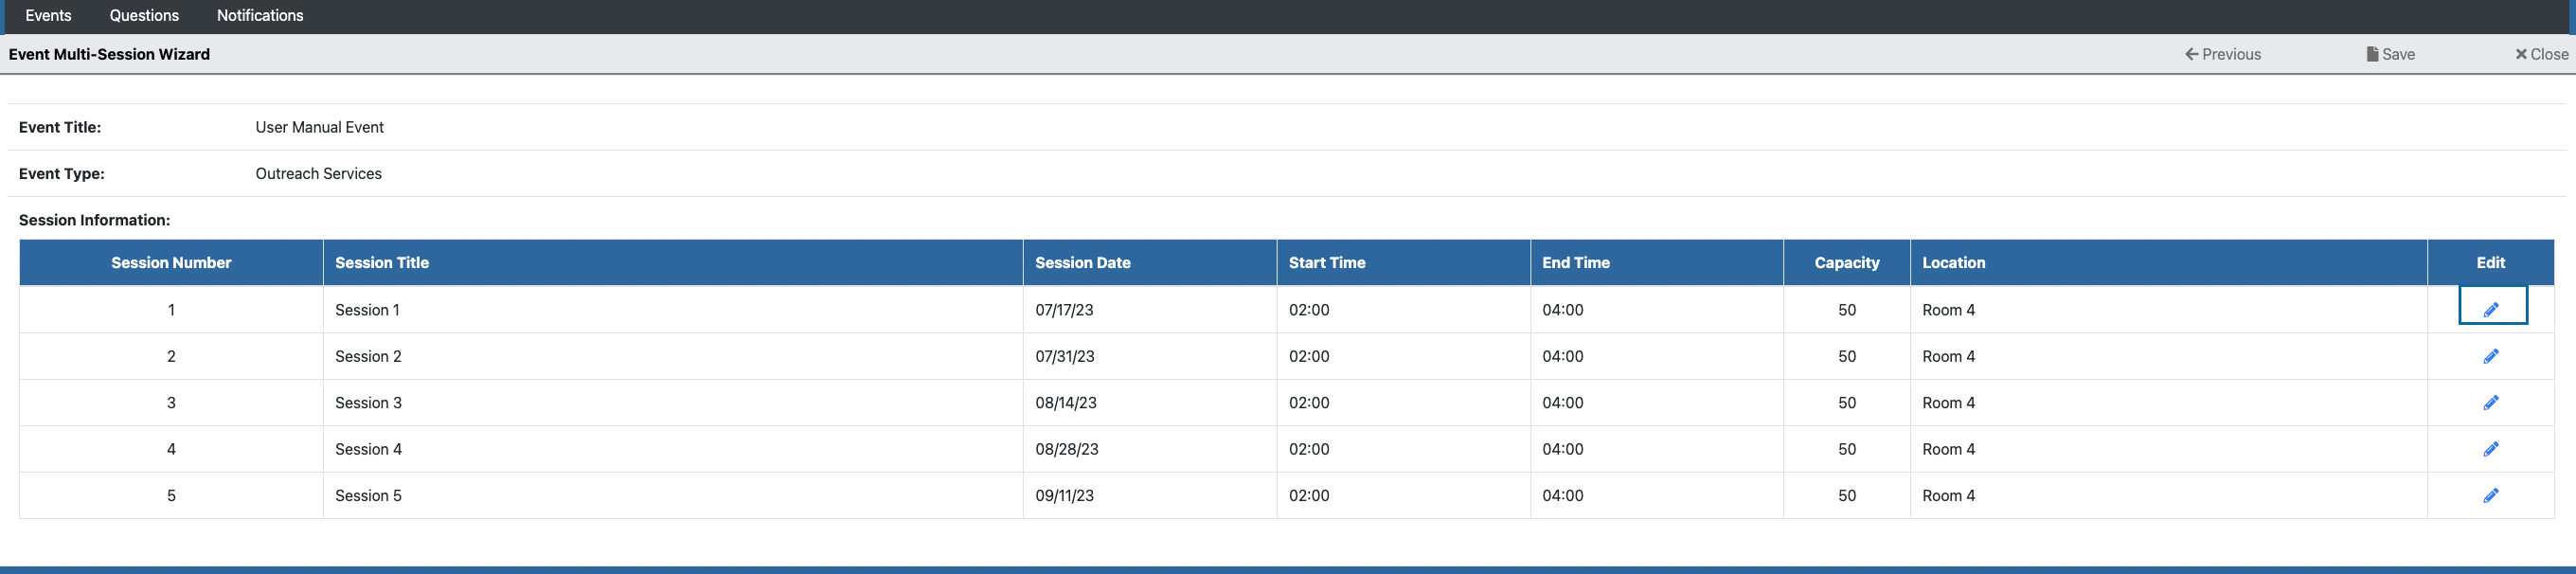
Once you have made location changes you can move on. You will see the Details screen for the event. On this screen you can edit any of the details of the event. At the bottom you can assign contacts to the event like educators. Notice that several other tabs are not available. Those will be reviewed in the Managing Events section of the manual.
Use the New Events button to create an event with one session. Use the Multisession Wizard to create an event with multiple sessions.
Use the Search box to search in the grid. Select the magnifying glass to open the event.
To document community-based outreach first select the Event button and then New Event.
Enter the event details. Select Community Outreach as your event type. Under Participants expected you will enter how many you expect to be reached at the event and then enter the number actually reached in the Attended.
Then enter the contact associated with the site in the third-party contacts box. This step is important as this is what ties this event with the provider. The contact must exist on the provider contact tab to complete this step.
Every event has to have a session to set the date and time for the outreach using the Quick Add tool.
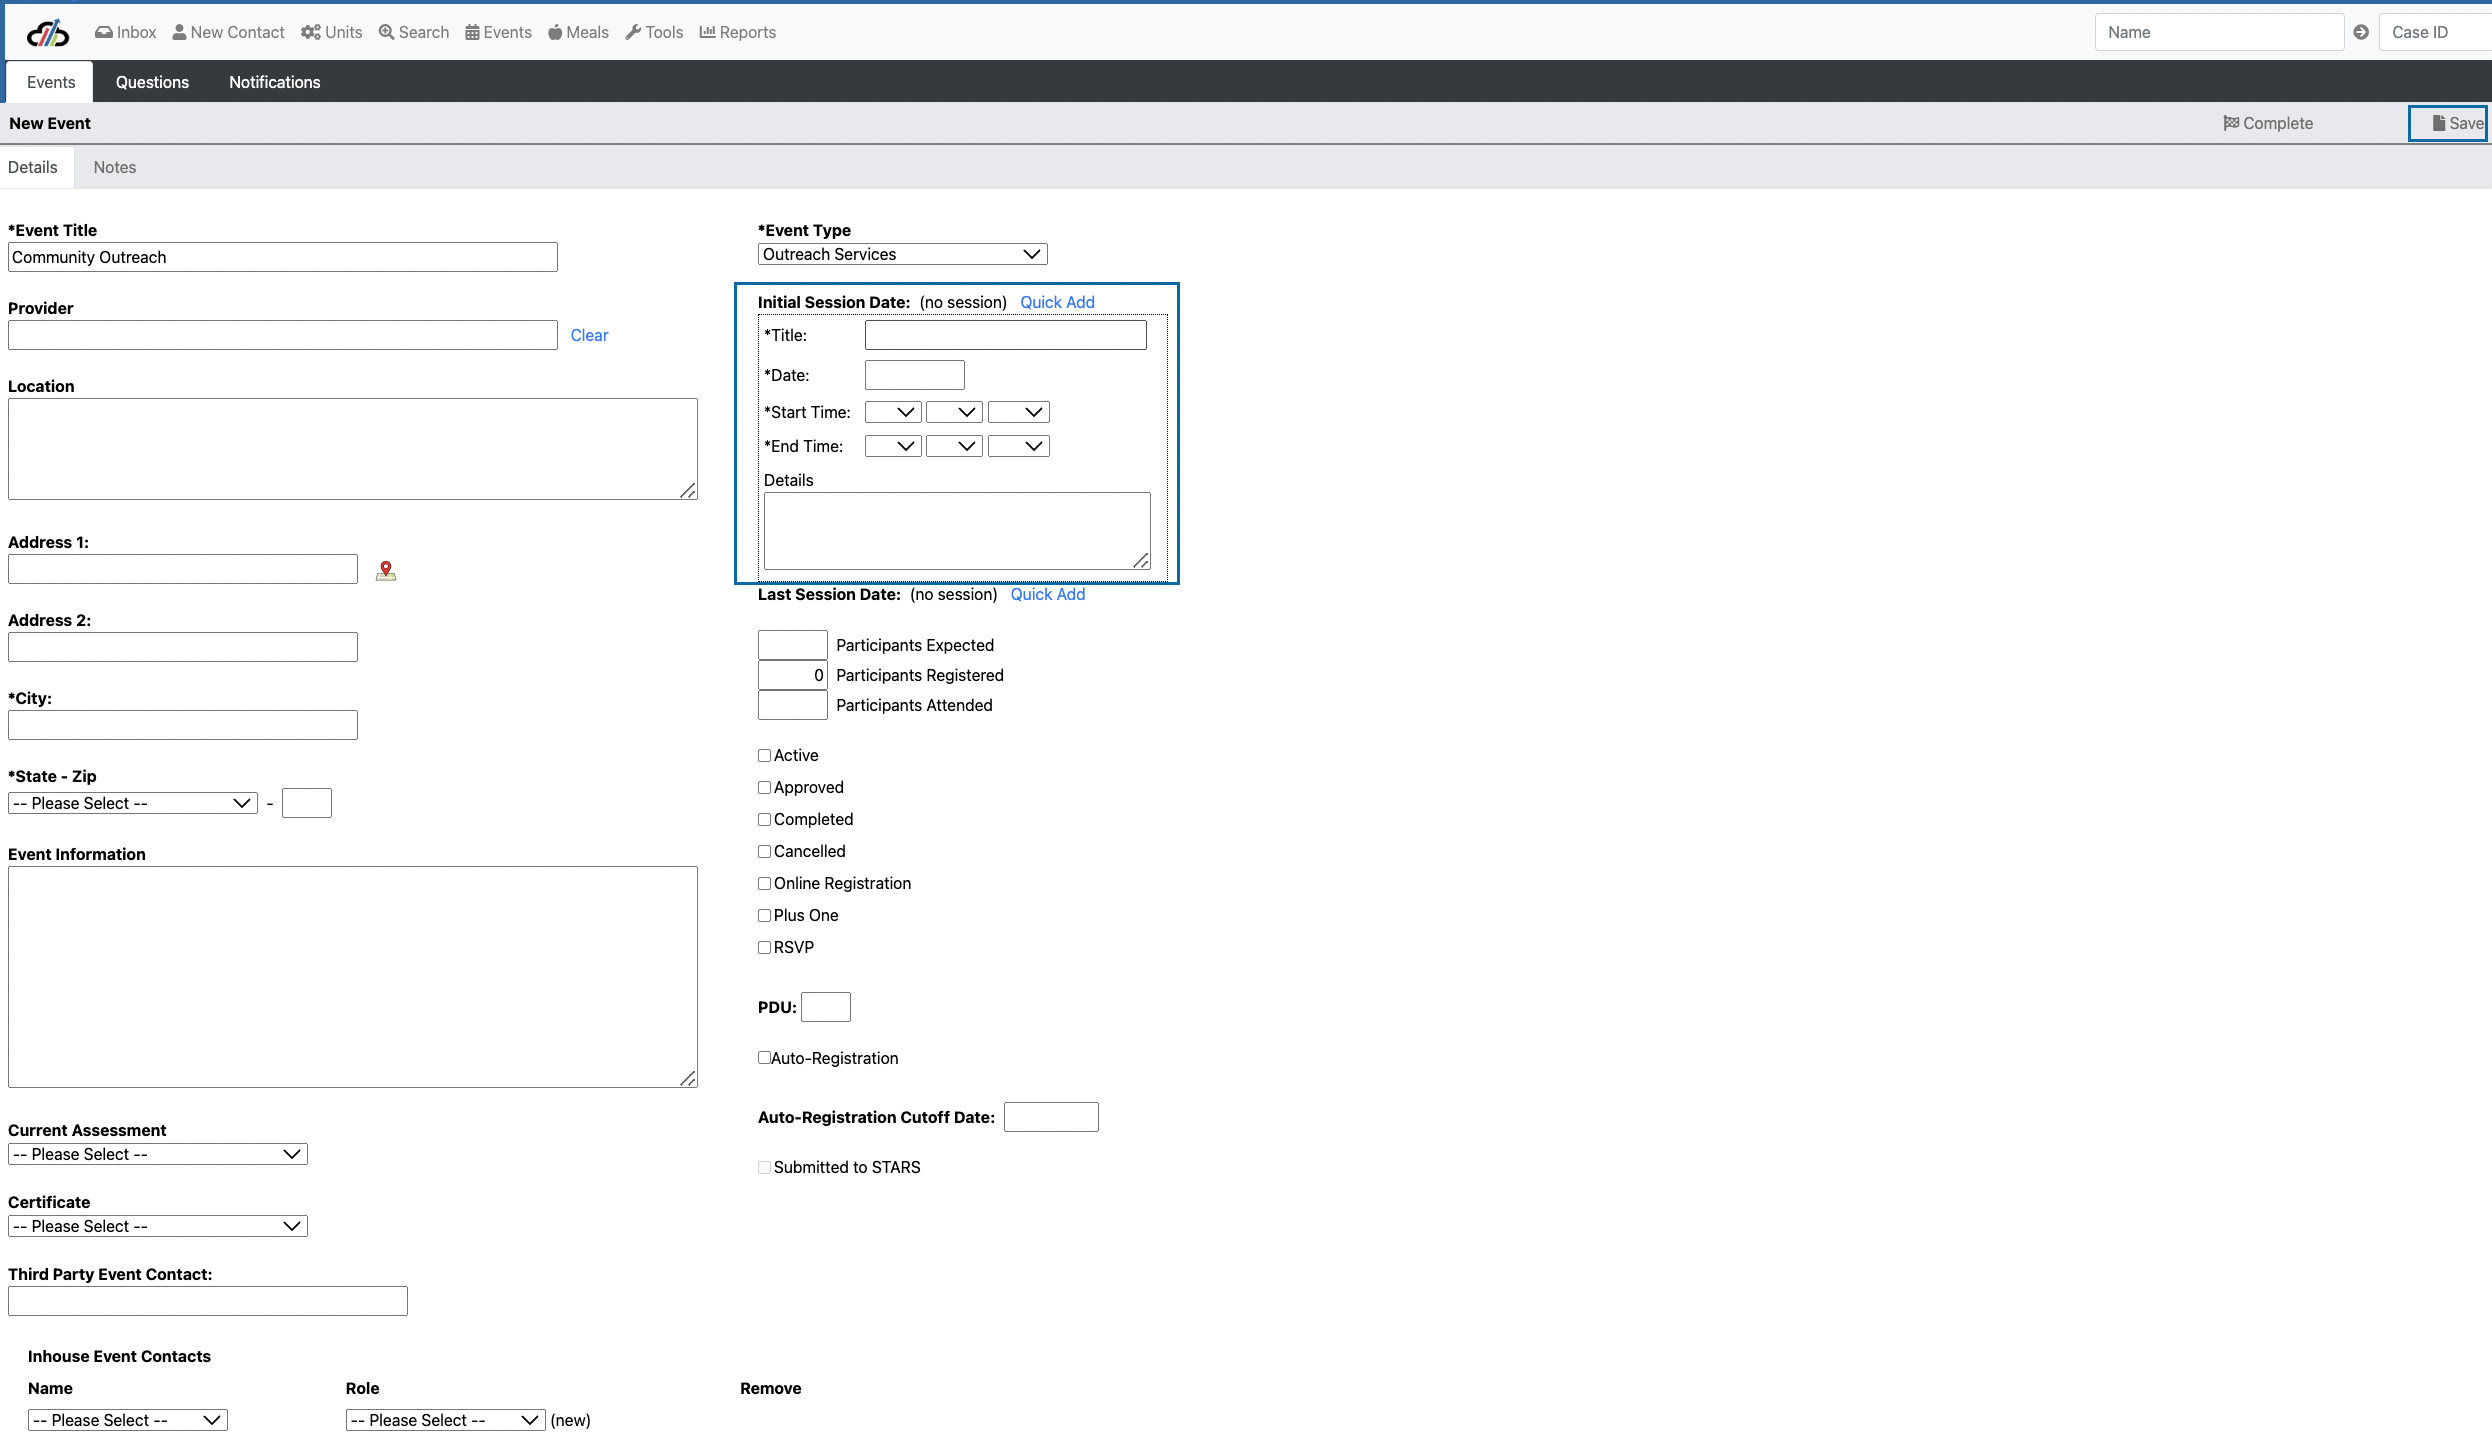
Once saved you will see the Outreach Details tab. Go to that tab to enter details about the population served in the community outreach.
When you are finished documenting the outreach simply check the box for completed on the details screen.
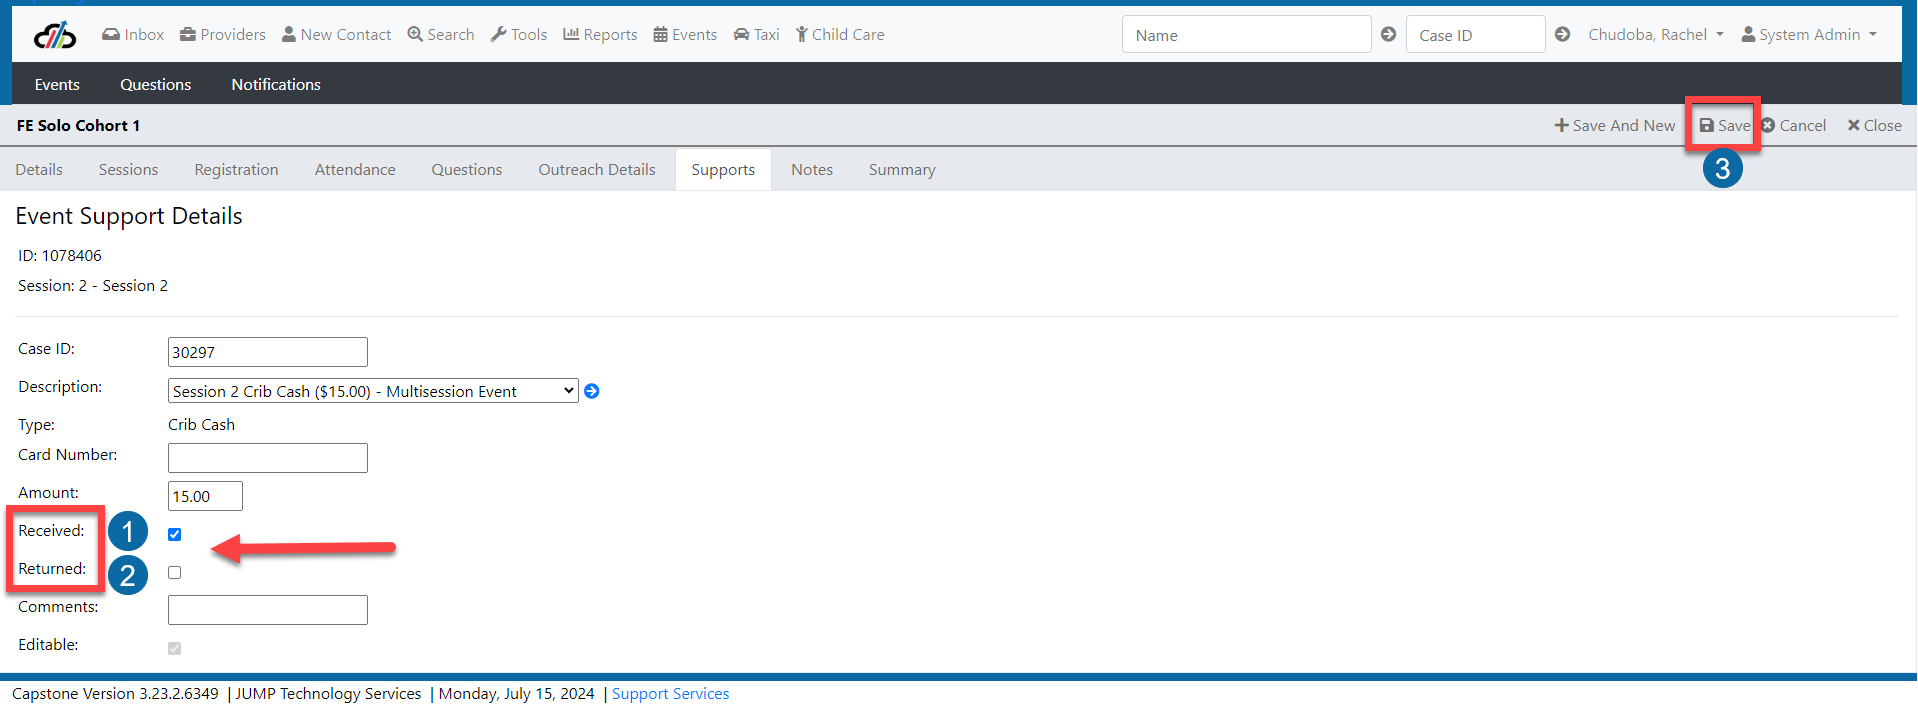
Returned Received
Supports need to be added to an event for every session, doing this will capture all supports that have been assigned to participants for that session. Navigate to an event

Select the supports tab, use the drop down and arrow to select the session that needs supports issued. The screen should say “Supports have not been issued for this session” select the check box and then Issue box

On the screen you will see two grids,one for Supports and one for Funds.
1. The supports grid will show all supports assigned by staff.
2. The funds grid will show attendance funds that the participant has earned based on attendance hours they have received
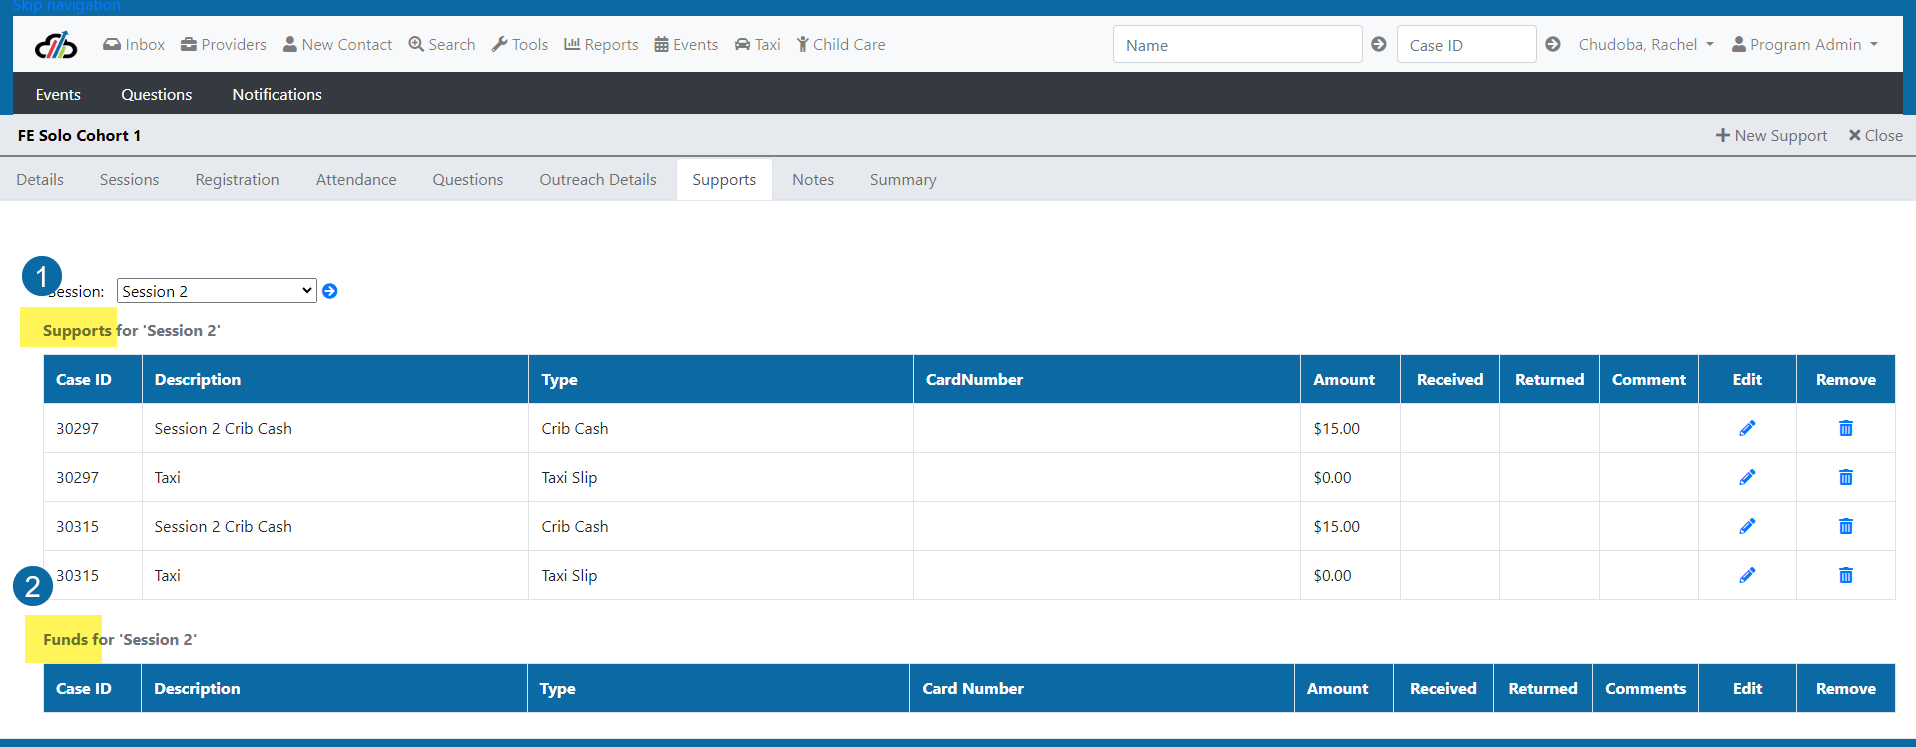
NOTE: If a support needs to be added, select New Support

Enter the Case ID, select the support, and then select the arrow

Select Save

The added support now shows on the sessions support screen

All of the supports on this screen will now show on the “Program Support Receipt” report, this report is ran each class day to print out the receipts for class. The day after class, staff reviews signed receipts to see which supports were received by participants. Staff then navigates back to the session to mark each support either returned or received. Select Edit on the support

Select either the
1. Received or
2. Returned checkbox and then
3. Save
Do that for all items in the supports and funds grids, check that each item has a checkmark.

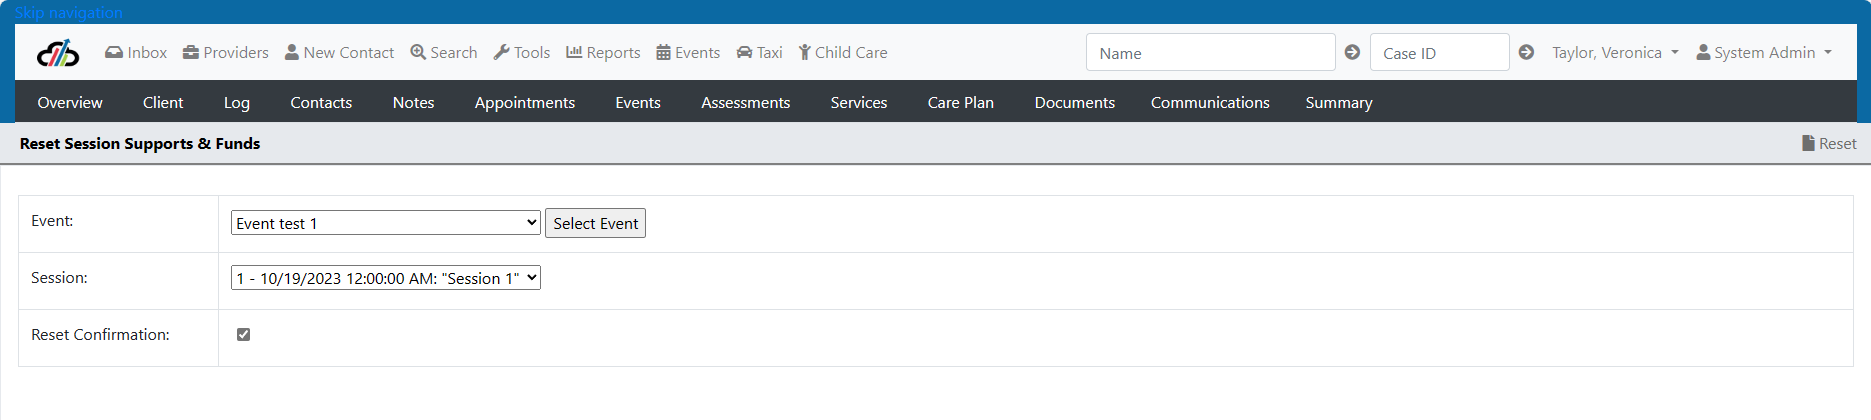
In the event that the supports need to be reset so that they can be reissued, there is a tool reset tool.

Select the event name and the Select Event button

Select the session name, reset confirmation box, and finally the Reset button.

You will see the success message if the reset was done correctly.

Now you can navigate back to the event, supports tab, select the session, and confirm that the supports were reset and can now be reissued.

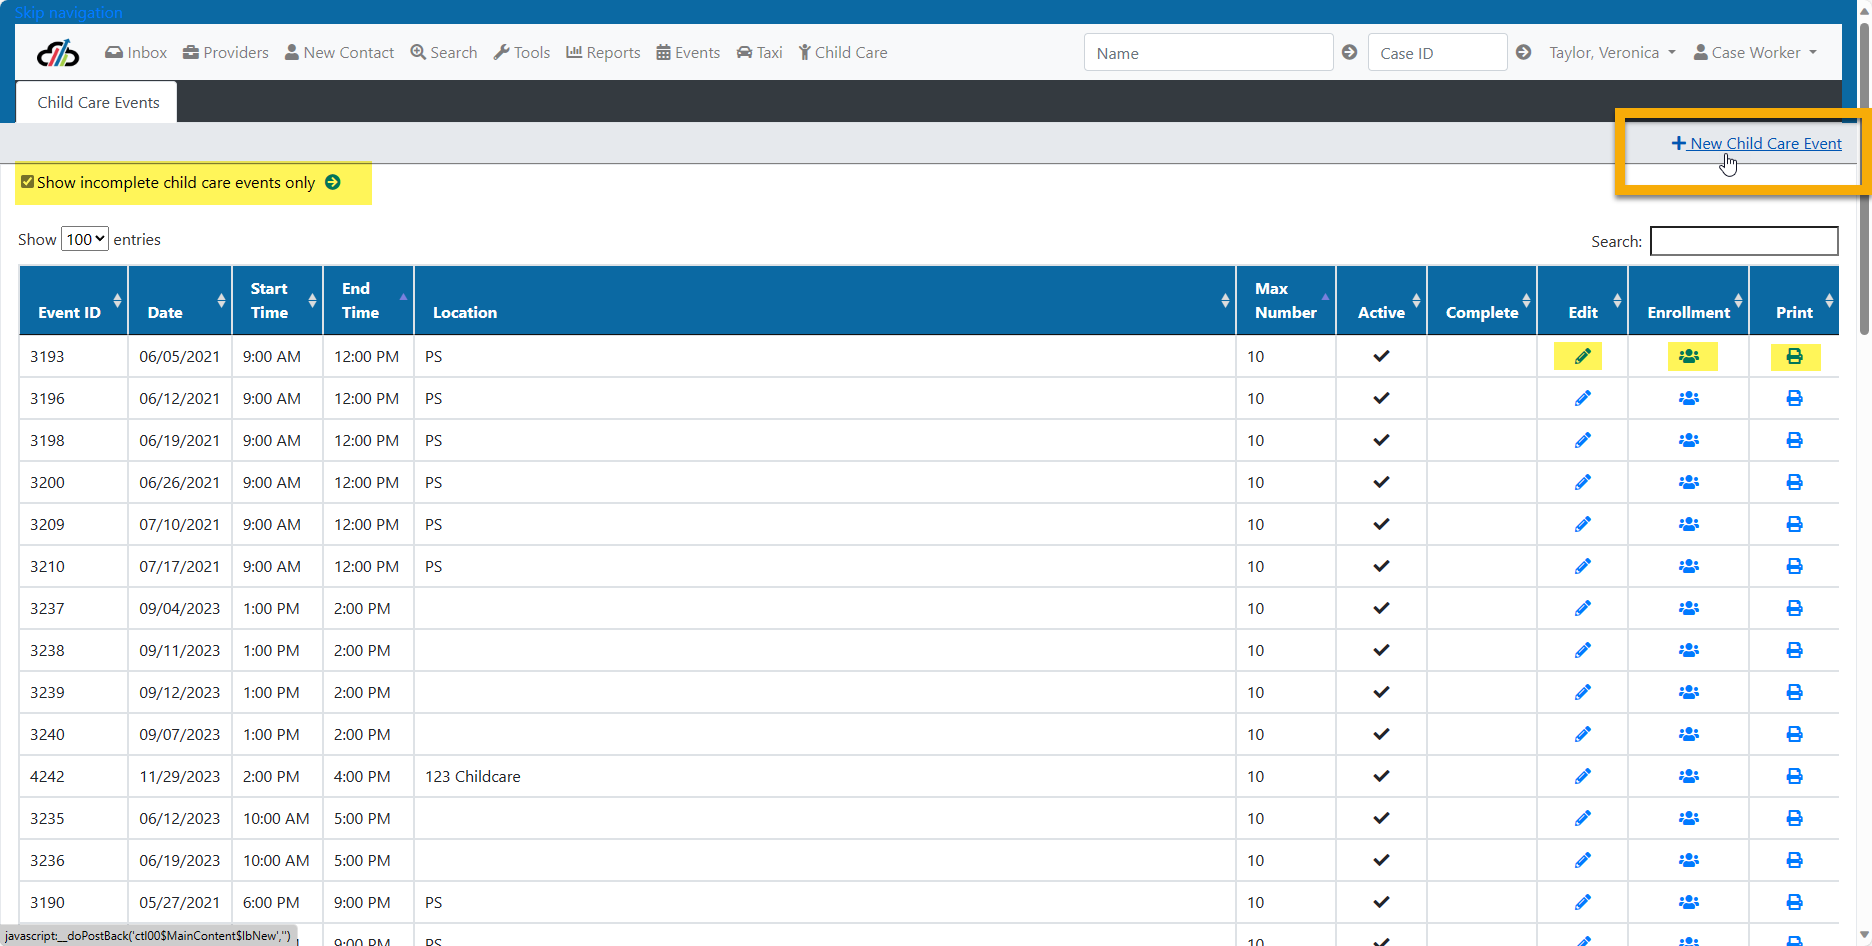
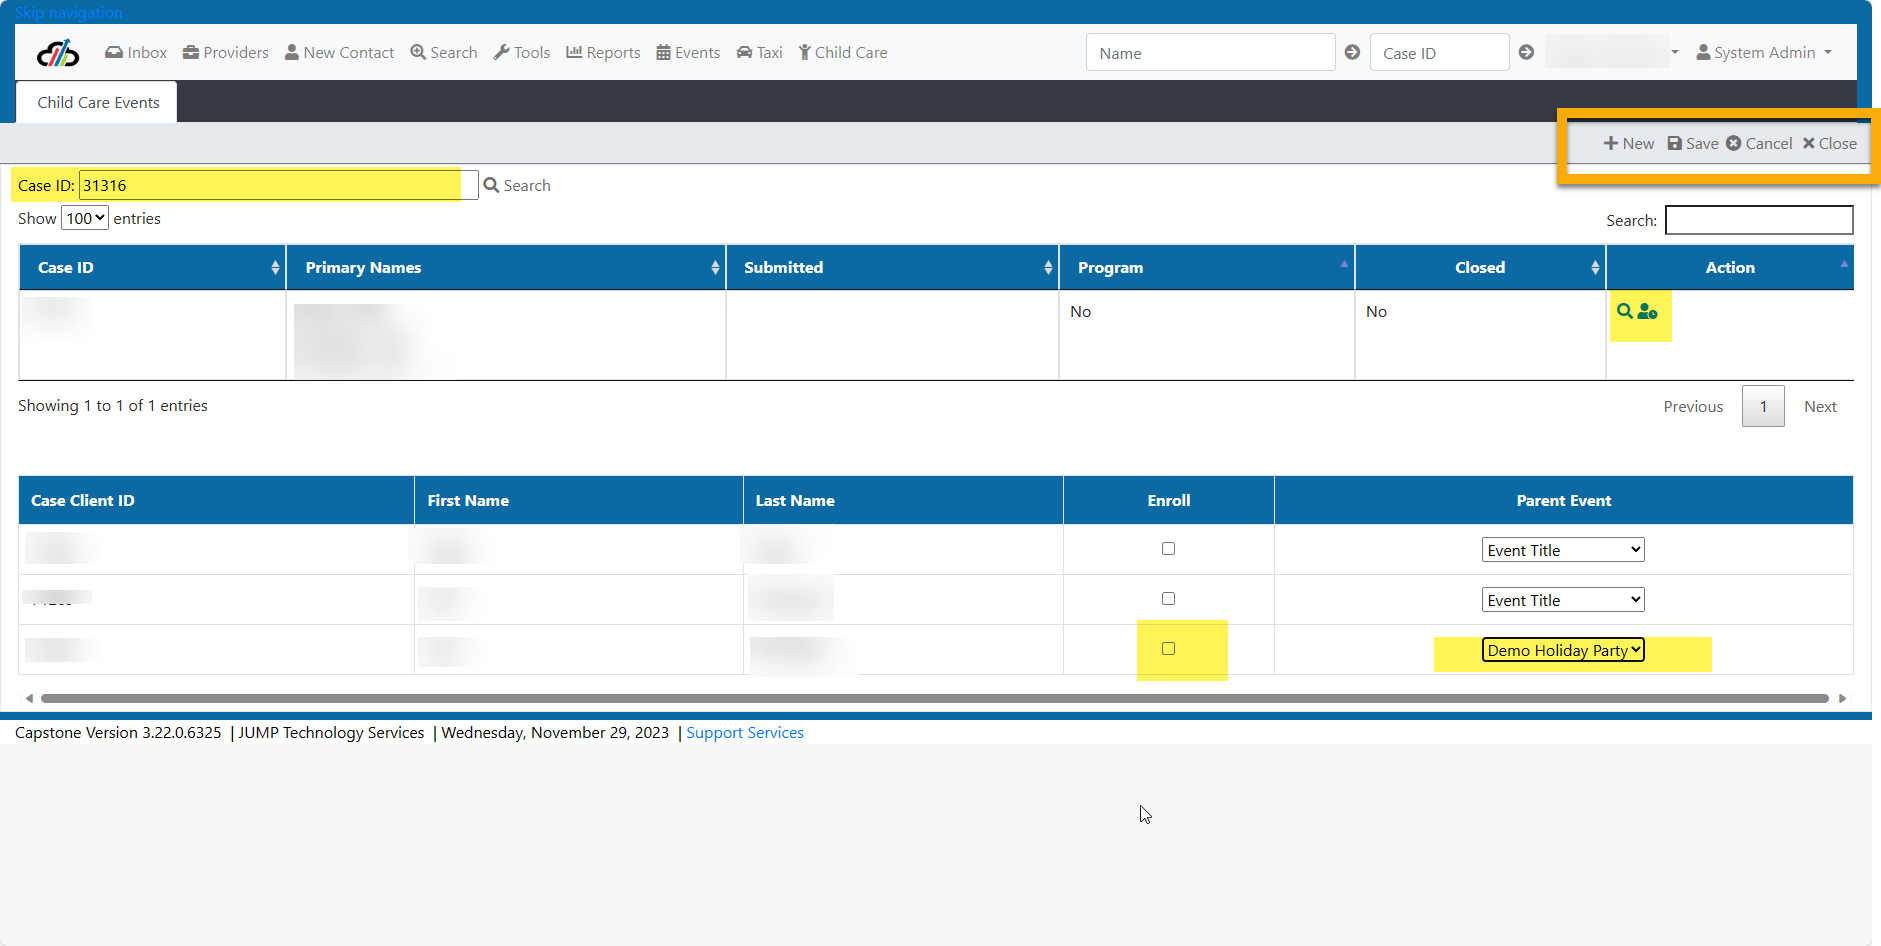
For Capstone Customers who use Childcare.
Select Childcare Events from the tool bar.

A page will open up that shows you any incomplete childcare events in a grid and gives you the option to add a new childcare event by selecting the +New Child Care Event located in the top right hand corner of the screen.
- You can edit existing Childcare Events in the grid by selecting the pencil icon,
- View and add enrollment by selecting the enrollment icon
- or print out a childcare ledger by selecting the printer icon
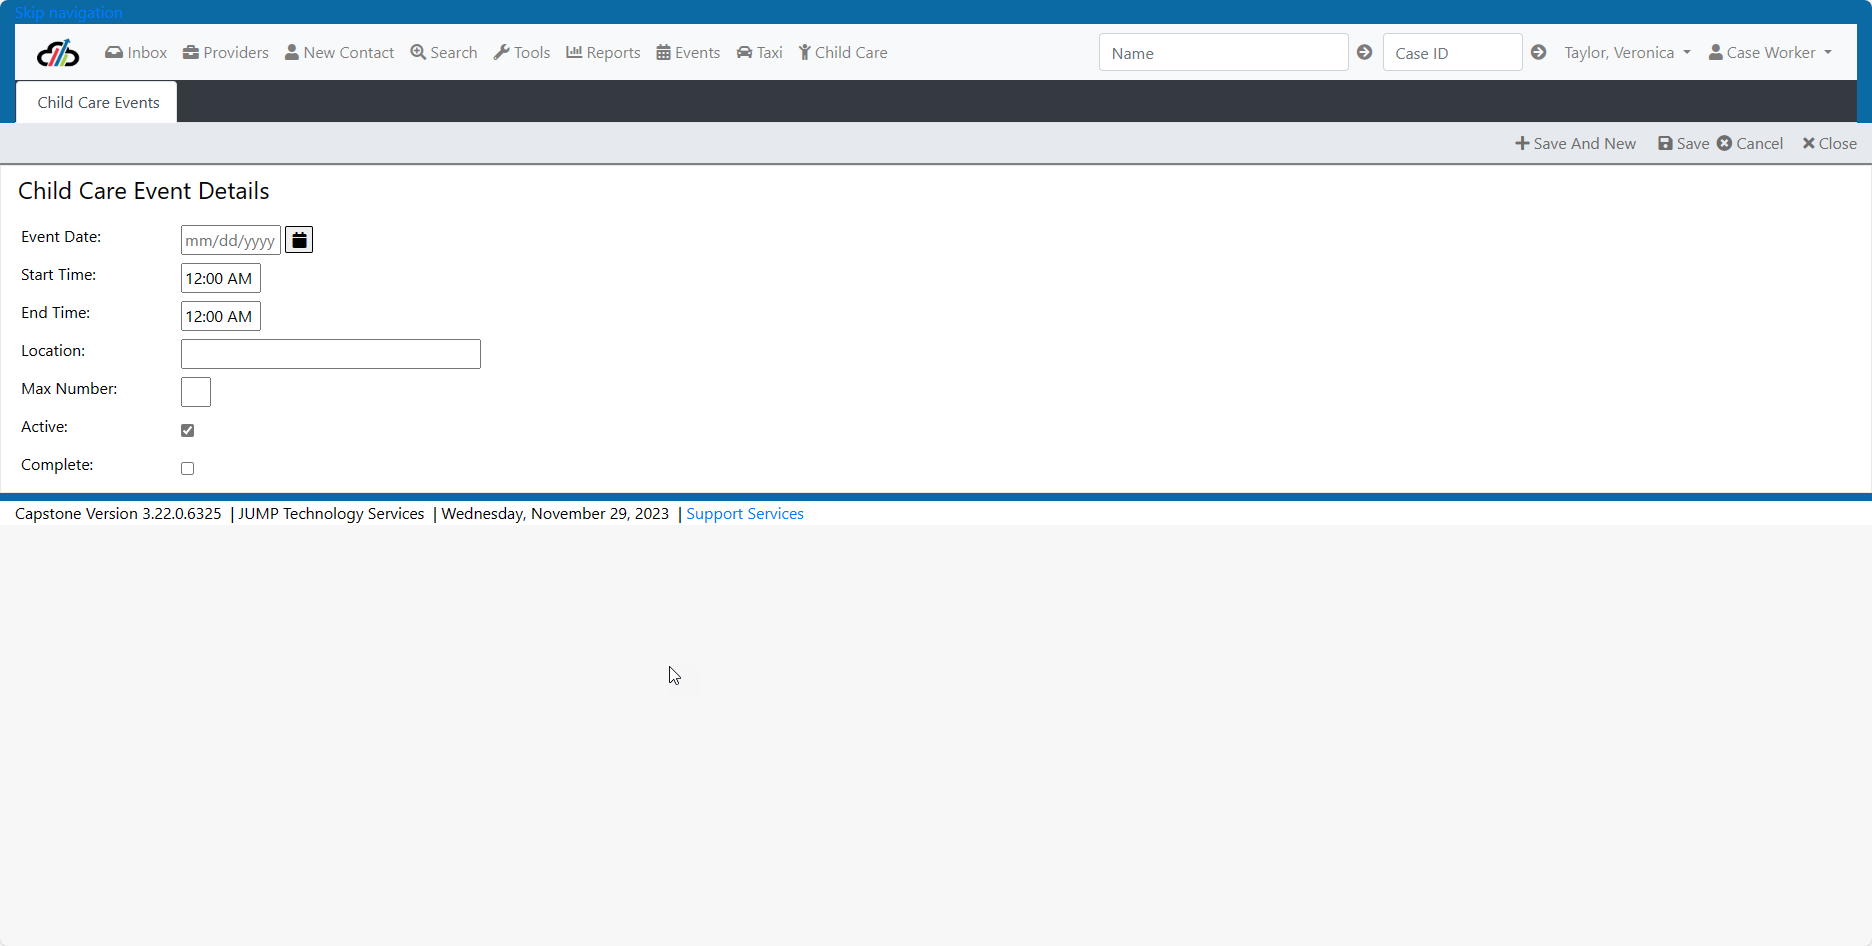
When you select New Child Care Event, fill out the information on the screen. You can select Save and New to save the existing childcare event and start a new one. When you select to edit an existing childcare event, you will have these same fields available to update.
Select the enrollment icon to add attendance by selecting the check box and saving already registered children, or add children to the child care event by selecting New.
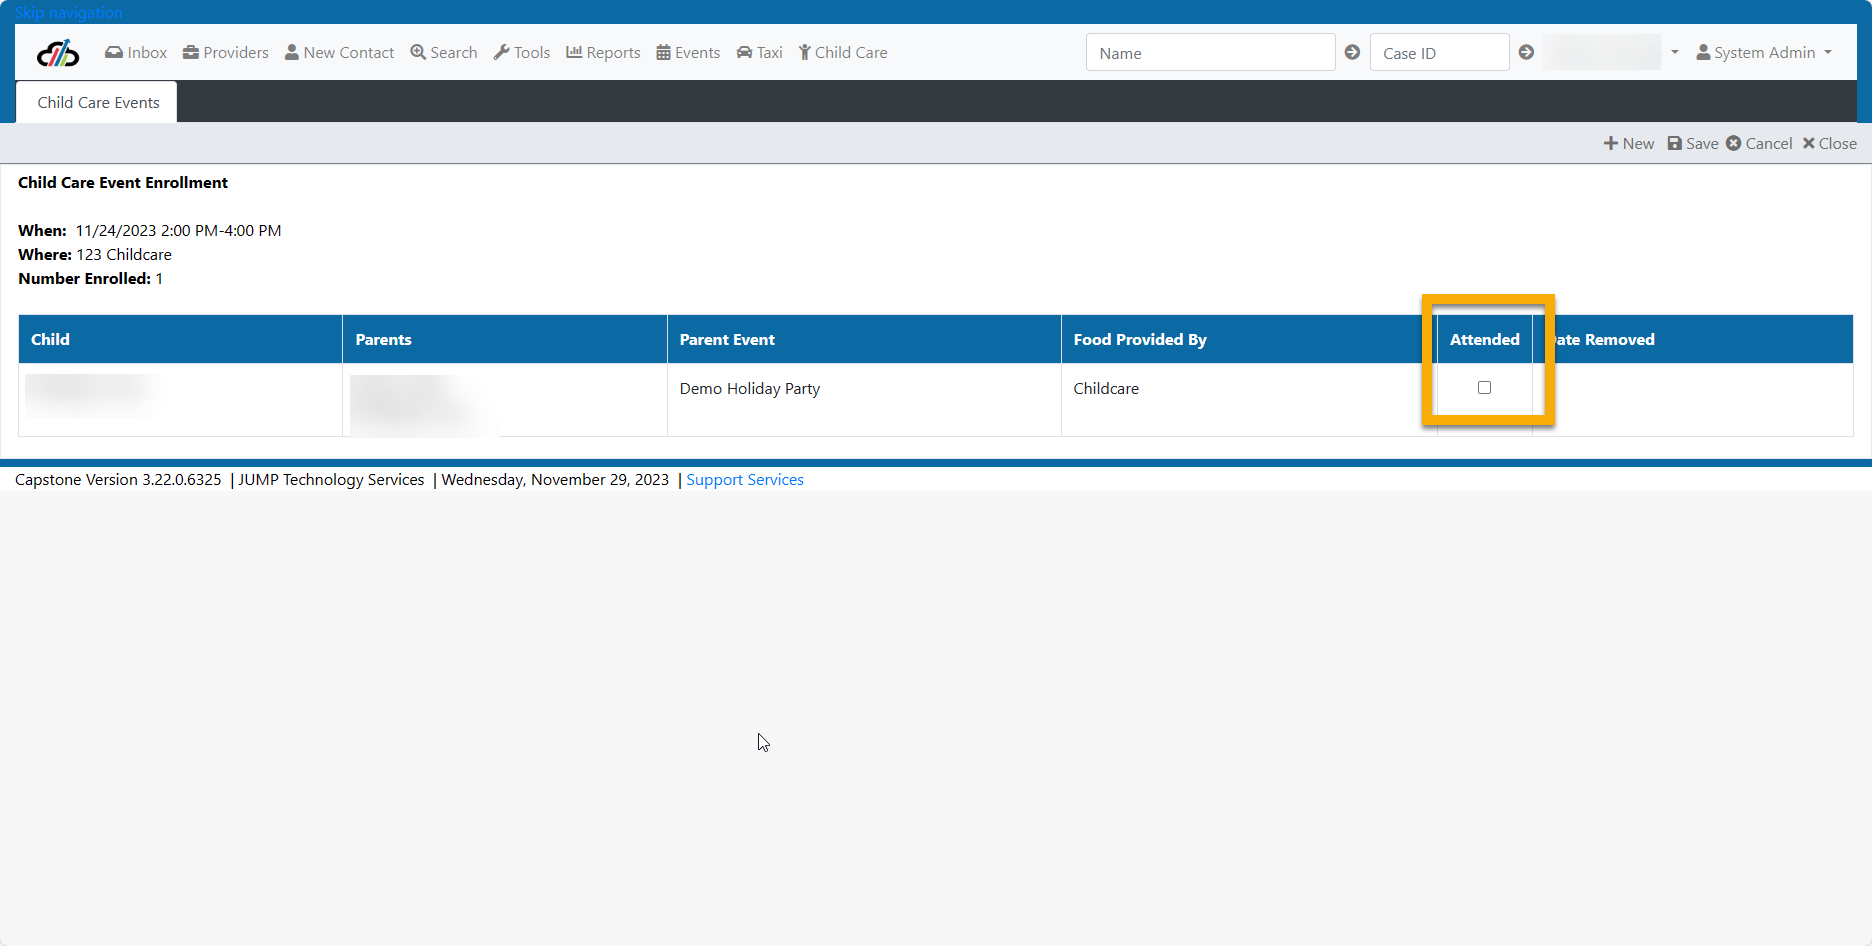
When you add new you will then search for the case ID

Here you can use the magnifying glass to navigate to the case or
Enroll the child in the Childcare Event by selecting the Parent's Event, select enroll next to the child and Save
Transportation
The Transportation tab shows the scheduled taxi appointments (both appointments and events that requre a taxi) and allows the user to make changes to the scheduled taxi.
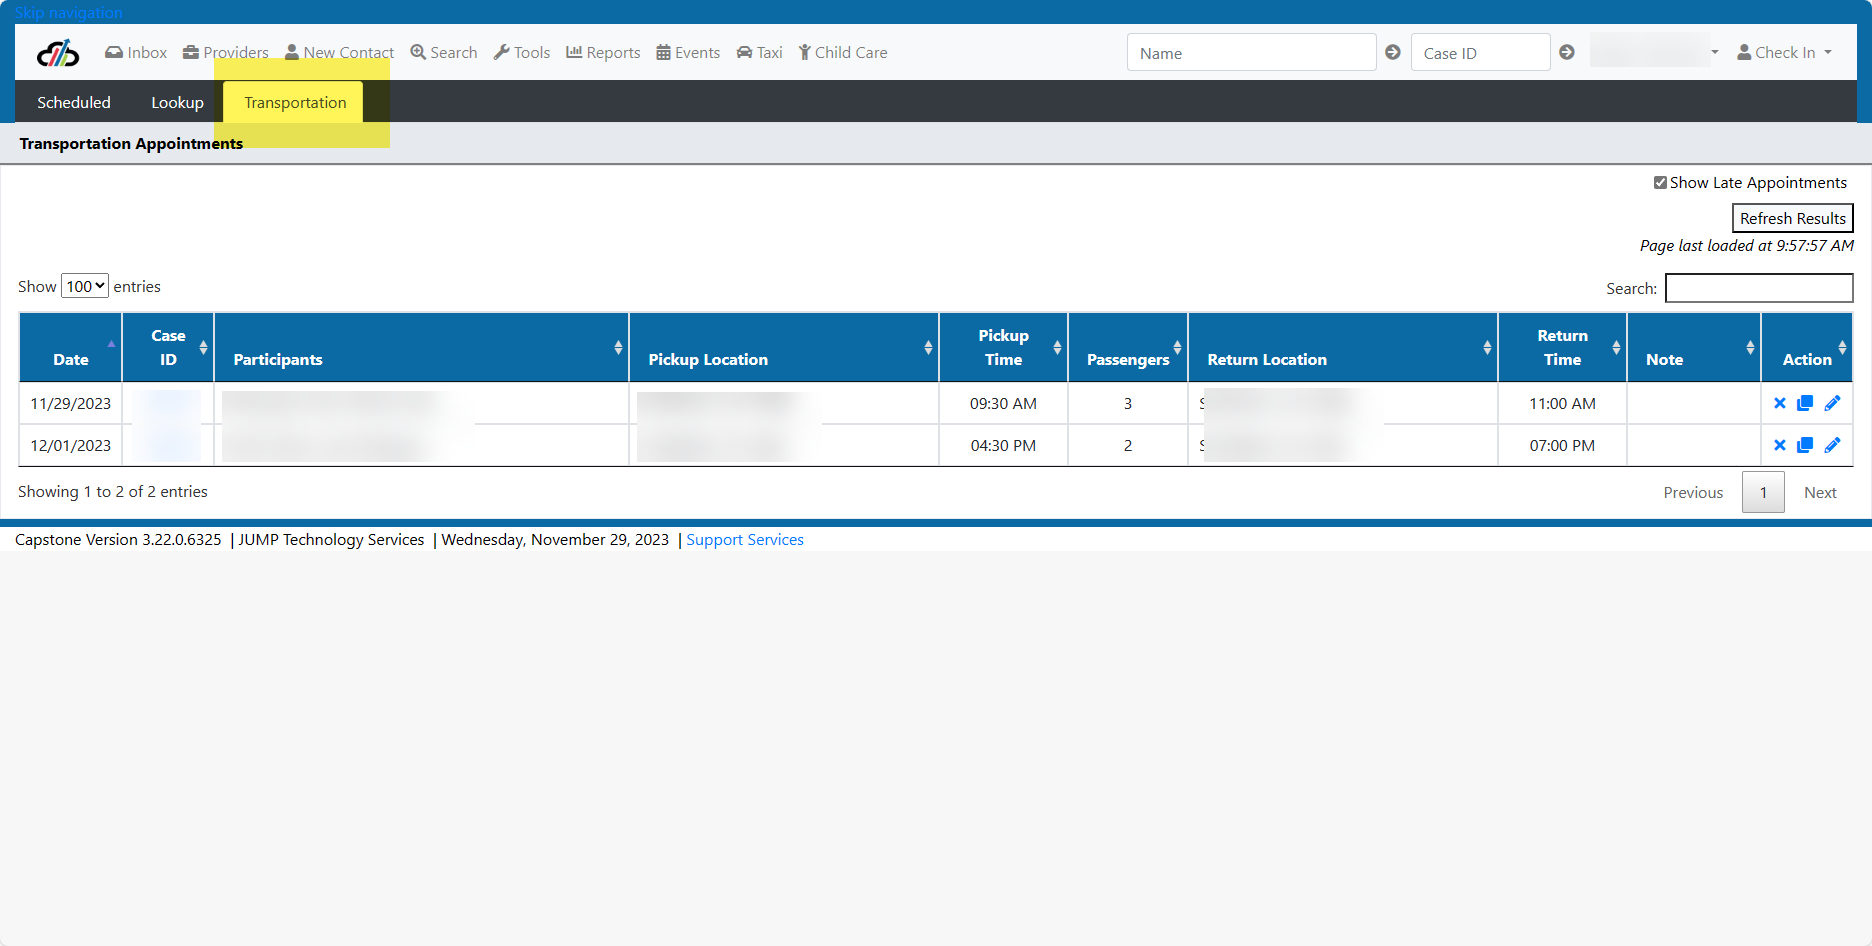
Actions you can take on this screen are:
Remove the scheduled transportation appointment by using the X.
Split the taxi between locations using the double page icon.
Edit the transportation appointment using the pencil icon.
#IntakeWorker #IntakeSupervisor #IntakeSupervisorTools #CaseWorker #CaseSupervisor #CaseSupervisorTools
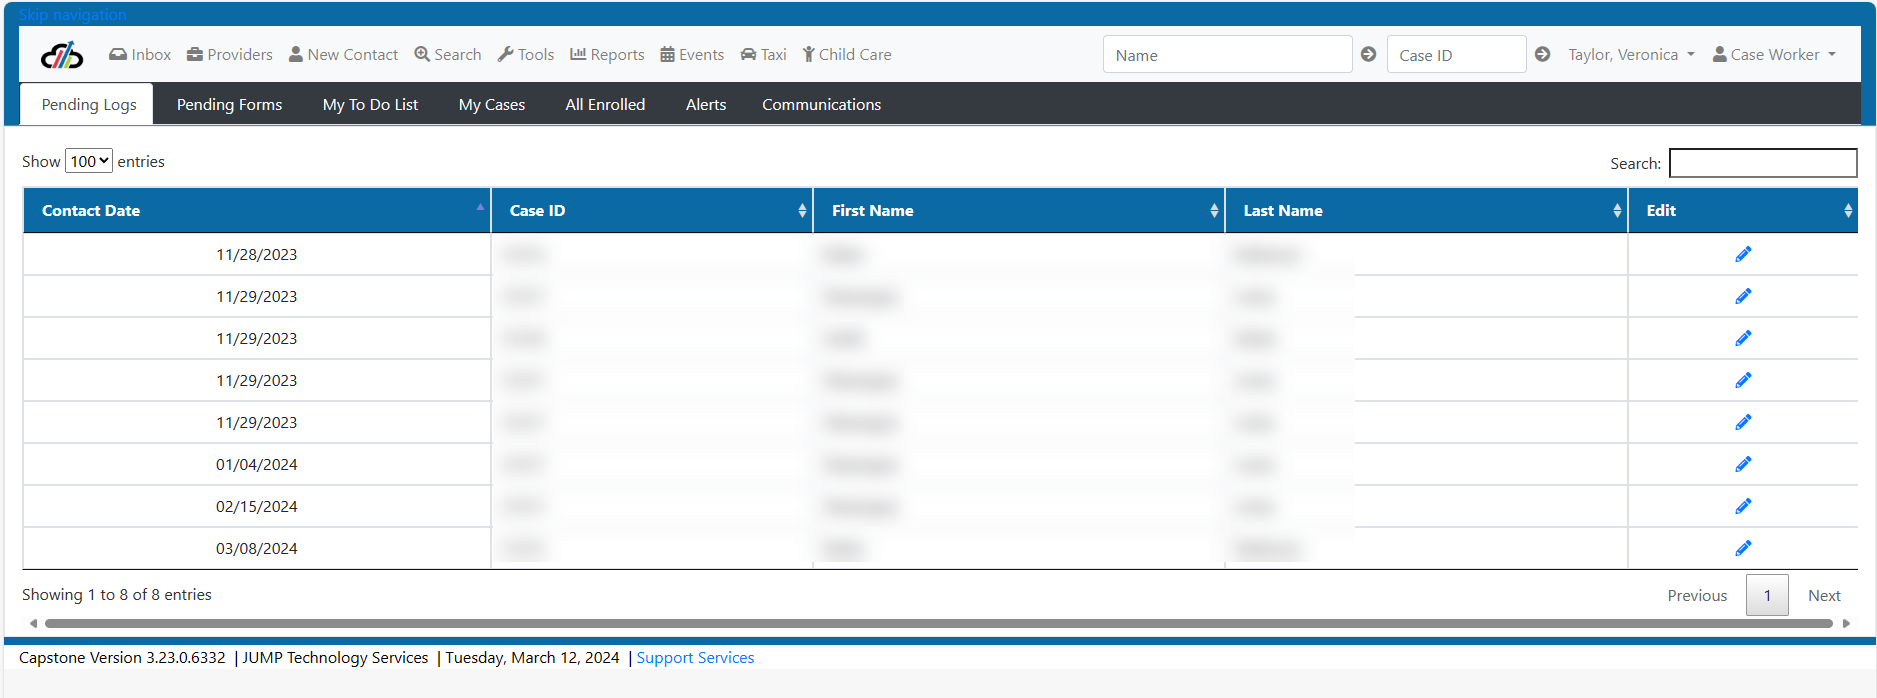
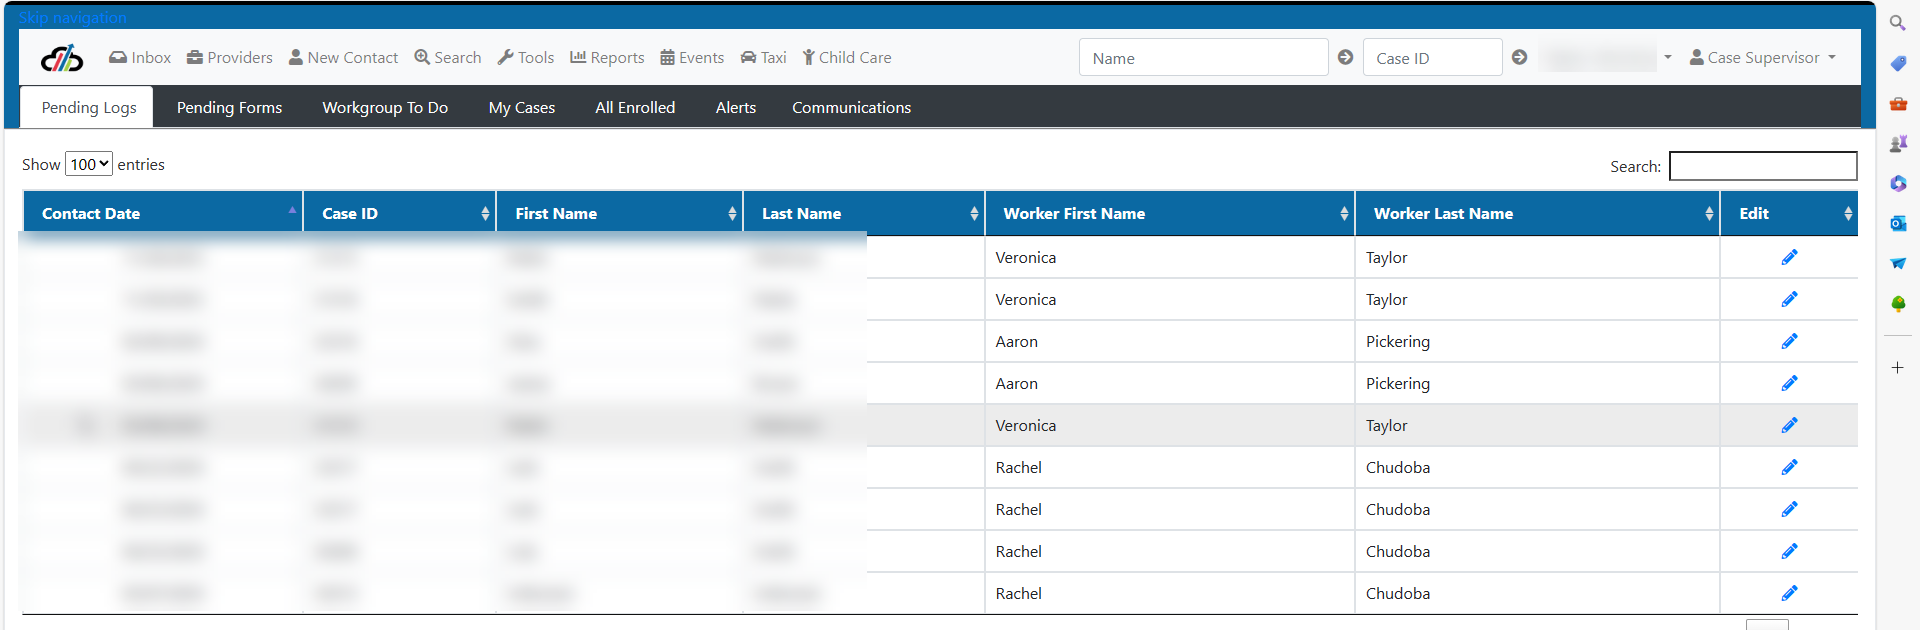
PENDING LOGS - This is where you will find Logs that are saved, but not finished. To edit or finish the log click the pencil on the right.
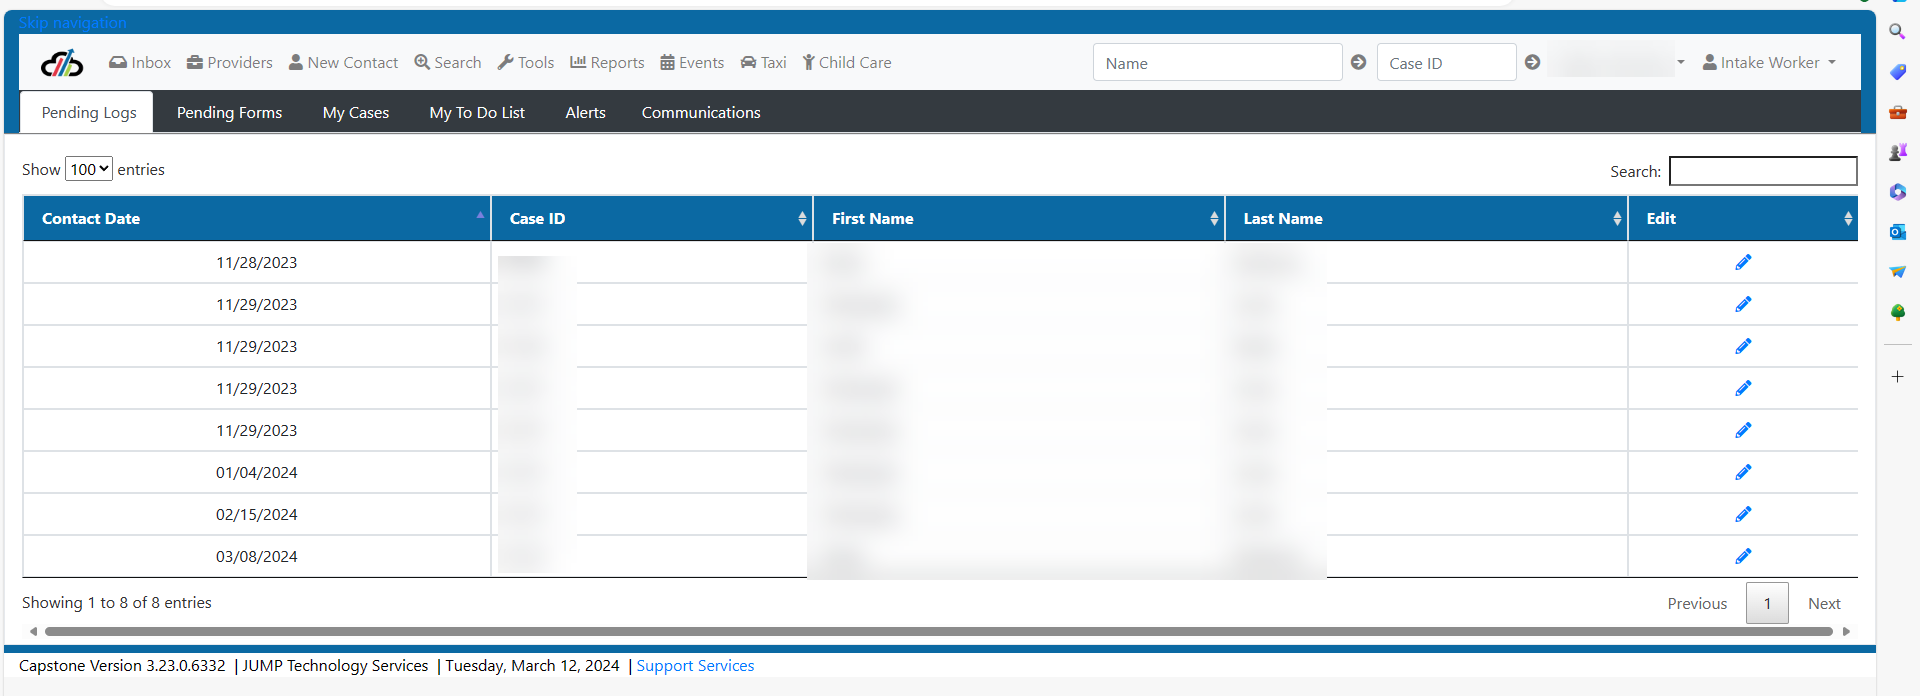
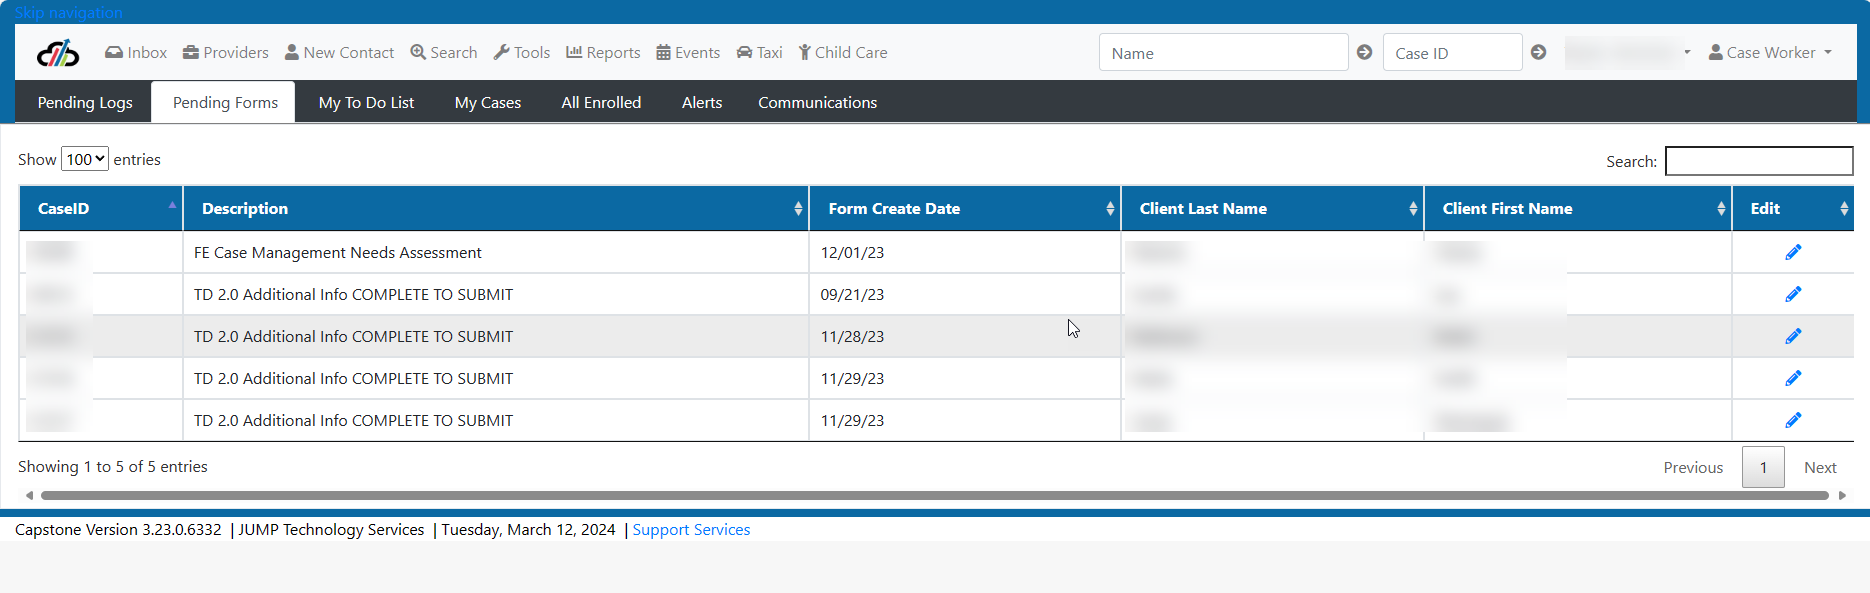
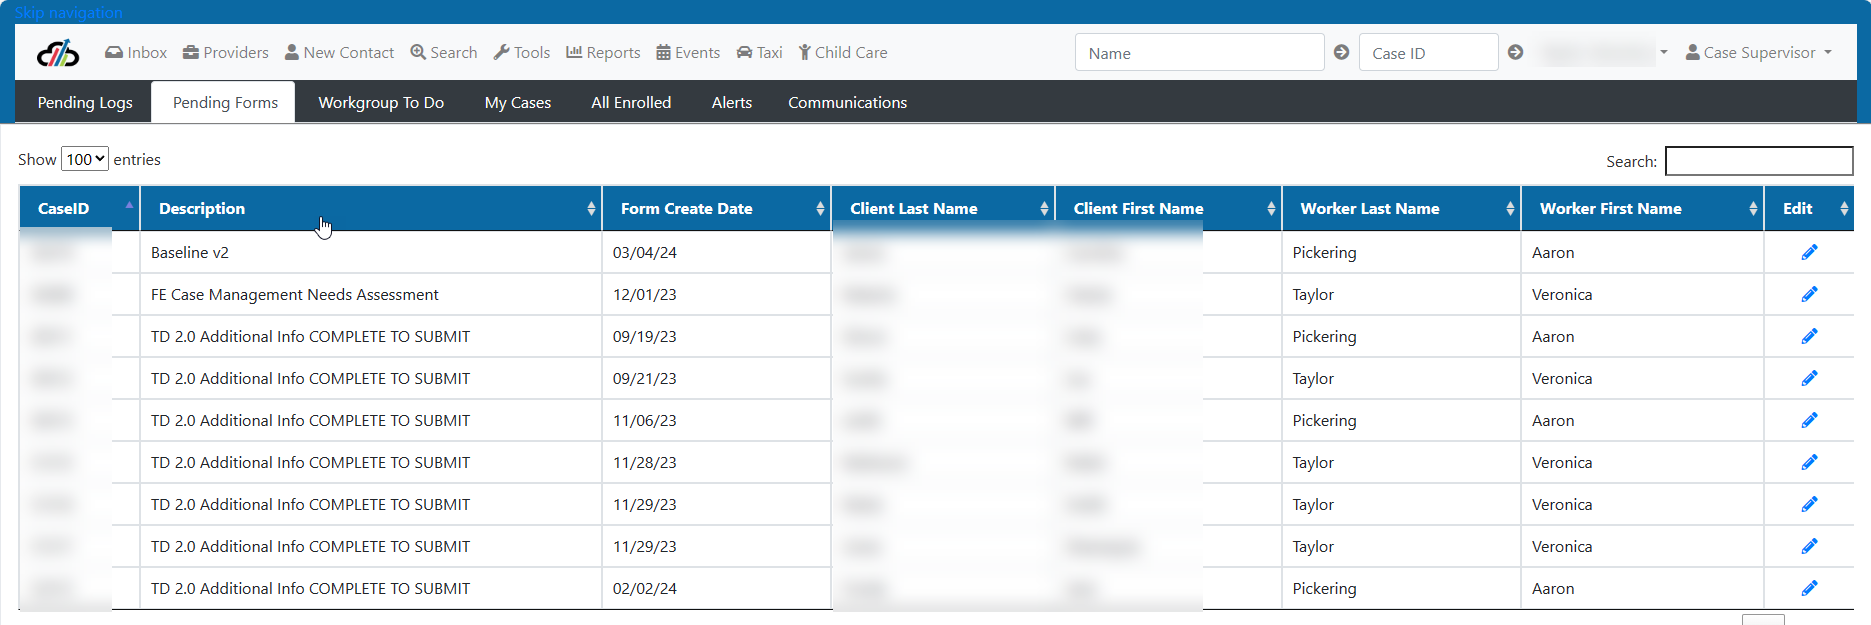
PENDING FORMS - This is where you will find pending assessments that are saved, but not finished. To edit or finish the log click the pencil on the right.
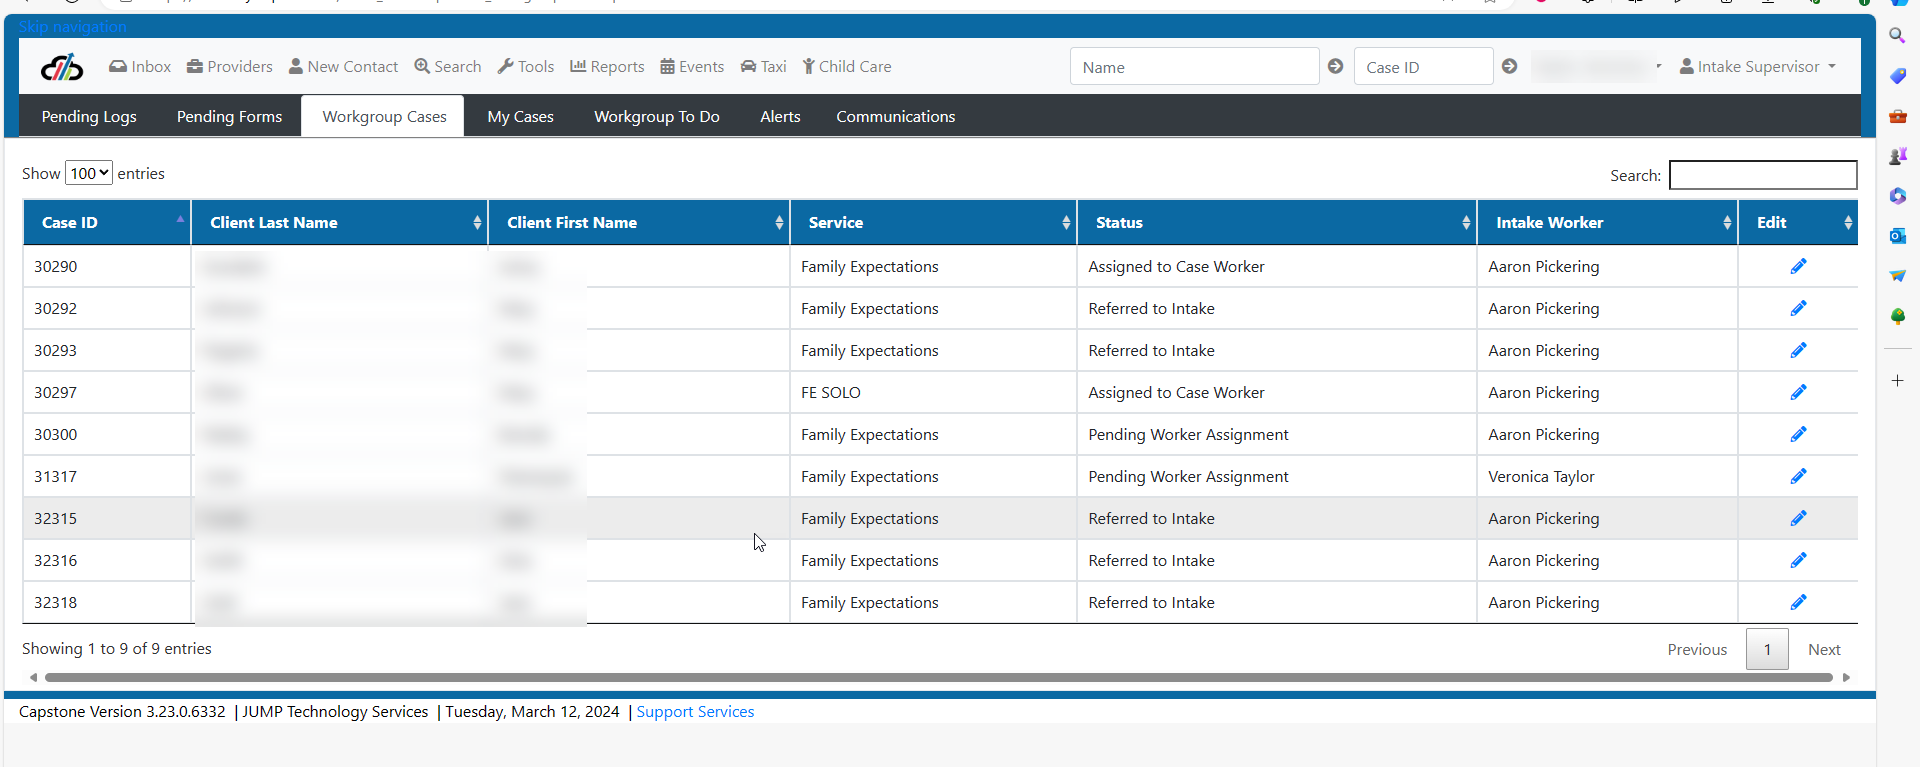
WORKGROUP CASES (INTAKE SUPERVISOR ONLY) – This is a list of all the cases that area assigned to everyone in the workgroup.
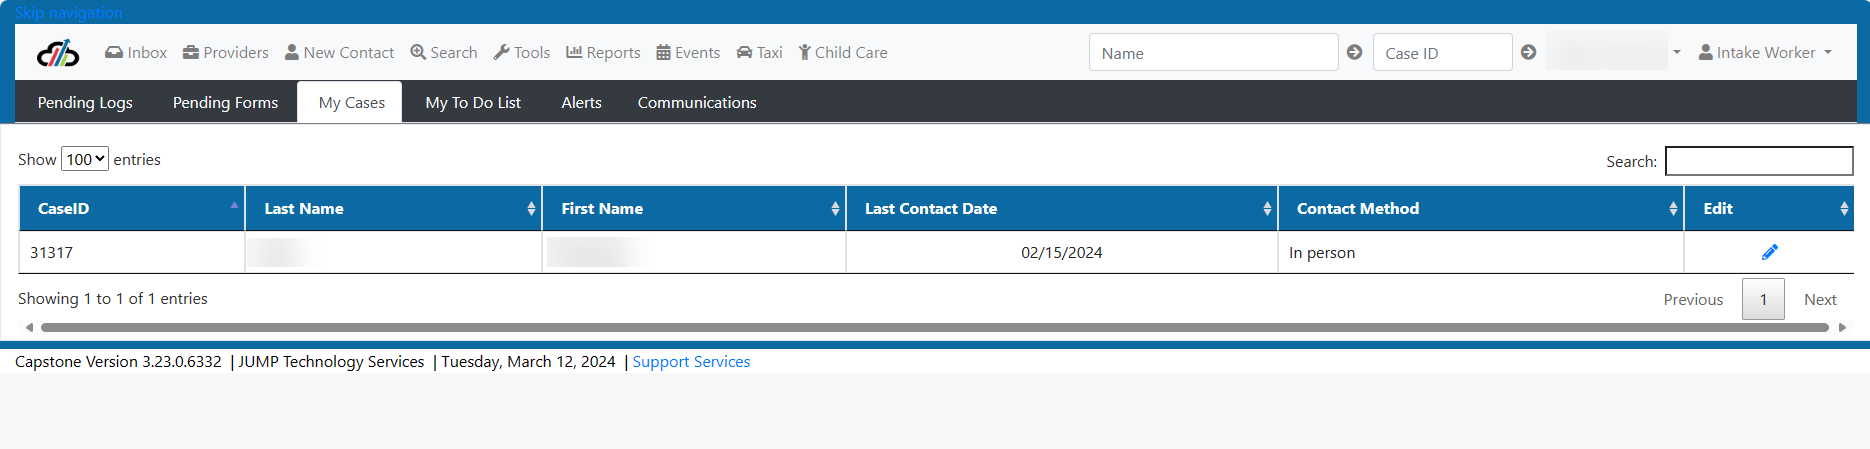
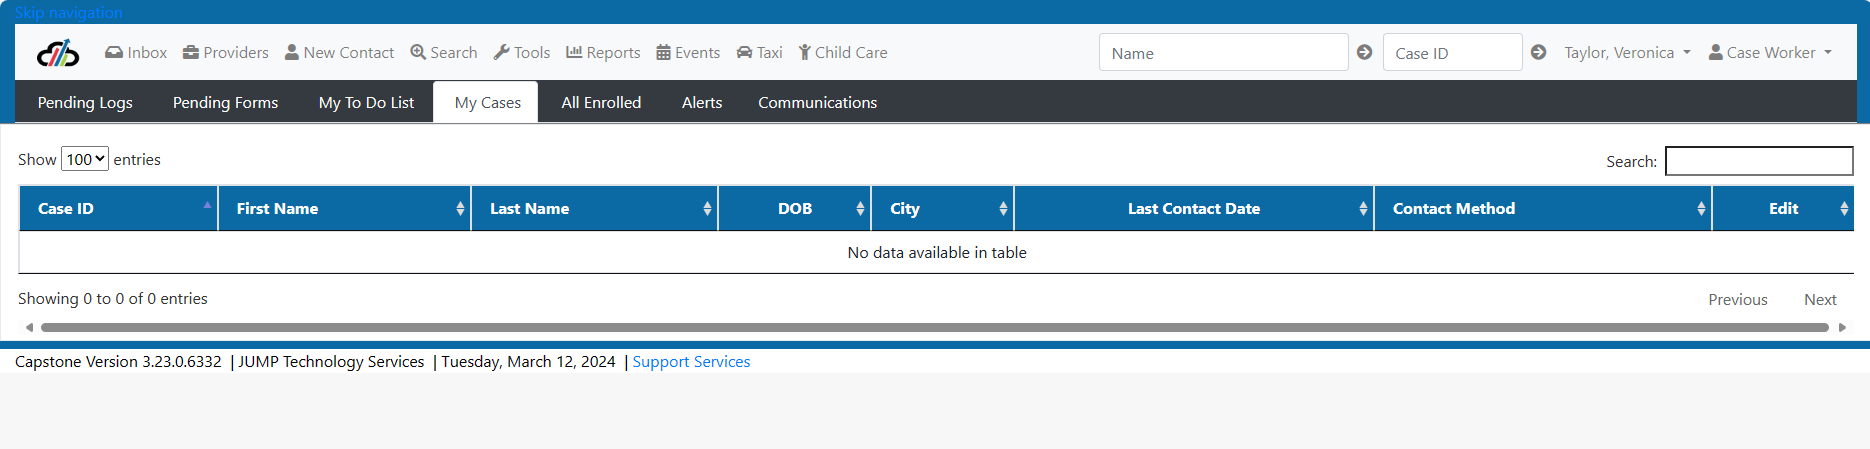
MY CASES – This is a list of all cases assigned to you. To edit the case, click the pencil on the right.
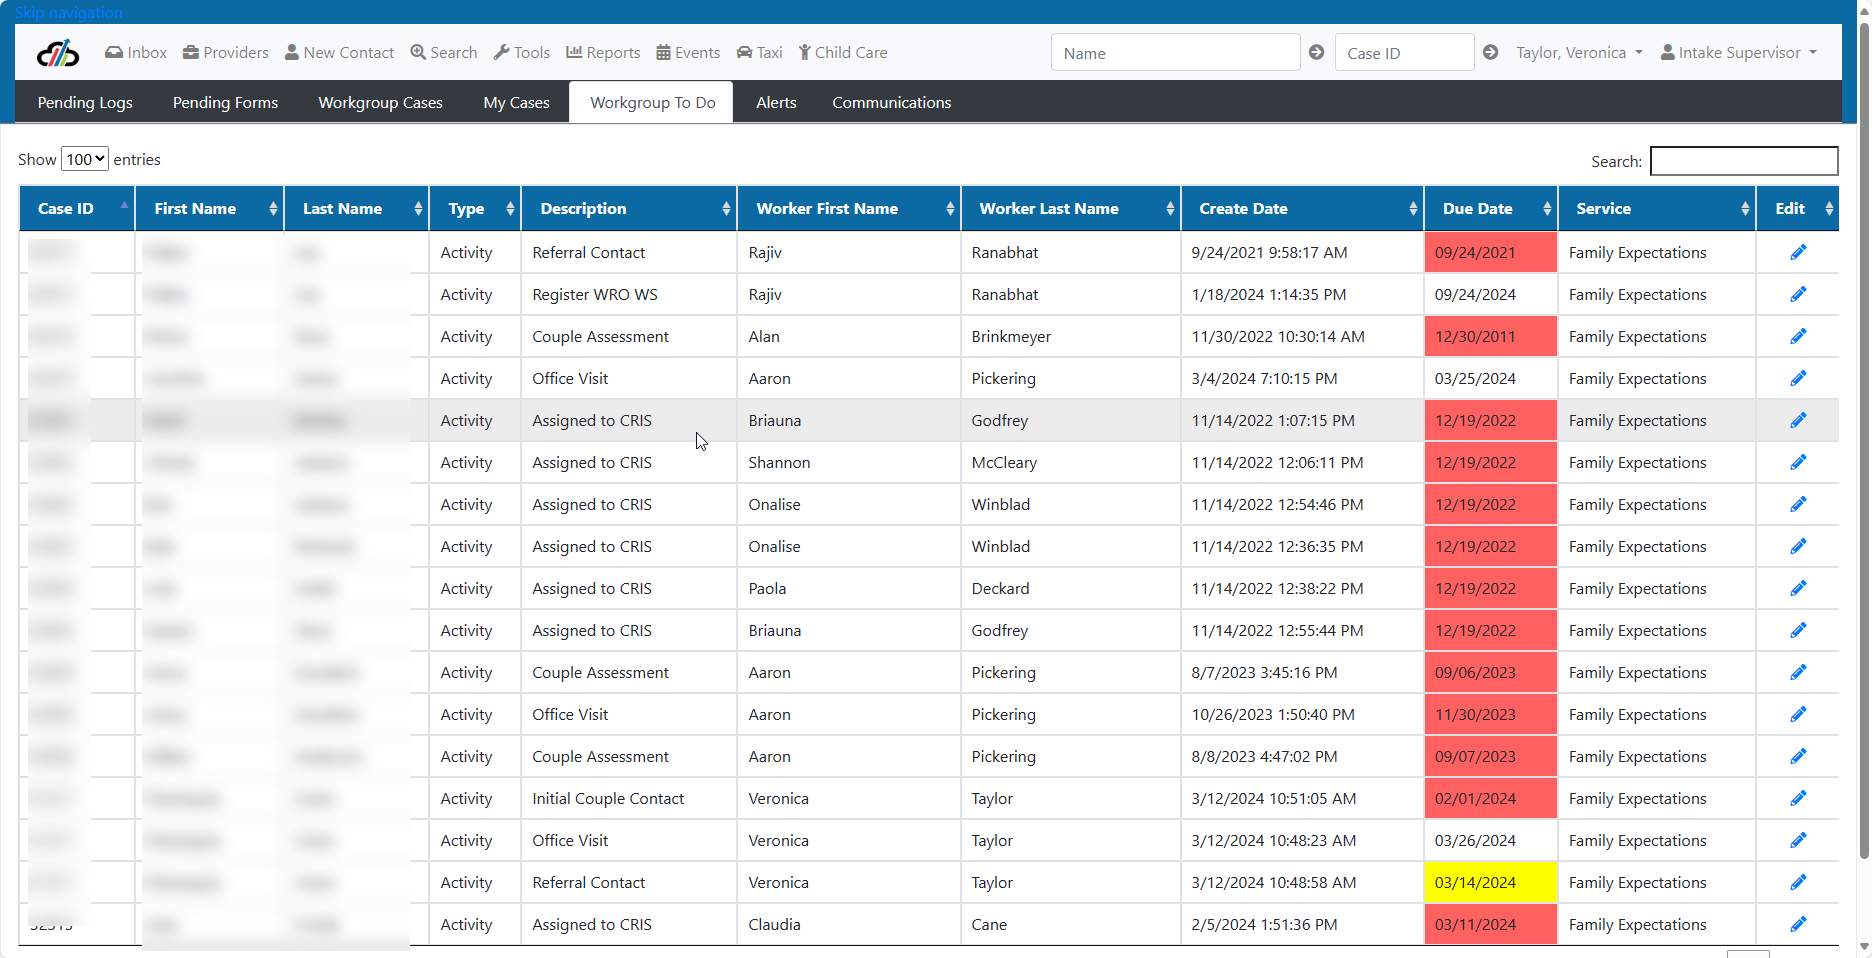
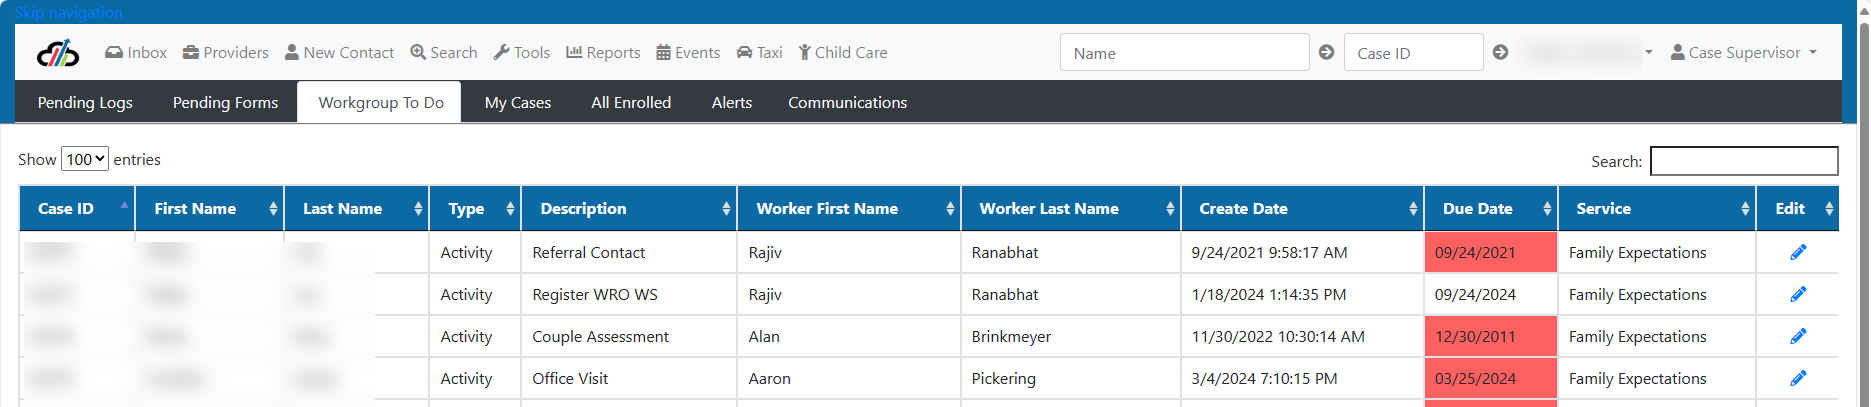
WORKGROUP TO DO (INTAKE SUPERVISOR ONLY) - This is a list of all the activities assigned to the workgroup.
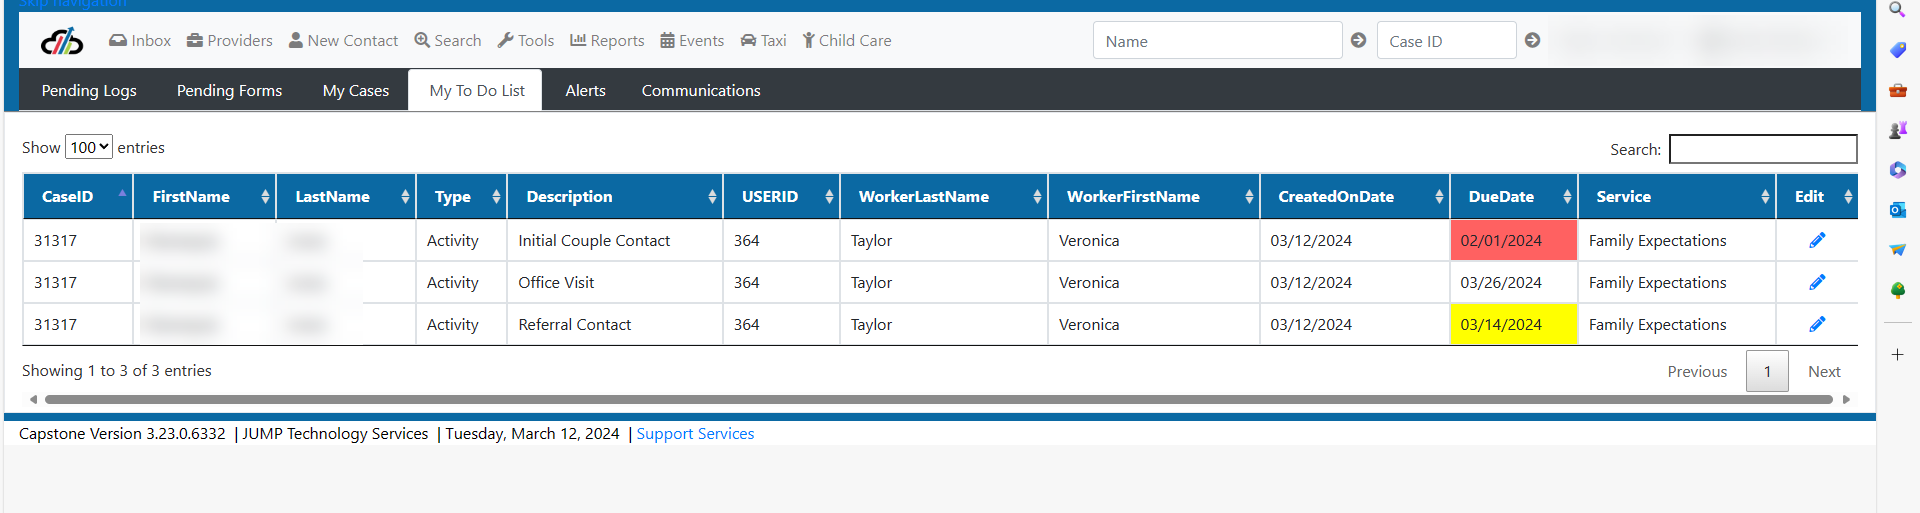
MY TO DO LIST – This is a list of all the activities that have not been completed or cancelled. To edit the activity, click the pencil on the right.
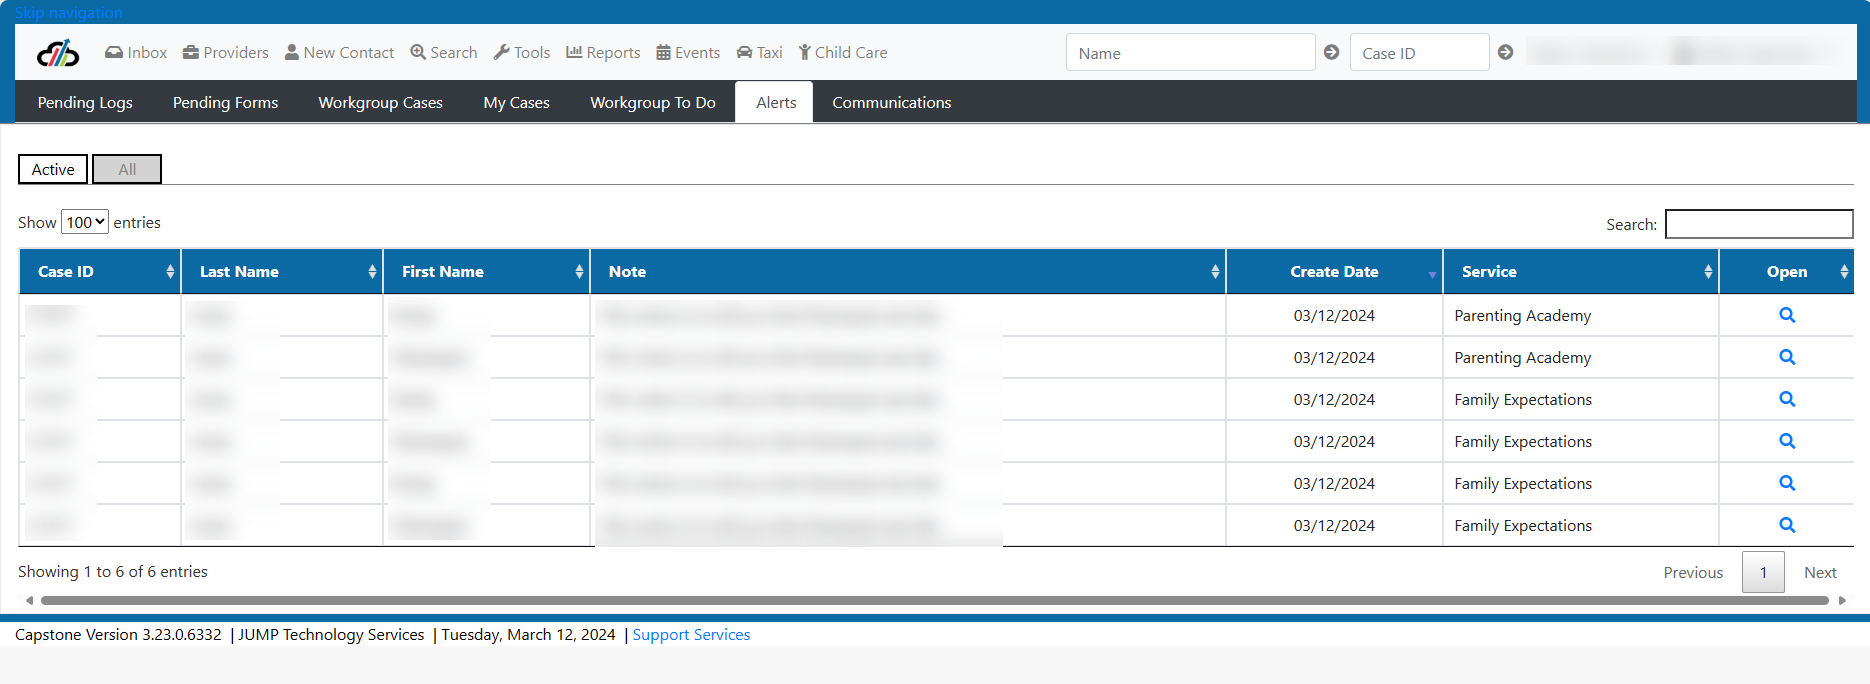
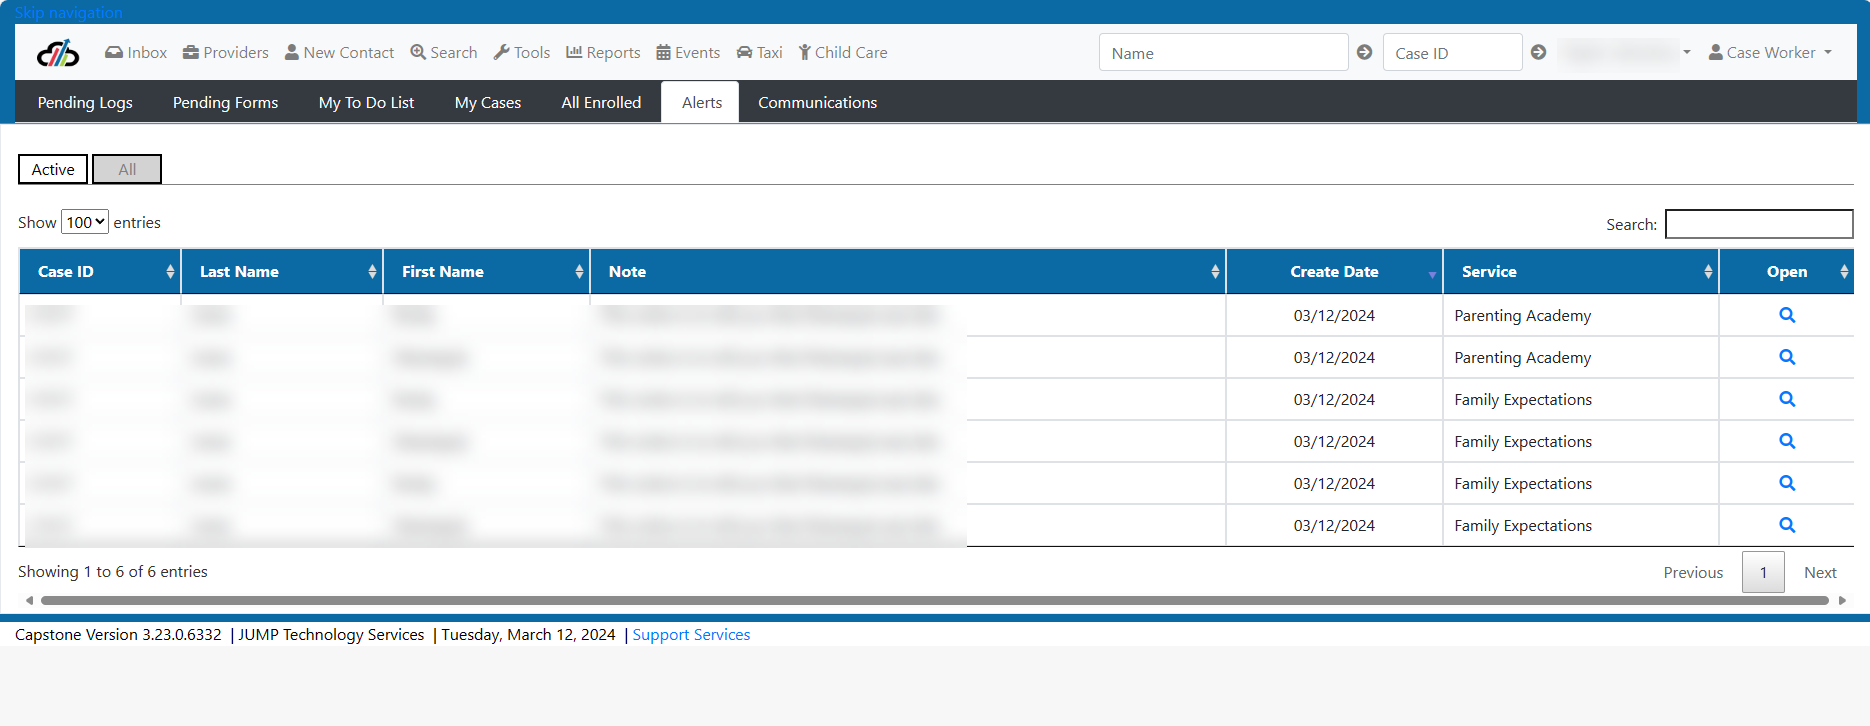
ALERTS – This is where you will see any alerts that have been sent to you or a work group that you are assigned from another user about a case or participant.
INTAKE SUPERVISOR TOOLS – The Tools tab is used by an Intake Supervisor to reassign cases. This is done by using the Case Reassignment tool.

To use the Case Reassignment tool, select the role that the previous worker has, the name of the previous worker and finally, the name of the worker that will be assigned these cases. Click the boxes next to the cases you wish to transfer. Click save at the top right to confirm changes.
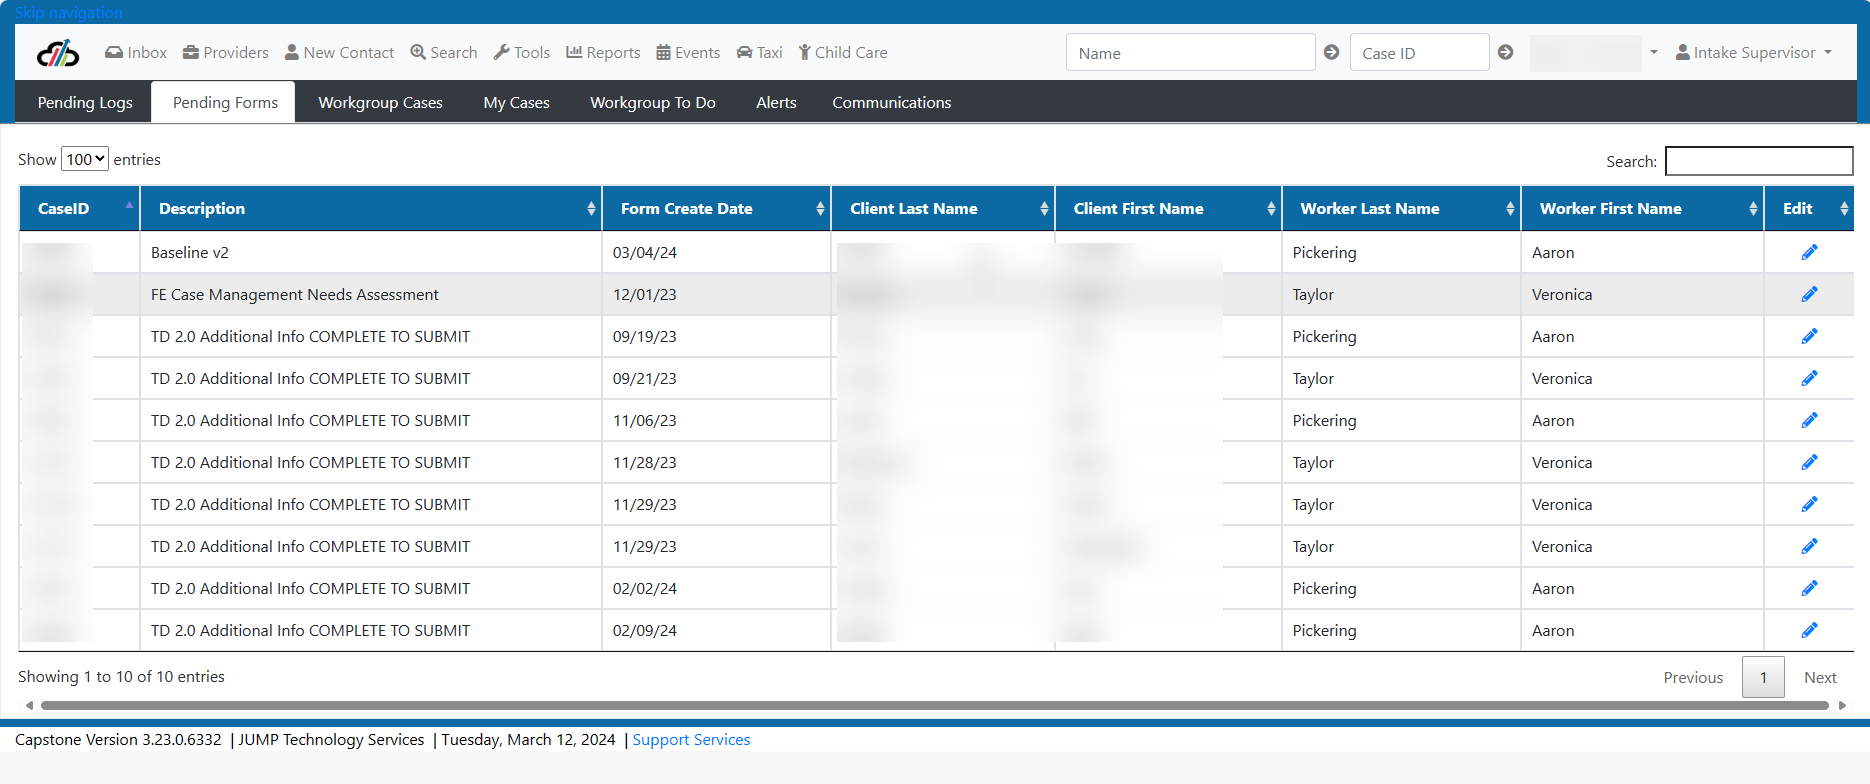
PENDING LOGS - This is where you will find Logs that are saved, but not finished. To edit or finish the log click the pencil on the right.
PENDING FORMS - This is where you will find pending assessments that are saved, but not finished. To edit or finish the log click the pencil on the right.
MY TO DO LIST – This is a list of all the activities that have not been completed or canceled. To edit the activity, click the pencil on the right.
MY CASES – This is a list of all the cases that you are assigned as the Case Worker.
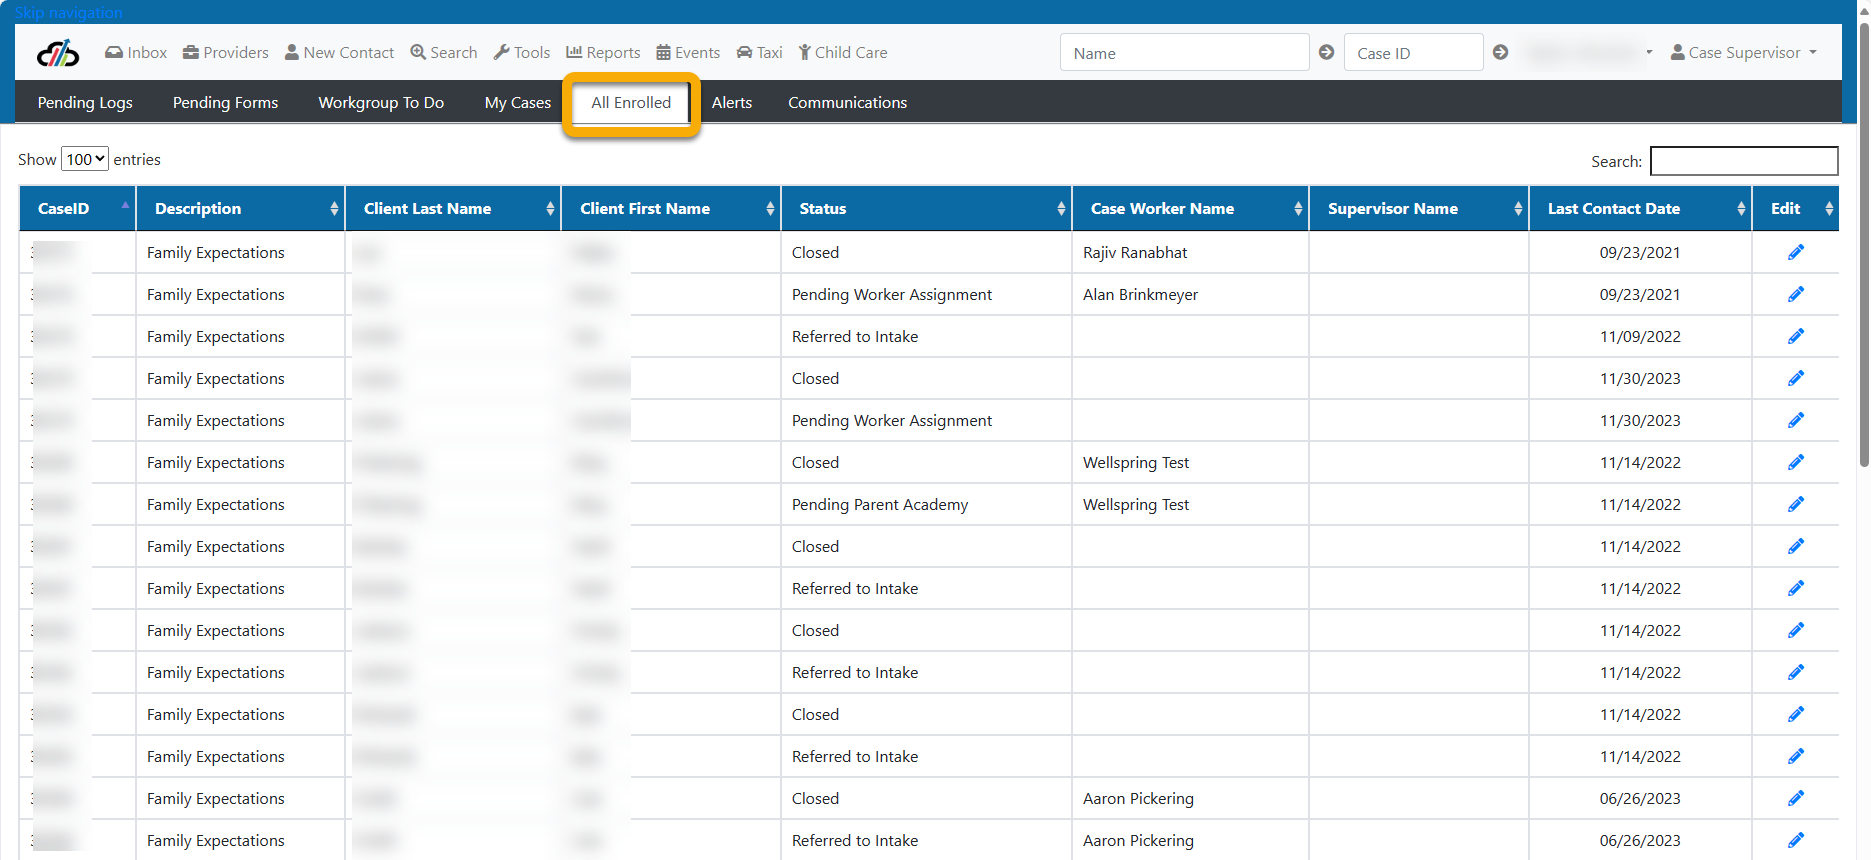
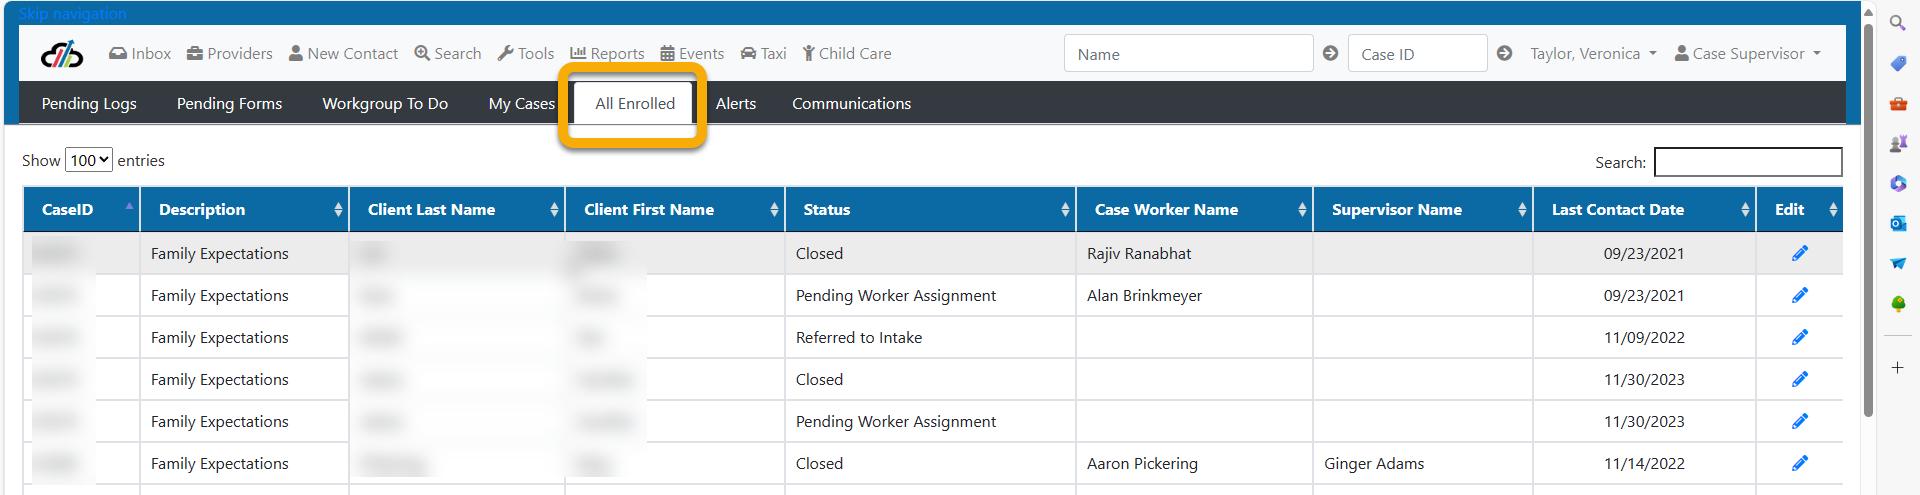
ALL ENROLLED – This is a list of all open cases.
ALERTS – This is where you will see any alerts that have been sent to you or a work group that you are assigned from another user about a case or participant.
PENDING LOGS – This is where you will find Logs that are saved, but not finished. To edit or finish the log click the pencil on the right.
PENDING FORMS - This is where you will find pending assessments that are saved, but not finished. To edit or finish the log click the pencil on the right.
WORKGROUP TO DO - This is a list of all the activities assigned to the workgroup.
MY CASES – This is a list of all the cases that you are assigned as the Case worker
ALL ENROLLED – This is a list of all open cases.
ALERTS - This is where you will see any alerts that have been sent to you or a work group that you are assigned from another user about a case or participant.
CASE SUPERVSIOR TOOLS– The Tools tab is used by Case Supervisors to reassign cases. This is done by using the Case Reassignment tool.
To use the Case Reassignment tool, select the role that the previous worker has, the name of the previous worker and finally, the name of the worker that will be assigned these cases. Click the boxes next to the cases you wish to transfer. Click save at the top right to confirm changes.

#NewAgency #NewProvider #ProviderContacts #NewResources #ServiceTree
#SearchResourceDirectory #ManageProviders #ProviderUpdateRequest
Provider Management
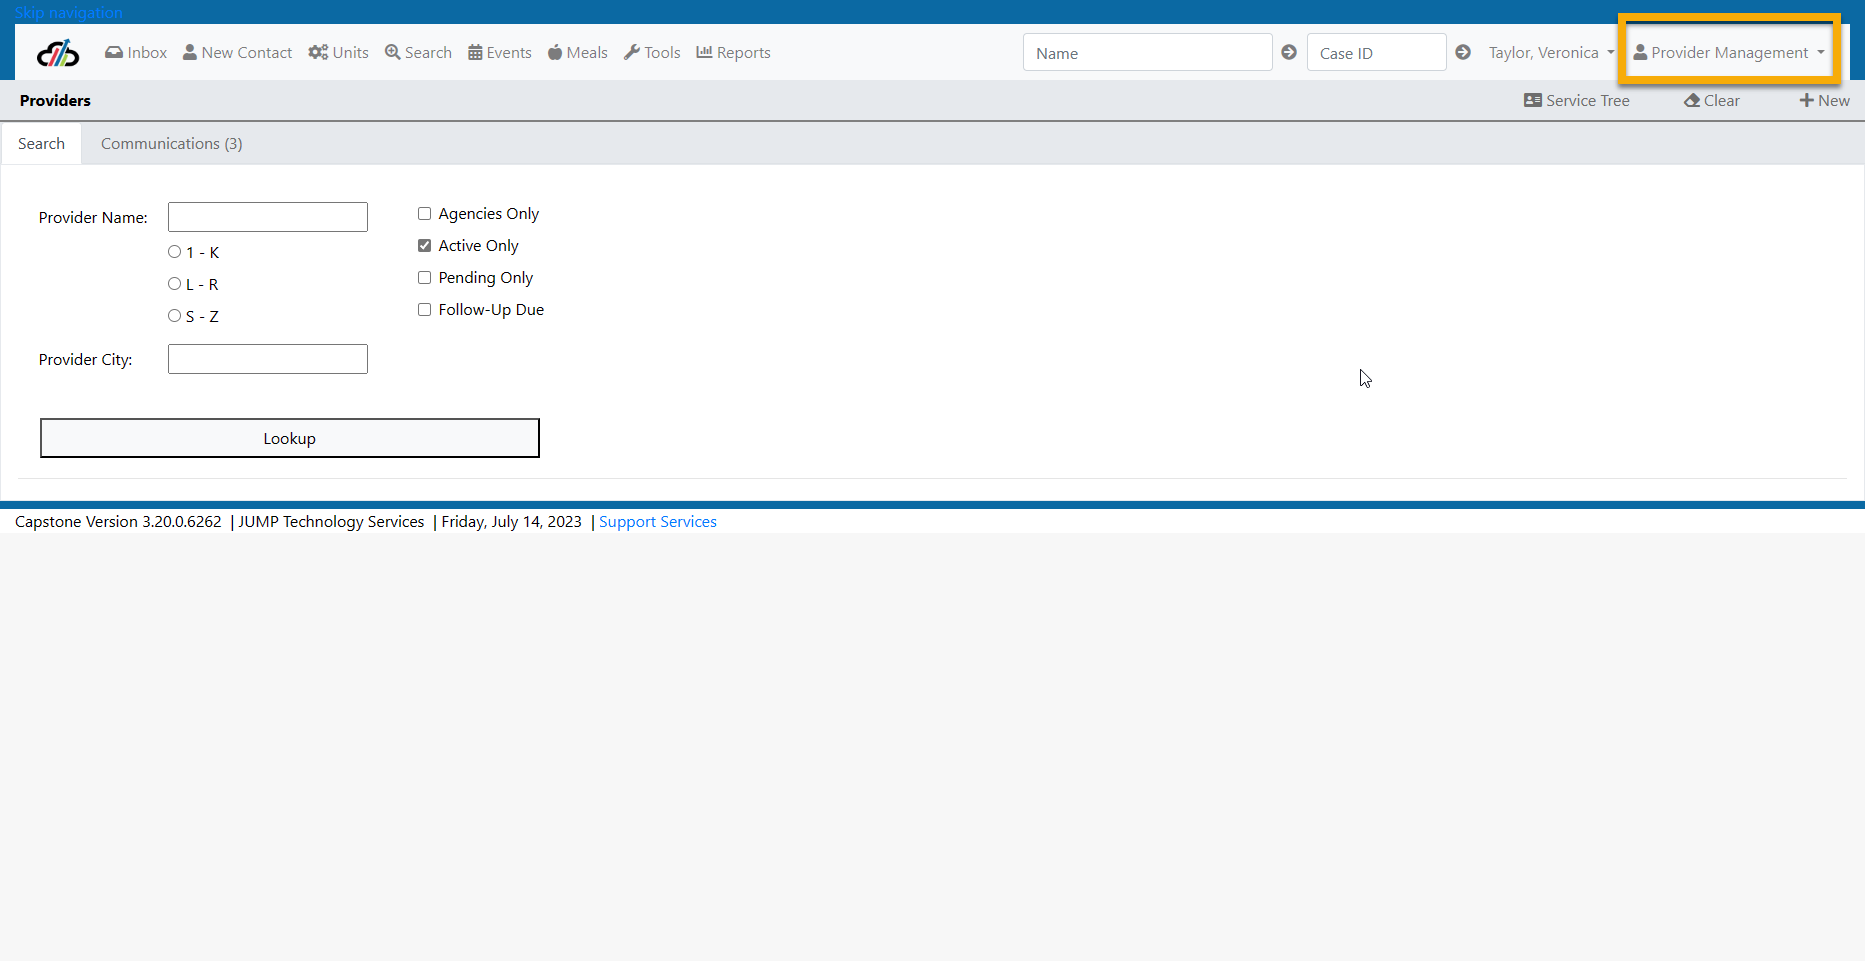
Who manages providers? Providers can be managed by the System Administrator Role or the Provider Management Role.
Provider Management Role
The Provider Management role is specific to Provider setup and management. The user with this role will provide setup support, communication, resource management.
Provider Management Role
Creating New Content Through the Provider Tab
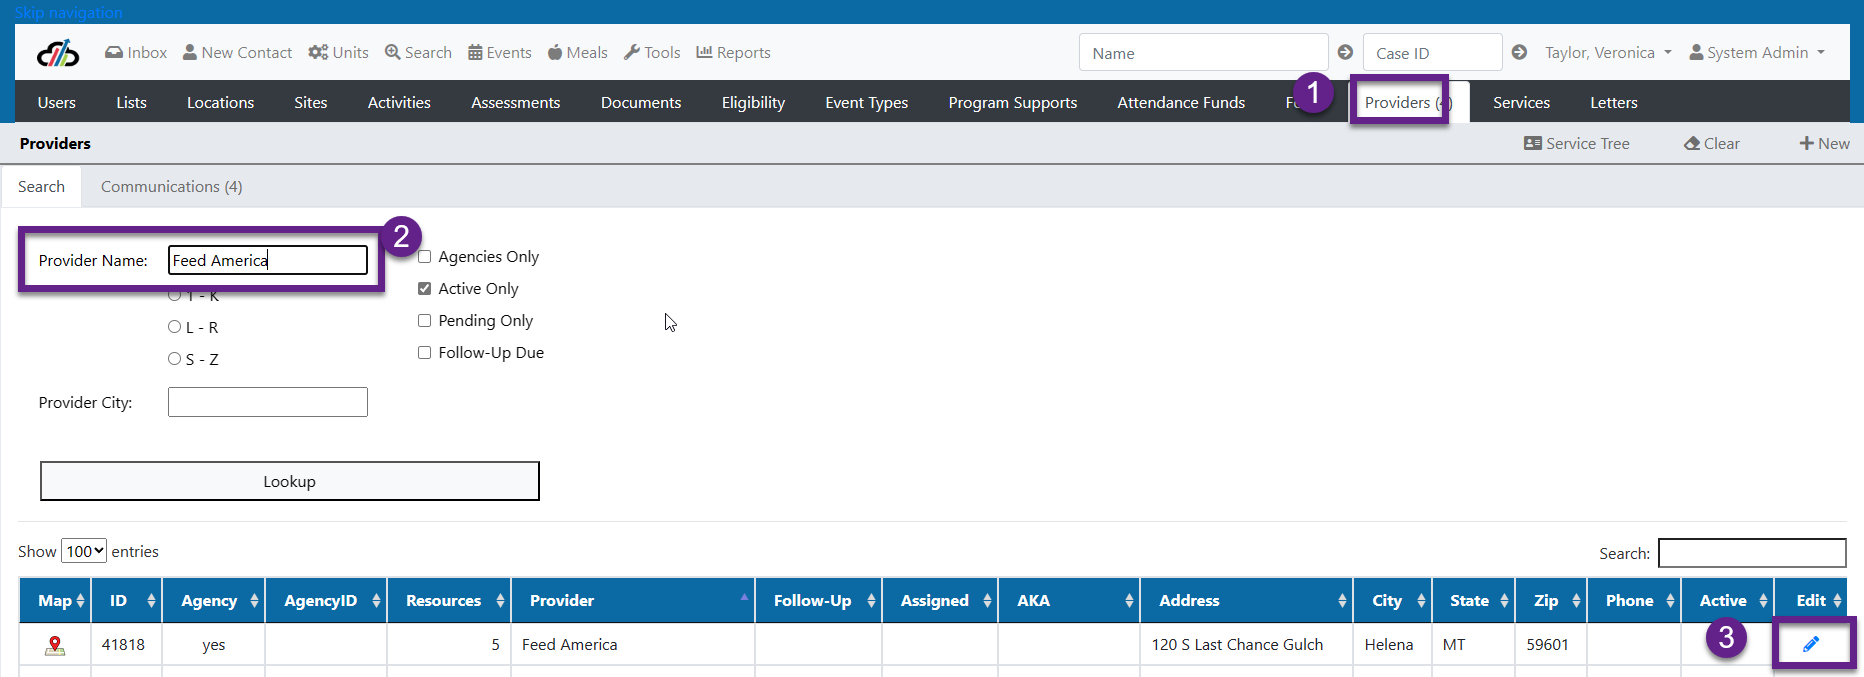
The first step in adding new content to the Provider Tab is establishing the Provider Agency also known as the Parent Organization.
Before you create a new Agency/Parent Organization
1. Search for the Agency by typing in the Provider Name or Provider City fields to ensure that the agency doesn’t already exist.
2. Use the filters to filter by Agencies Only, Active Only, Pending Only, and Follow-up Due. In this case we are filtering by Agency.
3. Click the Lookup button to find out of any Agencies exist. Some users prefer to do a search of Agency and then a search of Active.
4. If no Agency exists already select + New. This will begin your New Provider - In process flow where you will begin by adding information to the Provider General Screen
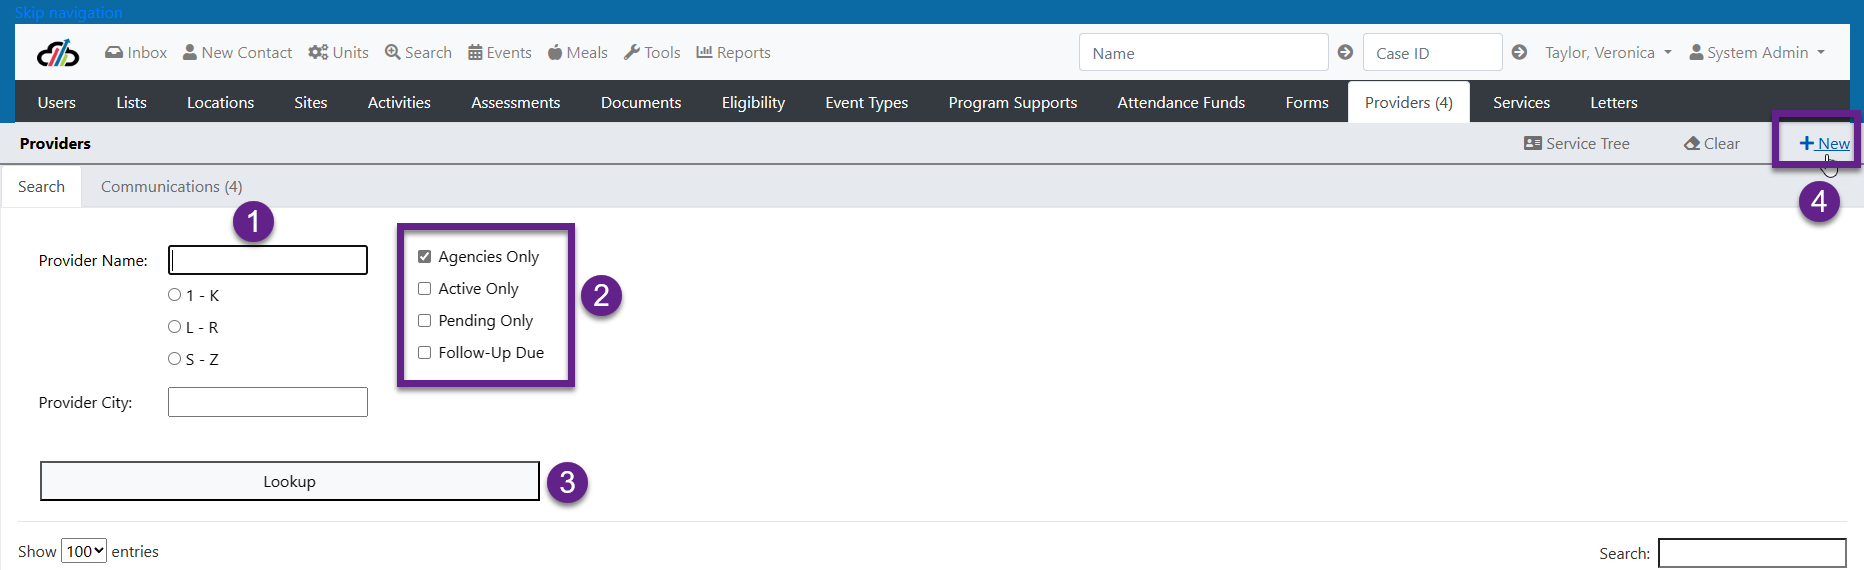
Provider - Agency Search
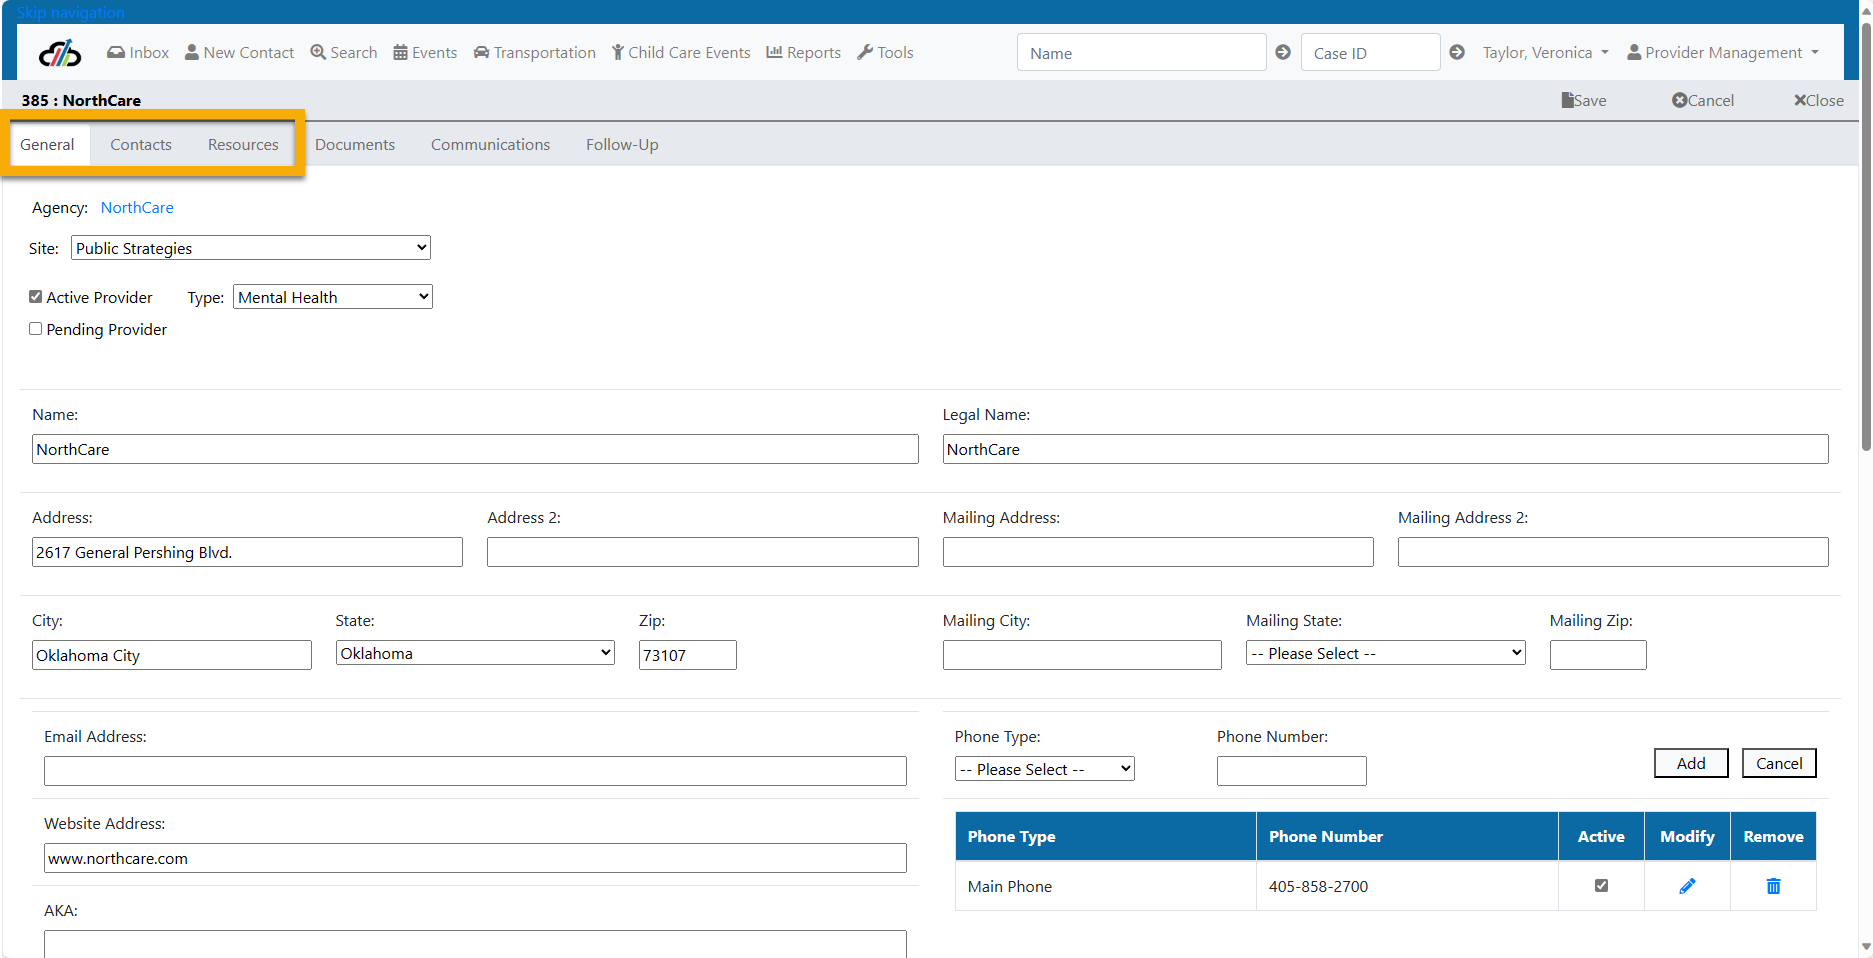
Entering Agency Information on Provider General Tab - For training purposes, the fields on this screen will be discussed in 3 Sections.
Section 1 – Agency Association to Program/Partner Site, Selecting Type and Making the Agency Active
- Select the Program/Partner Site to whom the Agency/Parent Organization is associated.
- Select Active Provider or Pending Provider
- Select the Type
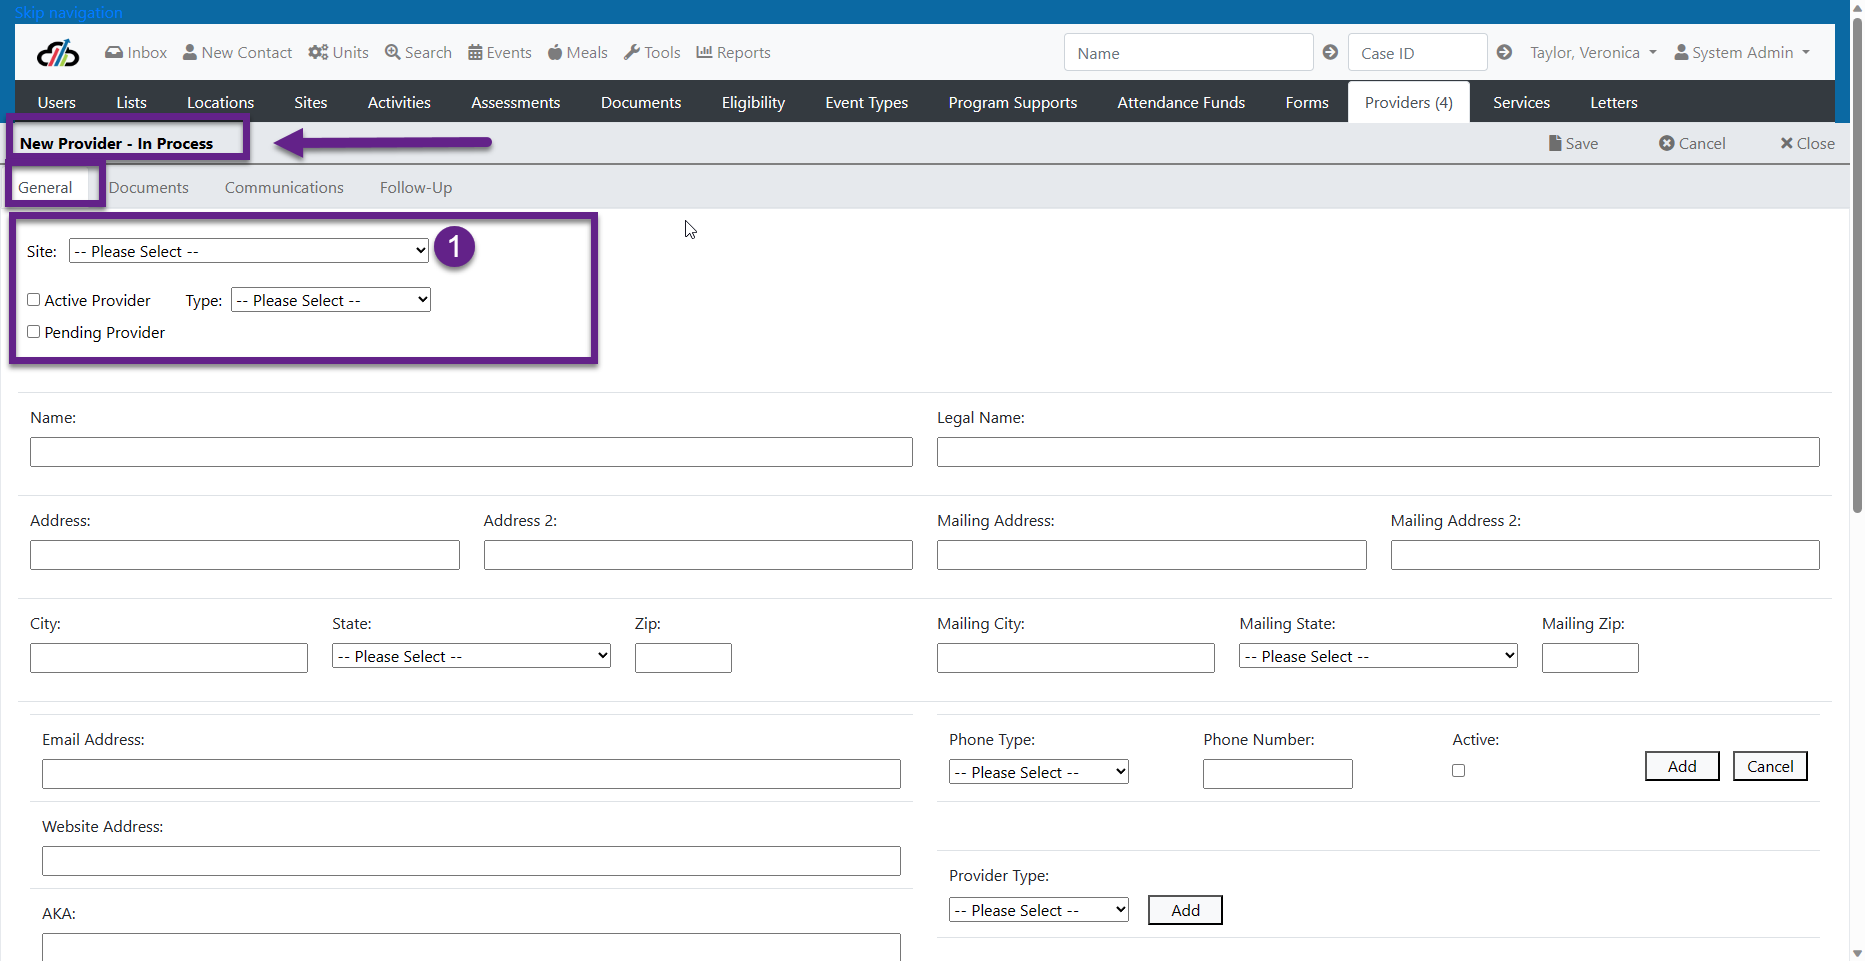
Provider General Tab - Section 1
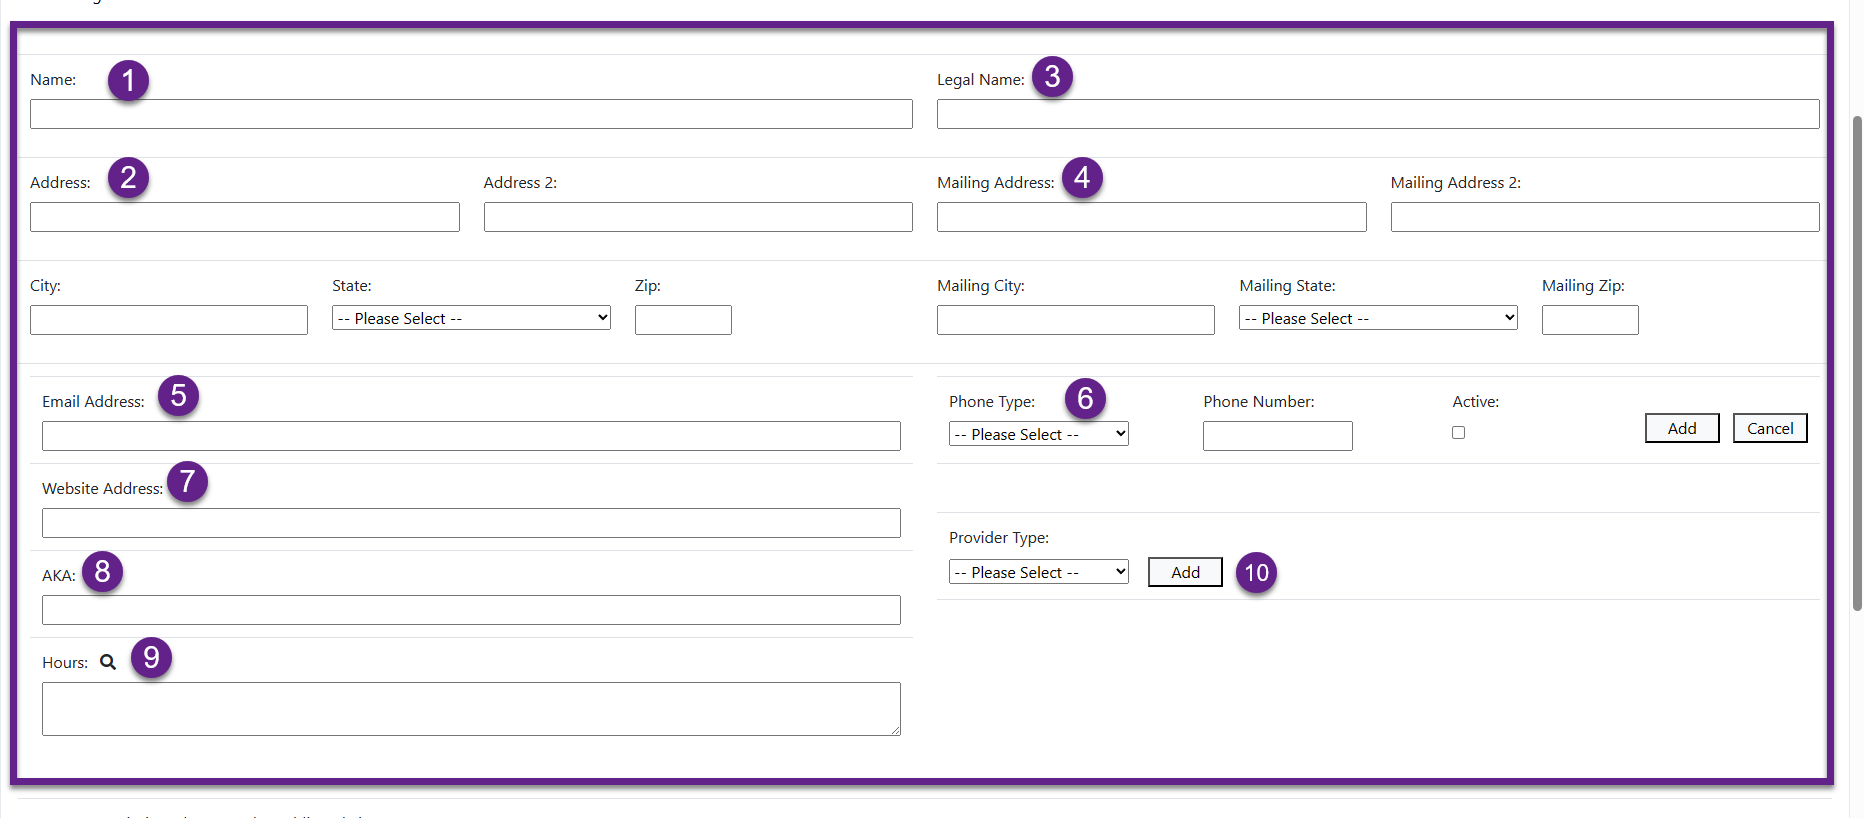
Section 2 – Agency demographic information
- Name field – this is the common business name.
- Address –
- Enter the location address
- Address 2 field is for the second part of an address such as apartment number or suite number
- City
- State
- Zip
- Legal Name – this is the legal name of the business. It is not always the same as the common business name.
- Mailing Address
- Enter the mailing address
- Mailing Address 2 field is for the second part of an address such as apartment number or suite number
- City
- State
- Zip
- Email Address
- Phone Type
- Use the drop down to select the phone type.
- Enter the phone number, including area code,
- mark the phone as Active.
- Select add to add this number to the phone grid. Only Active Numbers will show on the Public Website.
- Enter the Agency Website Address.
- AKA – Here you can add an additional Agency name for reference. For example, the YMCA may be referred to as “The Y”
- Hours – Enter the Agency hours of operation. If your System Admin has set up canned language you can use the spyglass to append the canned language.
- Select Provider Type from the dropdown and add to the Provider Type Grid.
Provider General Tab - Section 2
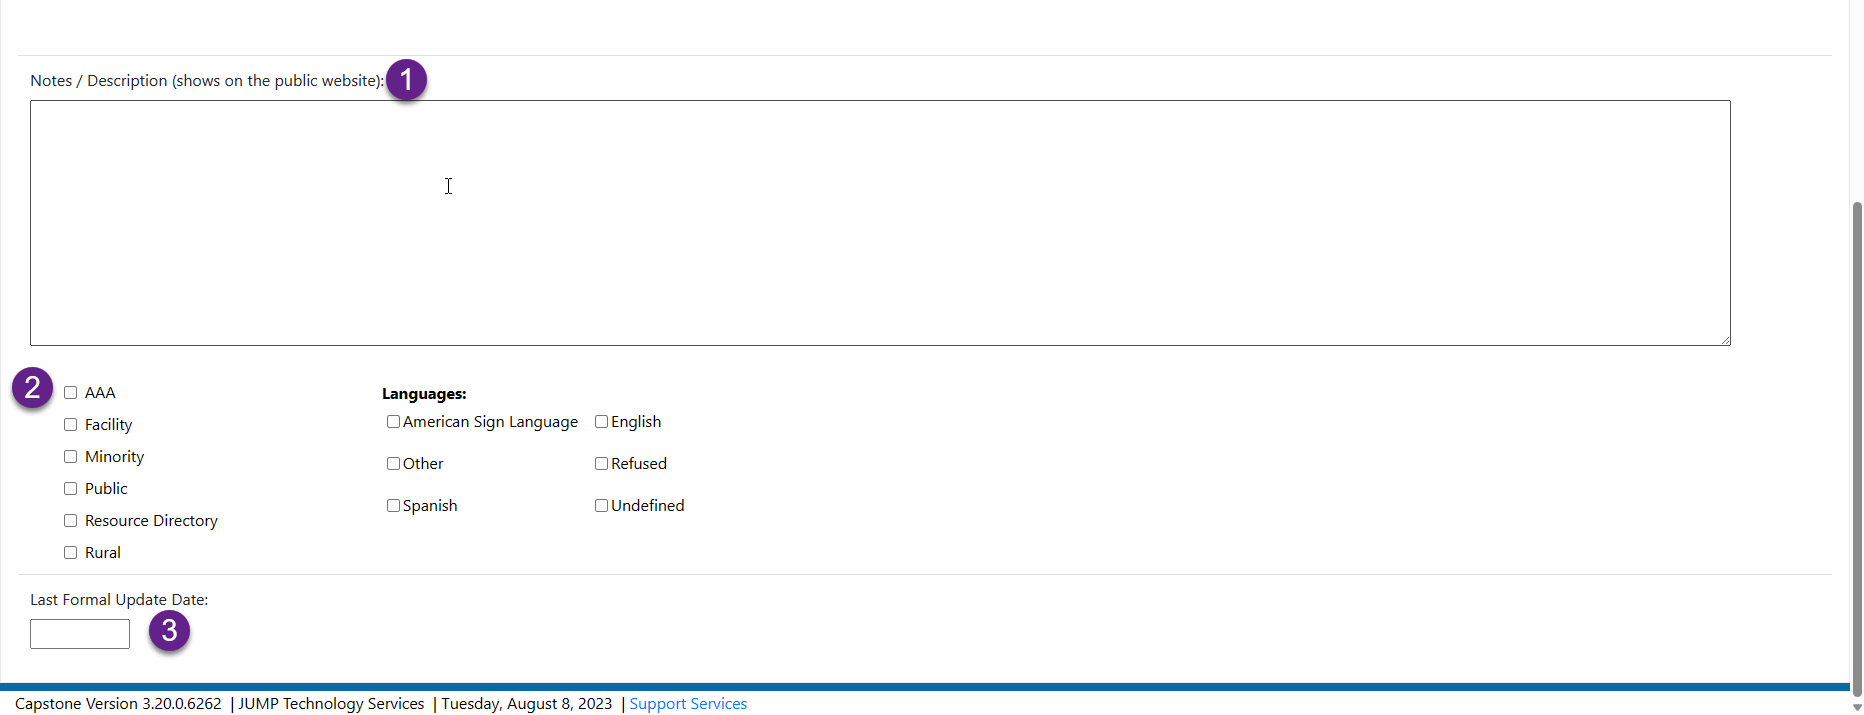
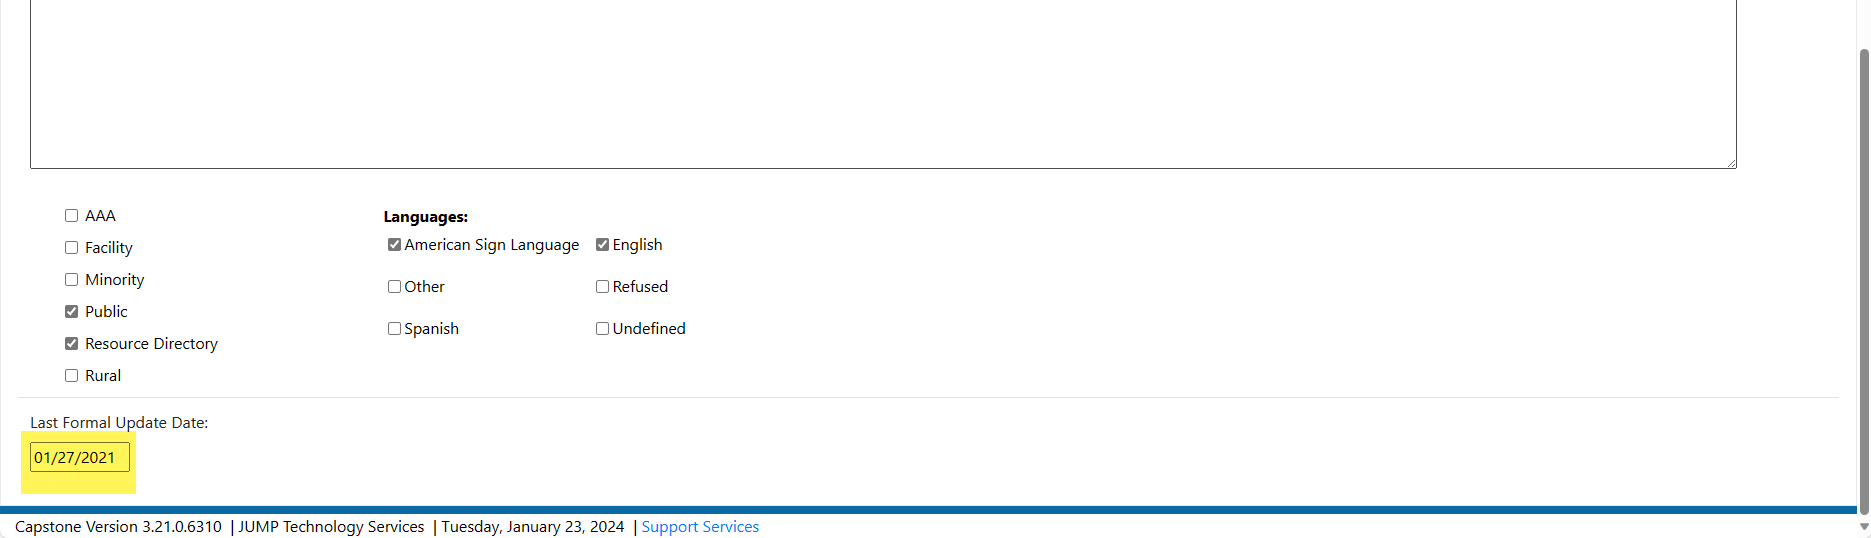
Section 3 - Notes/Description, Indicators and Last Formal Update Date
1. Notes/Description - Pertinent notes/desription abou the agency
2. Indicators - Select all that apply:
- Resource Directory (Select this indicator if you want the Agency to appear on the Capstone Internal Resource Directory)
- Rural
- Languages
3. Last Formal Update Date - It is important to update this field every time you update the Agency Provider Screen as it is used for reporting purposes.
Provider General Tab - Section 3
**Save
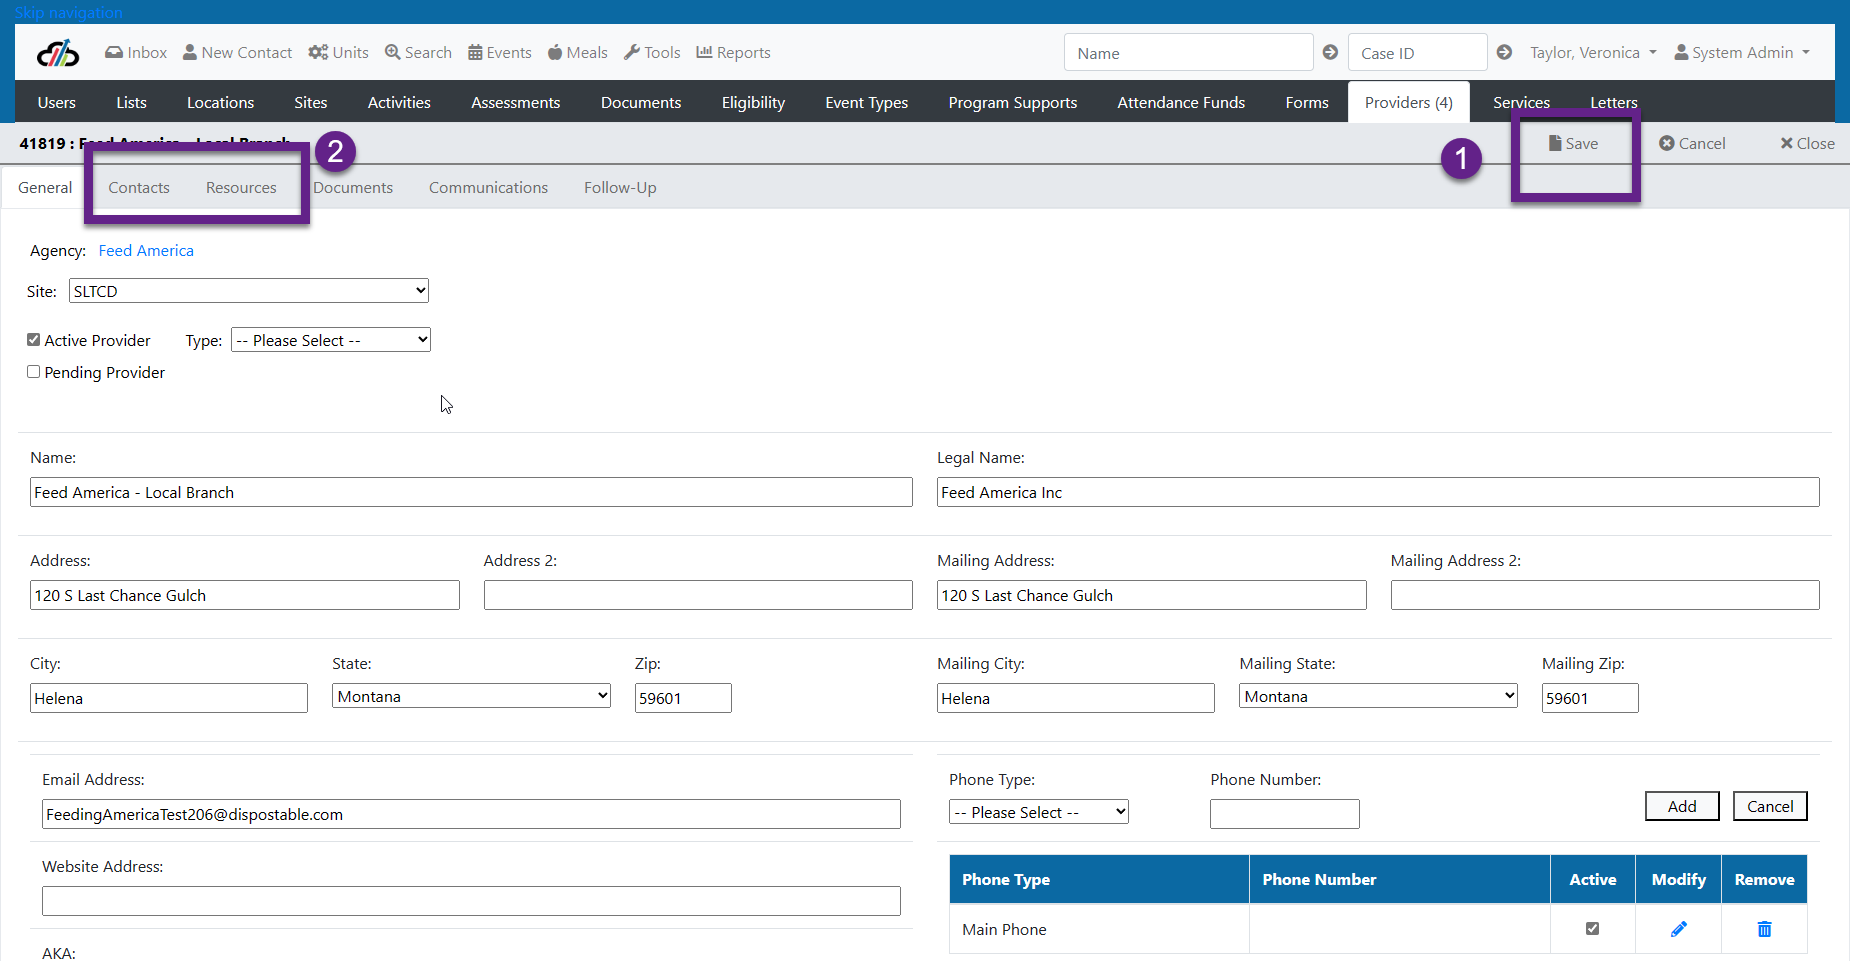
Once the Agency Provider General Screen has been saved, the Contacts, Resources, and Sites Tab (also known as location) will be available.

New Provider Site
Remember that the Provider Site is the location that provides the direct service to the consumer. The Provider (Location) Site is created from a tab located within the Agency and is associated to both the Agency/Organization and the Program/Partner Site.
If you have just created the Agency/Organization and are still on the Agency Provider General Screen you will select the Sites tab. Otherwise, you will:
- Navigate to the Providers tab
- Use the Search to search for the Agency by Provider Name or Provider City
- Edit the Agency by clicking the pencil icon
4. Select the Sites tab
5. Select + New

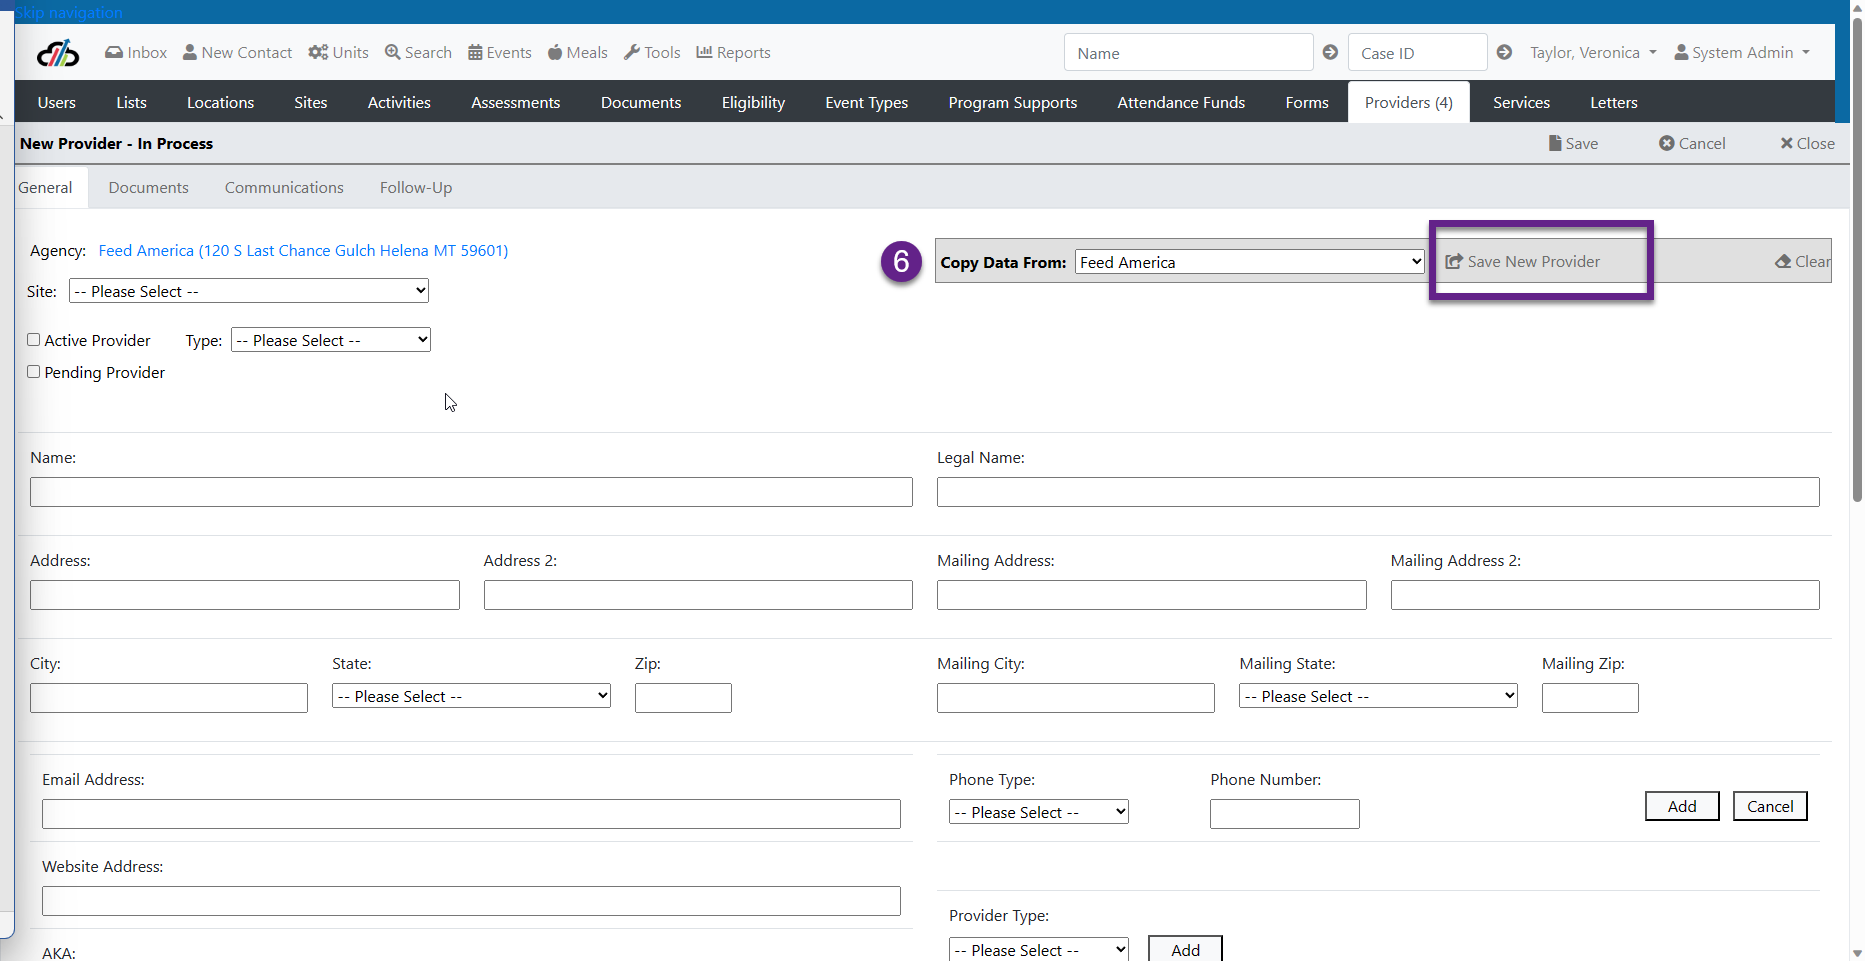
6. You can copy the data from the agency by selecting Save New Provider n the Copy Data From box
7. Complete the information needed on the Provider General Screen
Section 1 – Adding Provider Site Association to Program/Partner Site, Selecting Type and Making the Agency Active
- Select the Program/Partner Site to whom the Provider Site is associated.
- Select Active Provider
- Select the Type
Section 2 – Adding Provider Site demographic information
- Name field – this is the common business name. This is the name which will show on the Resource Directory and Public Website if these items are selected in Section 3.
- Address –
- Enter the site address (This address will show on the Internal Resource Directory and the Public Website if these items are selected in Section 3)
- Address 2 field is for the second part of an address such as apartment number or suite number
- City
- State
- Zip
- Legal Name – this is the legal name of the business. It is not always the same as the common business name.
- Mailing Address
- Enter the mailing address (This address will show on the Internal Resource Directory)
- Mailing Address 2 field is for the second part of an address such as apartment number or suite number
- City
- State
- Zip
- Email Address
- Phone Type
- Use the drop down to select the phone type.
- Enter the phone number, including area code,
- mark the phone as Active.
- Select add to add this number to the phone grid.
- Enter the Agency Website Address.
- AKA – Here you can add an additional Agency name for reference. For example, the YMCA may be referred to as “The Y”
- Hours – Enter the Agency hours of operation. If your System Admin has set up canned language you can use the spyglass to append the canned language.
- Select Provider Type from the dropdown and add to the Provider Type Grid.
Section 3 - Notes/Description, Indicators and Last Formal Update Date
1. Notes/Description - Here you will enter additional information that you want to see on the Public Site. Entering information in this field helps with ranking on the Public Site.
2. Indicators - Select all that apply:
- Resource Directory (Select this indicator if you want the Agency to appear on the Capstone Internal Resource Directory)
- Rural
- Languages
3. Last Formal Update Date - It is important to update this field every time you update the Agency Provider Screen as it is used for reporting purposes.
**Save - When you save the Provider Site ; Contacts and Resources are then available for you to utilize.
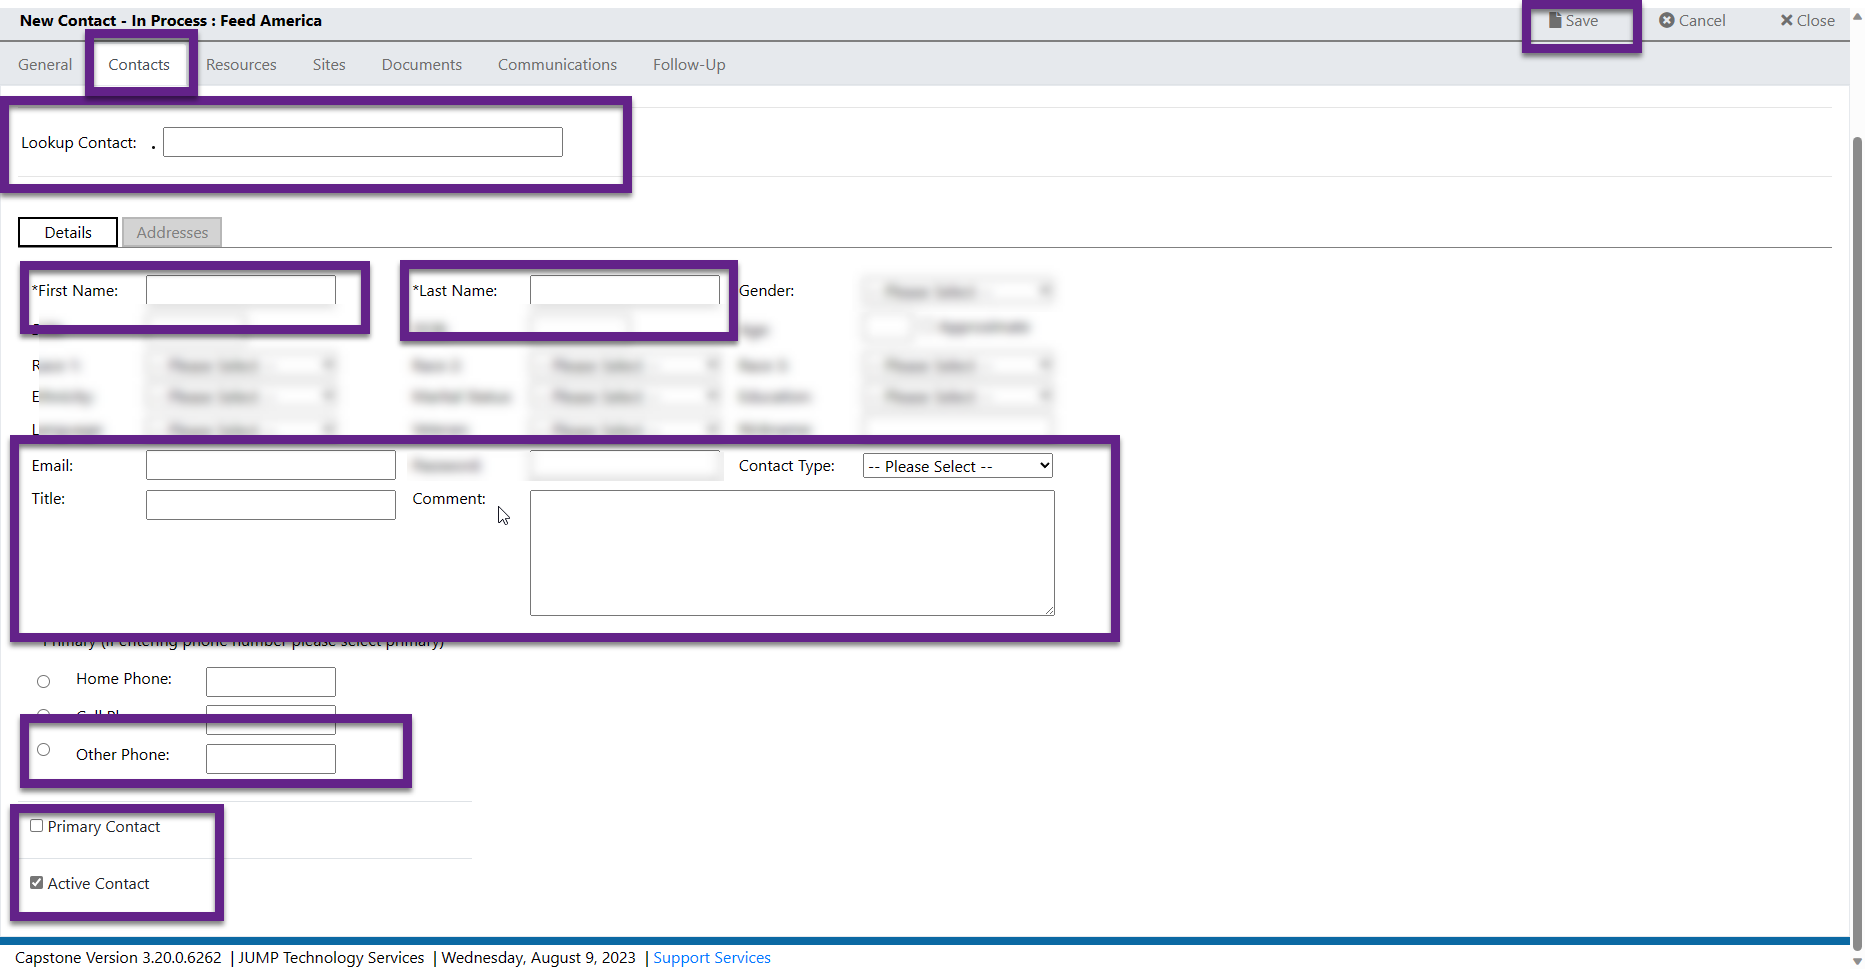
1.Navigate to the Provider Contacts and select +New
2. Search for the contact by typing the Contact Name in the Lookup Field.
2. Fill in
- Contact First Name
- Contact Last Name
- Email
- Contact Type
- Title
- Comment (if any additional information about this contact is needed)
- Primary Phone Number - Most customers put this in the Other Phone field
- Select Primary Contact
- Active Contact - This indicator tells the system that the contact is active.
3. Save
Also please note that there are other fields on this screen that do not pertain to your Provider Contact. Most customers only enter the information necessary to capture the basic Provider Contact Information.
Provider Contact
1. Navigate to the Resources Tab within the Agency or Provider Location
2. Enter a Keyword and select Find
3. Use the search box to hone in on resource descriptions that best fit the Provider Services
4. Select the Resources that best fit the Provider service (s)
5. Save the selected Resources

- The list of Resources comes from 211 Taxonomy.
Service Tree and Resource Directory Search (Internal to Capstone)
1. Select the Provider Tab (See Service Tree Screenshot)
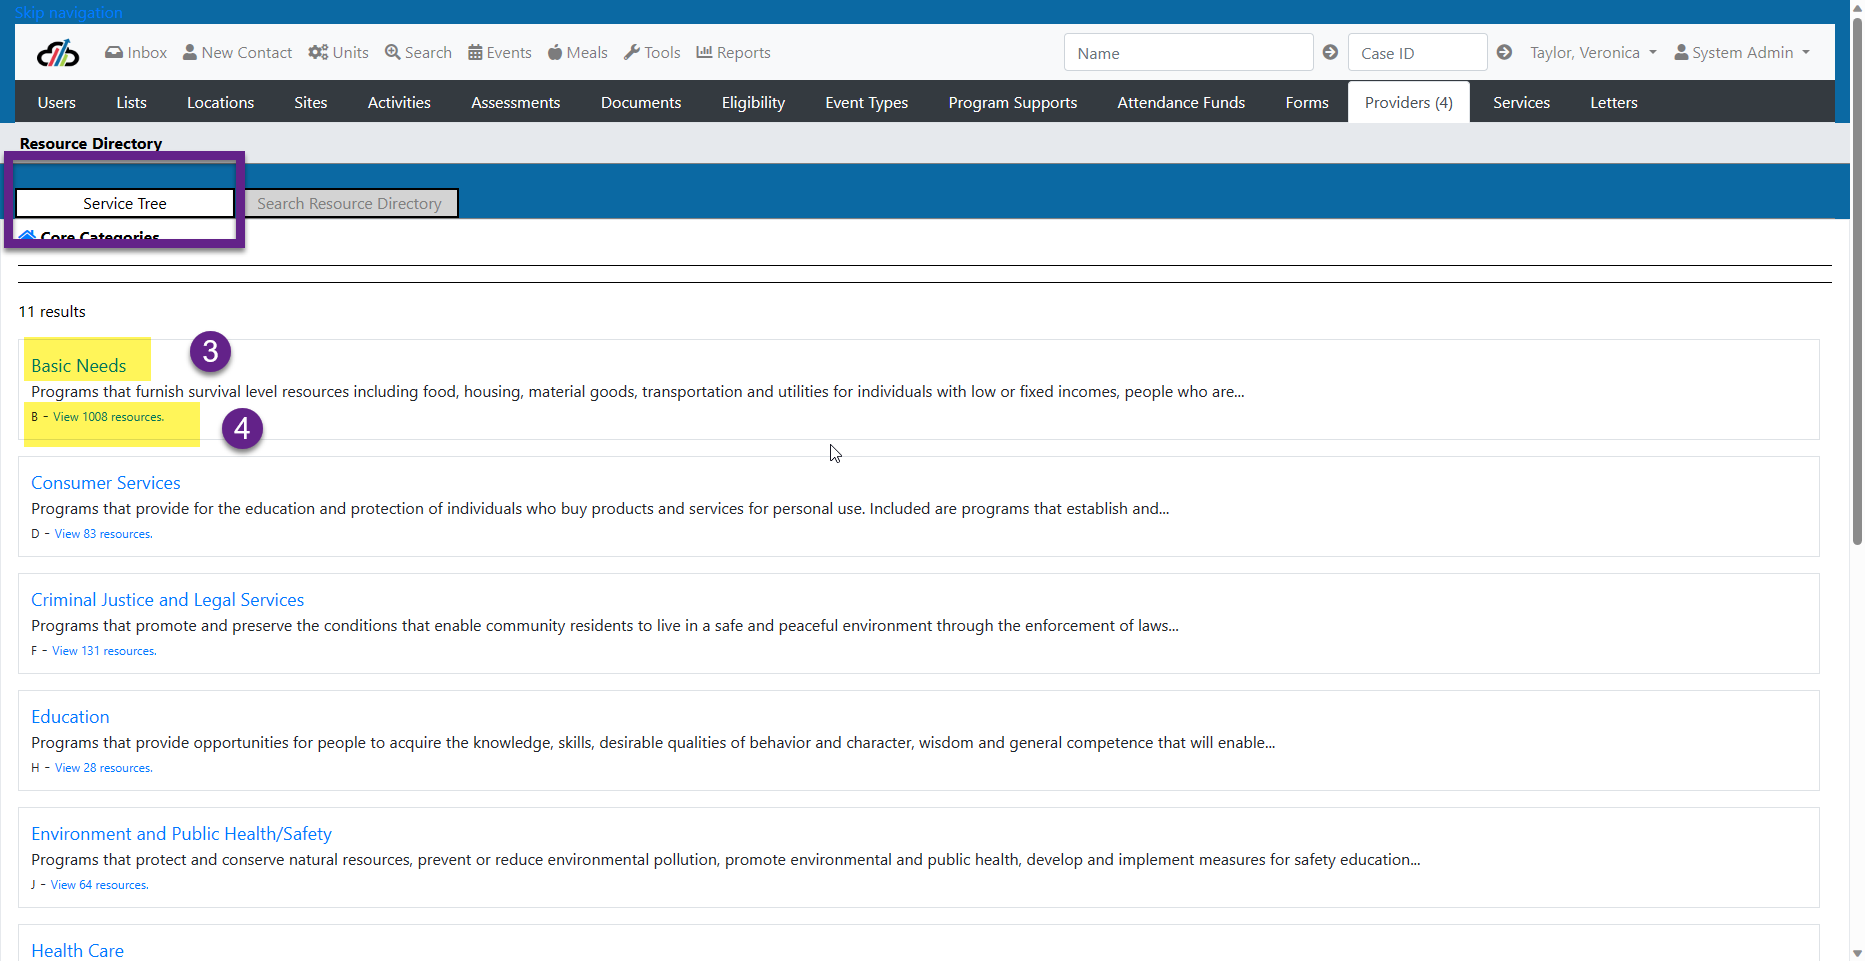
2. Select the Service Tree link - This will open up the Resource Directory. (See Service Tree Screenshot)
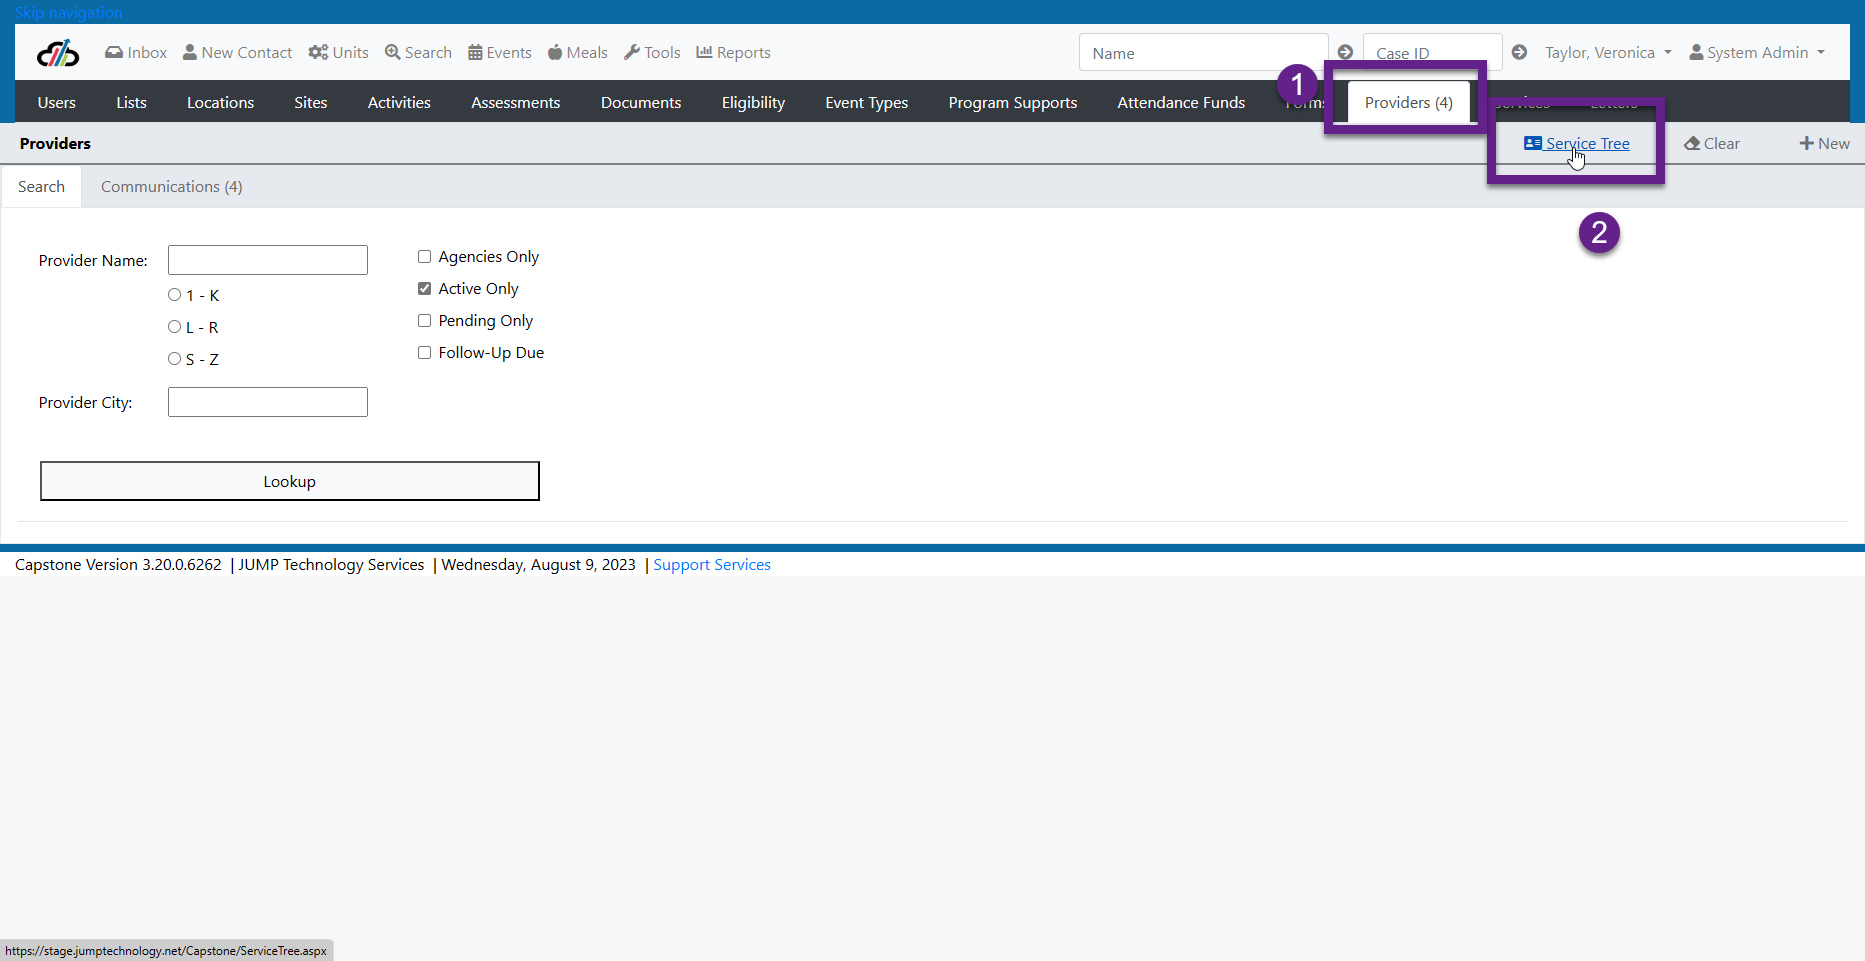
3. From the Service Tree Tab within the Resource Directory you can select a service to see the Core Services and the "branched" groups. (See Service Tree Core Services Screenshot)
4. Select the Service Code View to see details and the different providers who offer that service. (See Service Tree Core Services Screenshot)
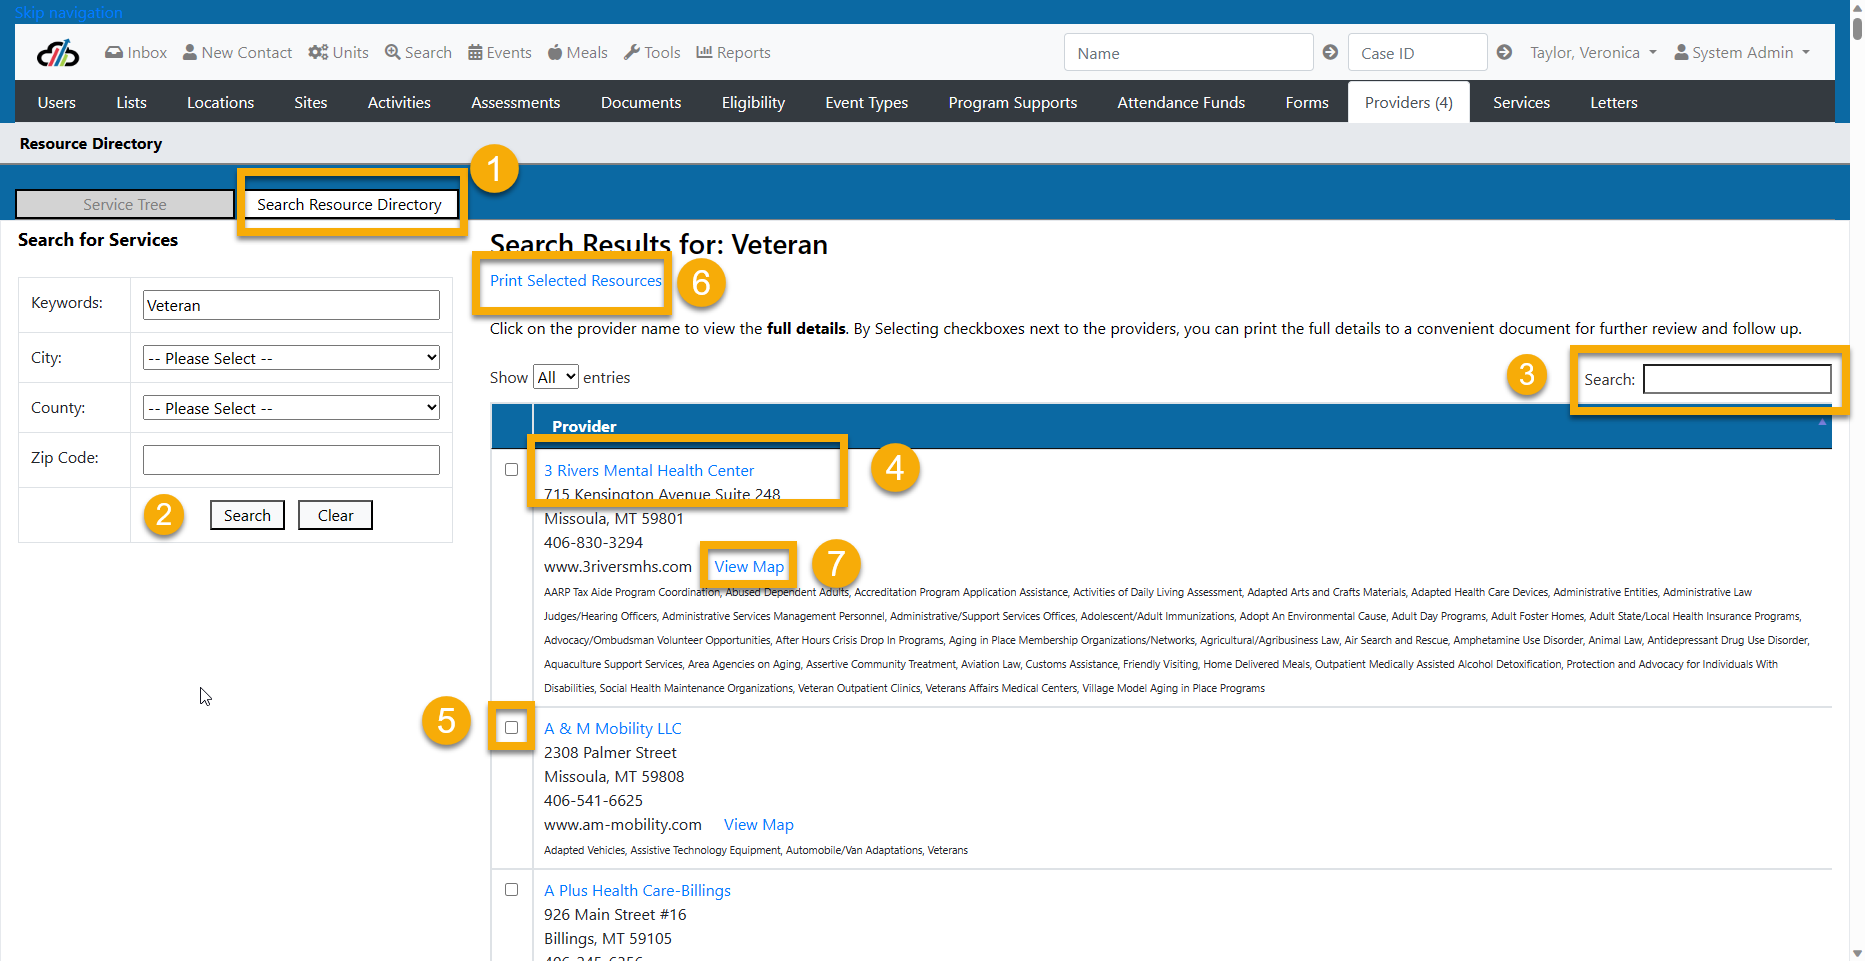
1. Select the Search Resource Directory Tab
2. You can search by Keyword, City, County or Zip.
3. Refine your search by entering information in the search field
4. Click on the Provider name to view the full details.
5. Select the Providers you would like to print
6. Print Selected Resources
7. View Provider on Google Maps by selecting the View Map link
- Select the Providers tab
- Use the Search to search for the provider by Provider Name or Provider City
- Select the Provider you are reviewing
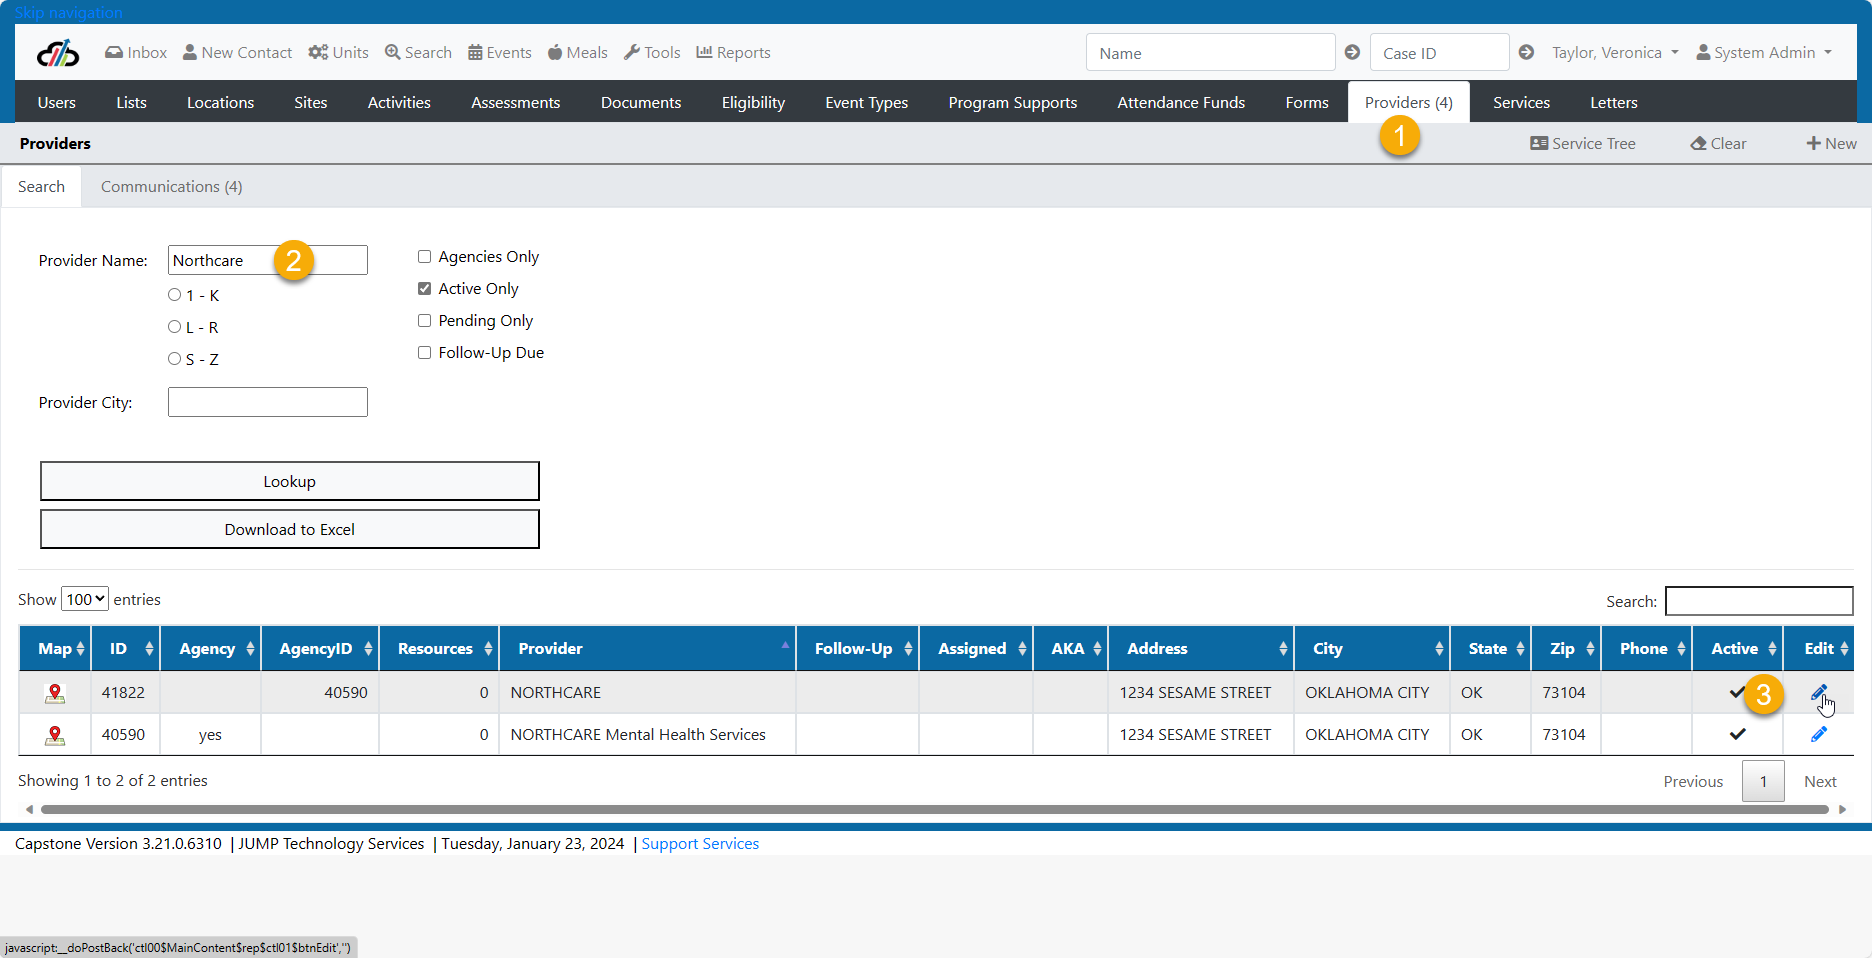
- You can return to the agency by selecting the Agency link at the top of the General, Contacts, or Resources tabs. Note: The Agency is sometimes called the Organization or Parent Provider.
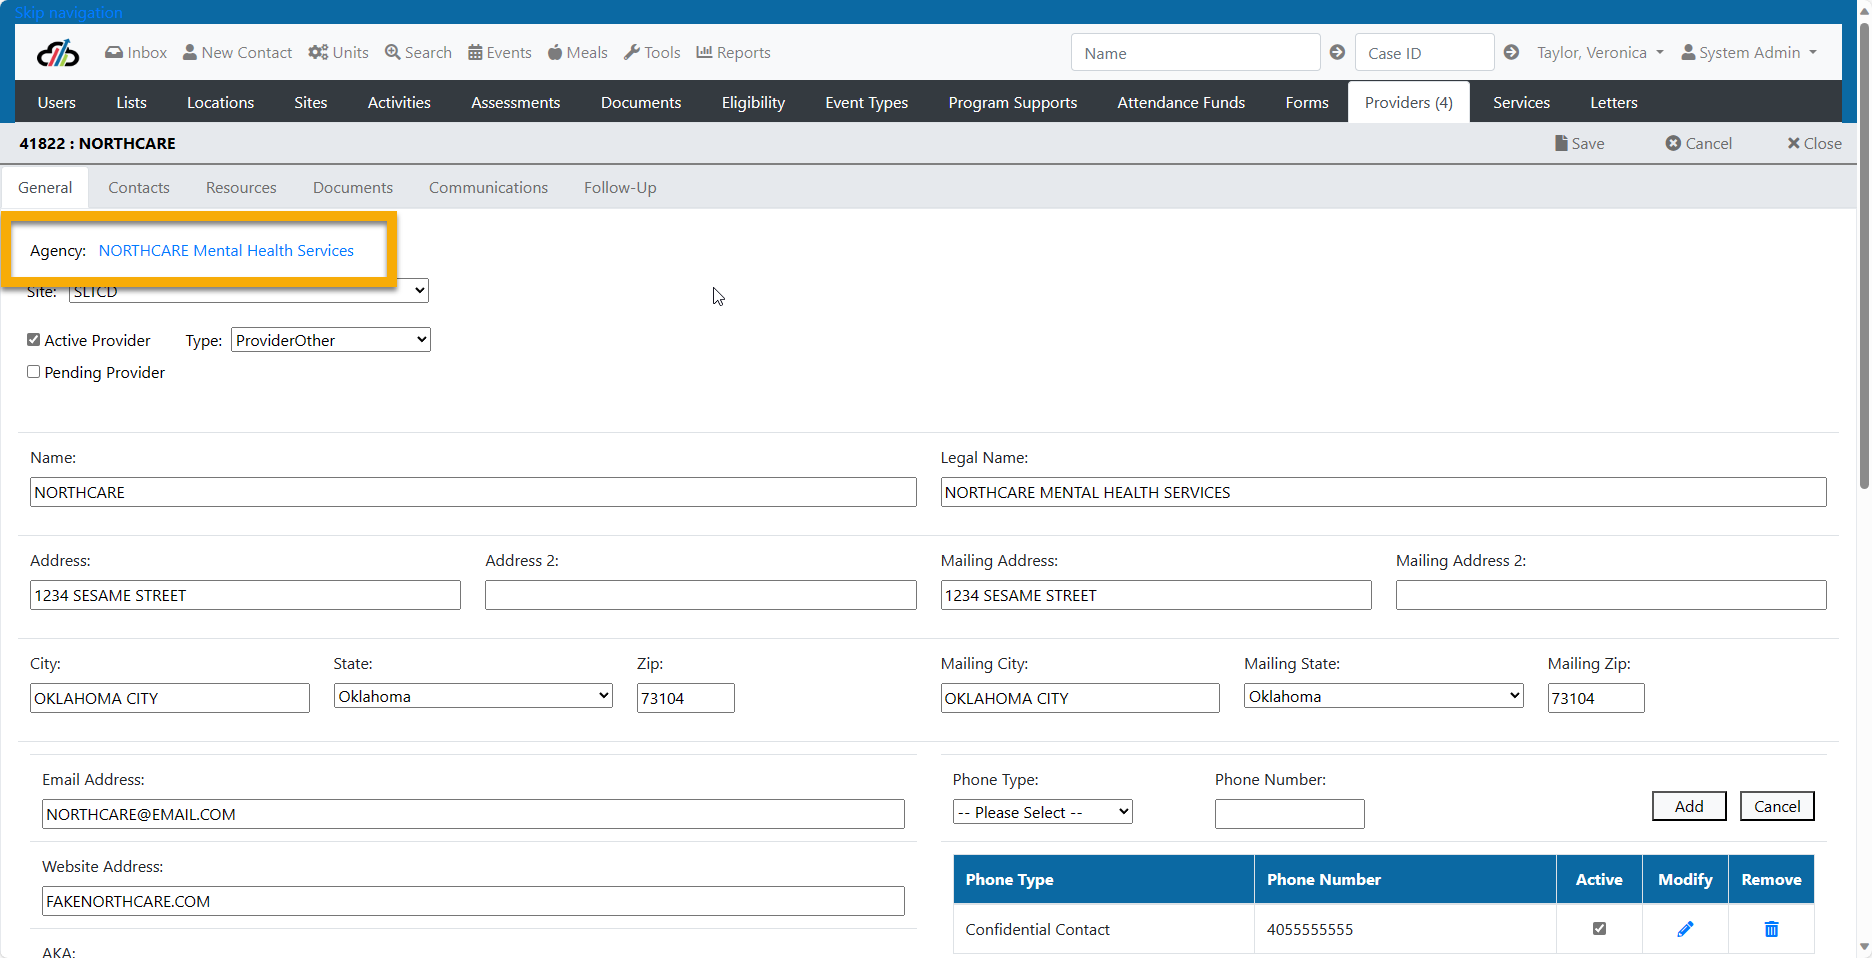
- Review the data on the General tab, Contacts Tab and Resources Tab
- Once you are done reviewing the provider data, enter the Last Formal Update Date at the bottom of the General tab.
Provider Follow Up
The Provider Follow Up Module was designed to help workers manage work which needs to be completed on a specific provider.
The Provider Search Screen shows both the follow up date and the name of the worker assigned to that task.
Only one Follow Up is allowed at a time.

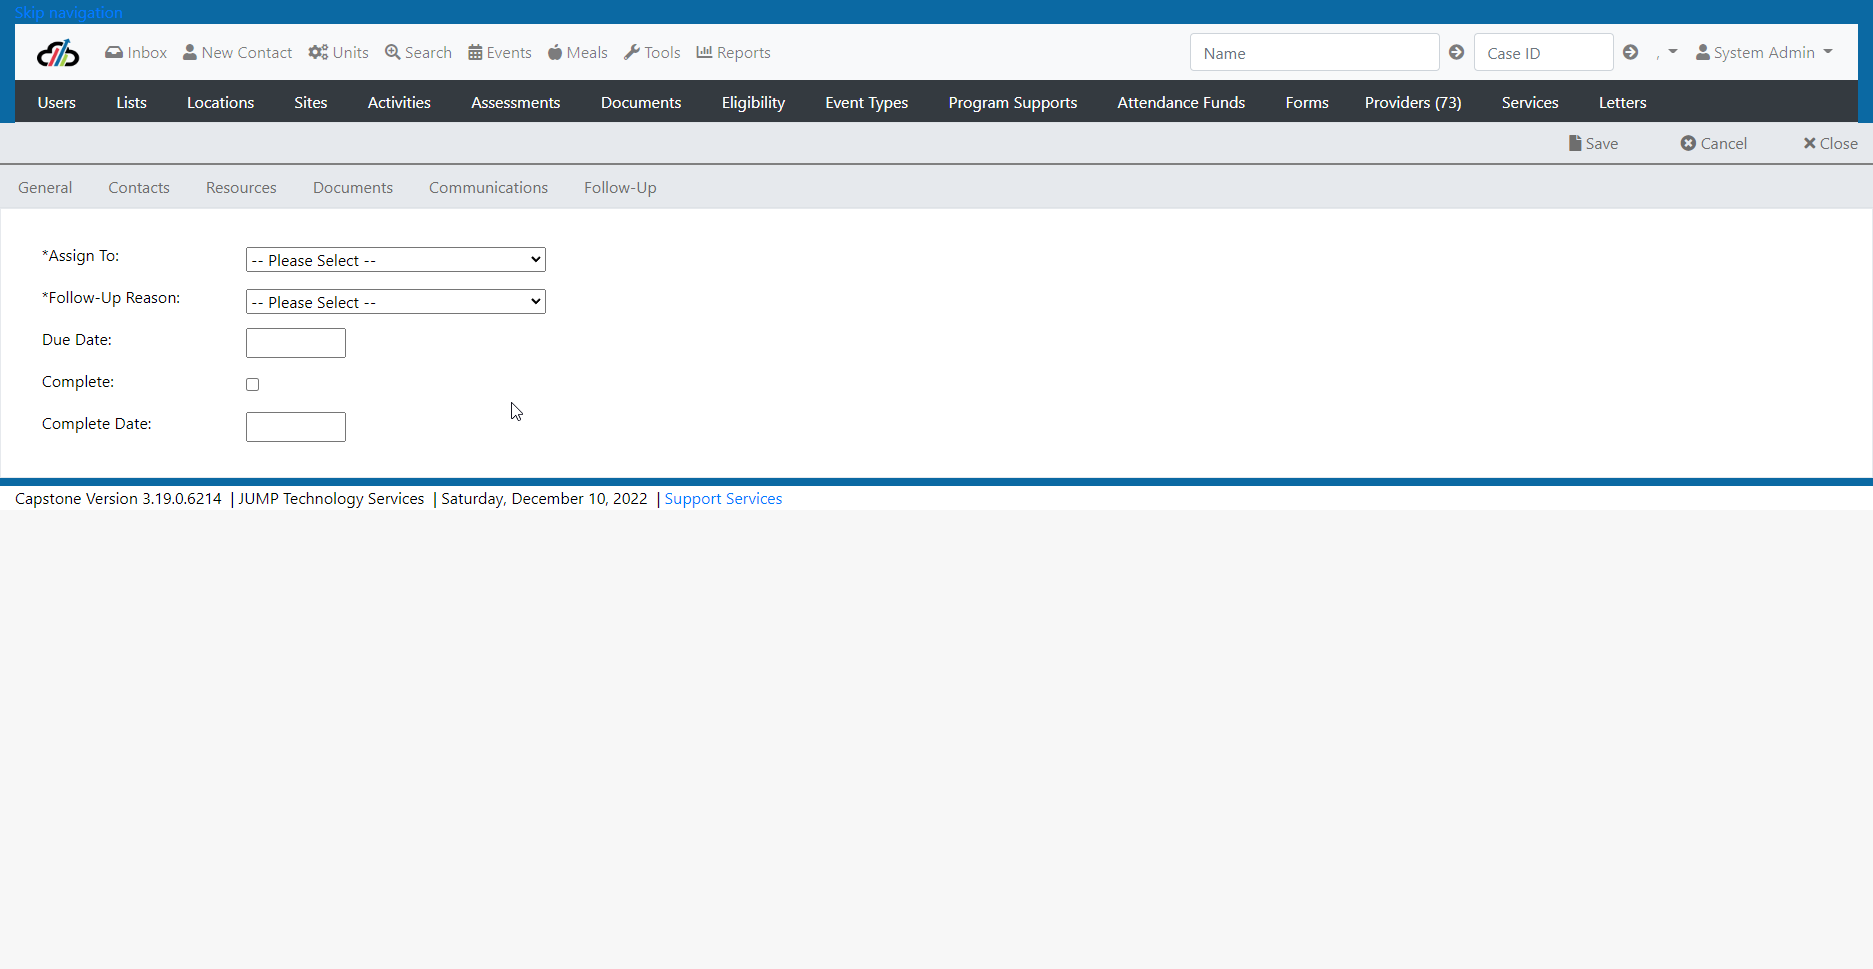
Create A Follow Up Task
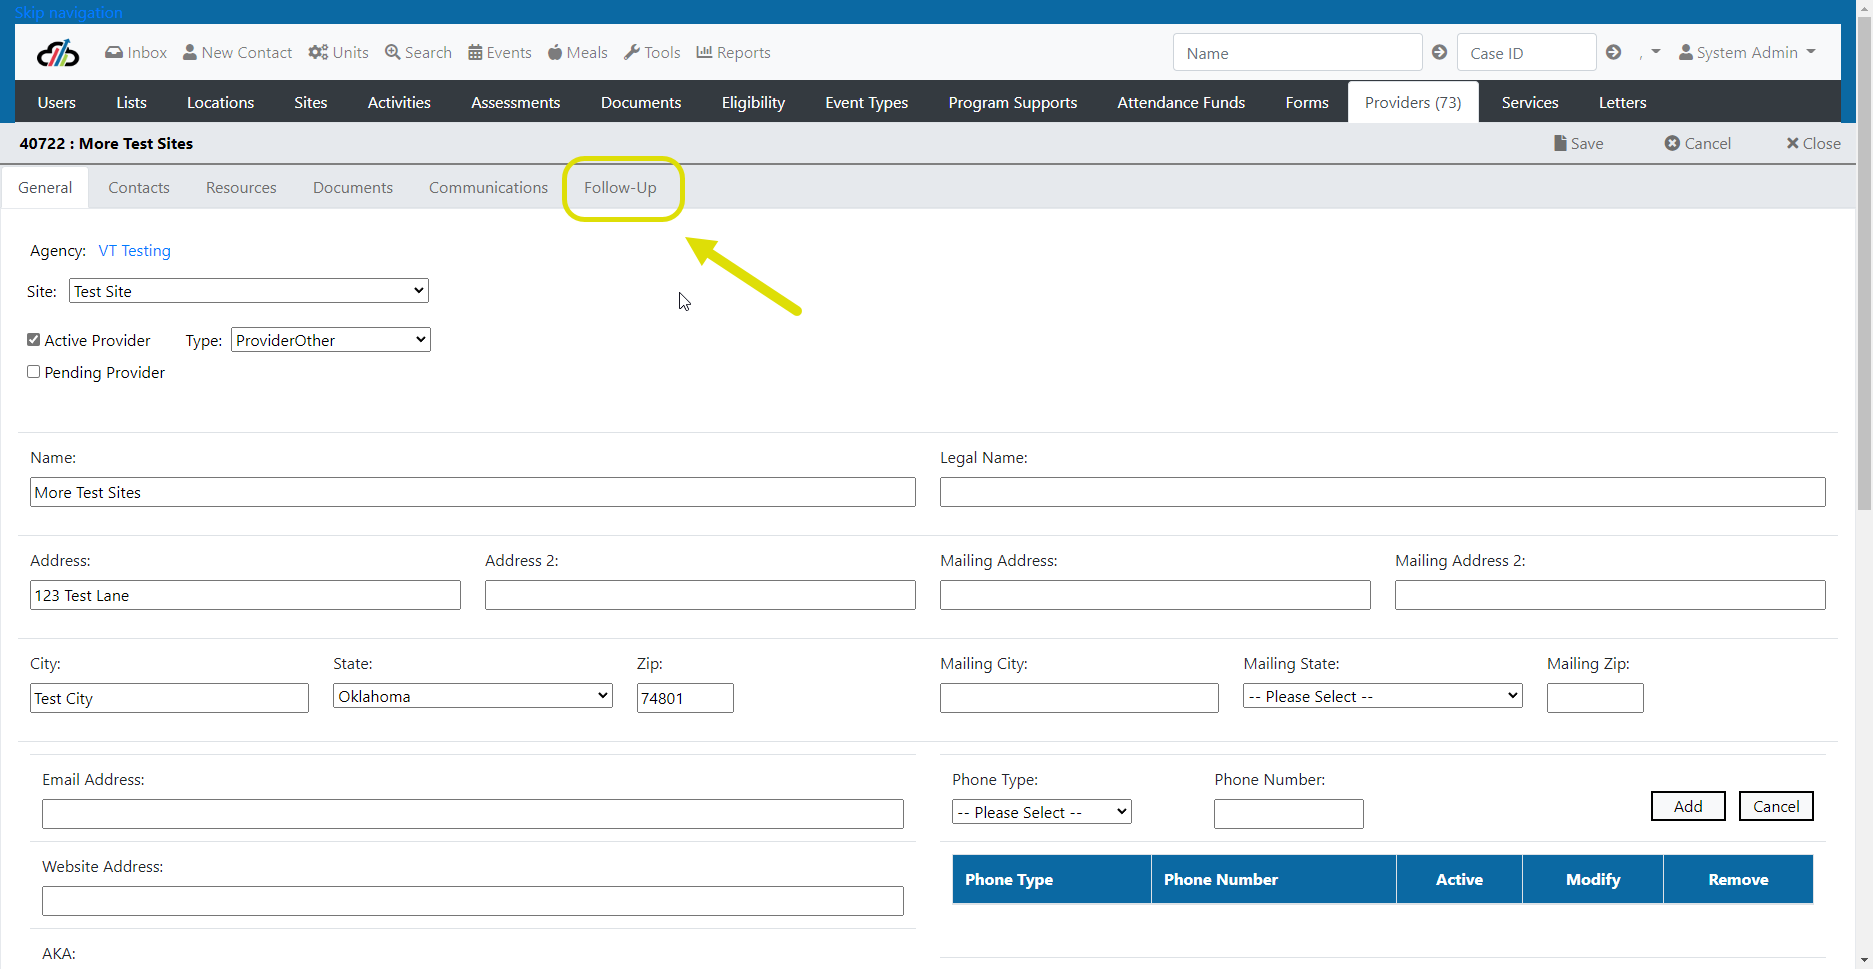
To create a Follow Up Task, select the Follow Up tab.
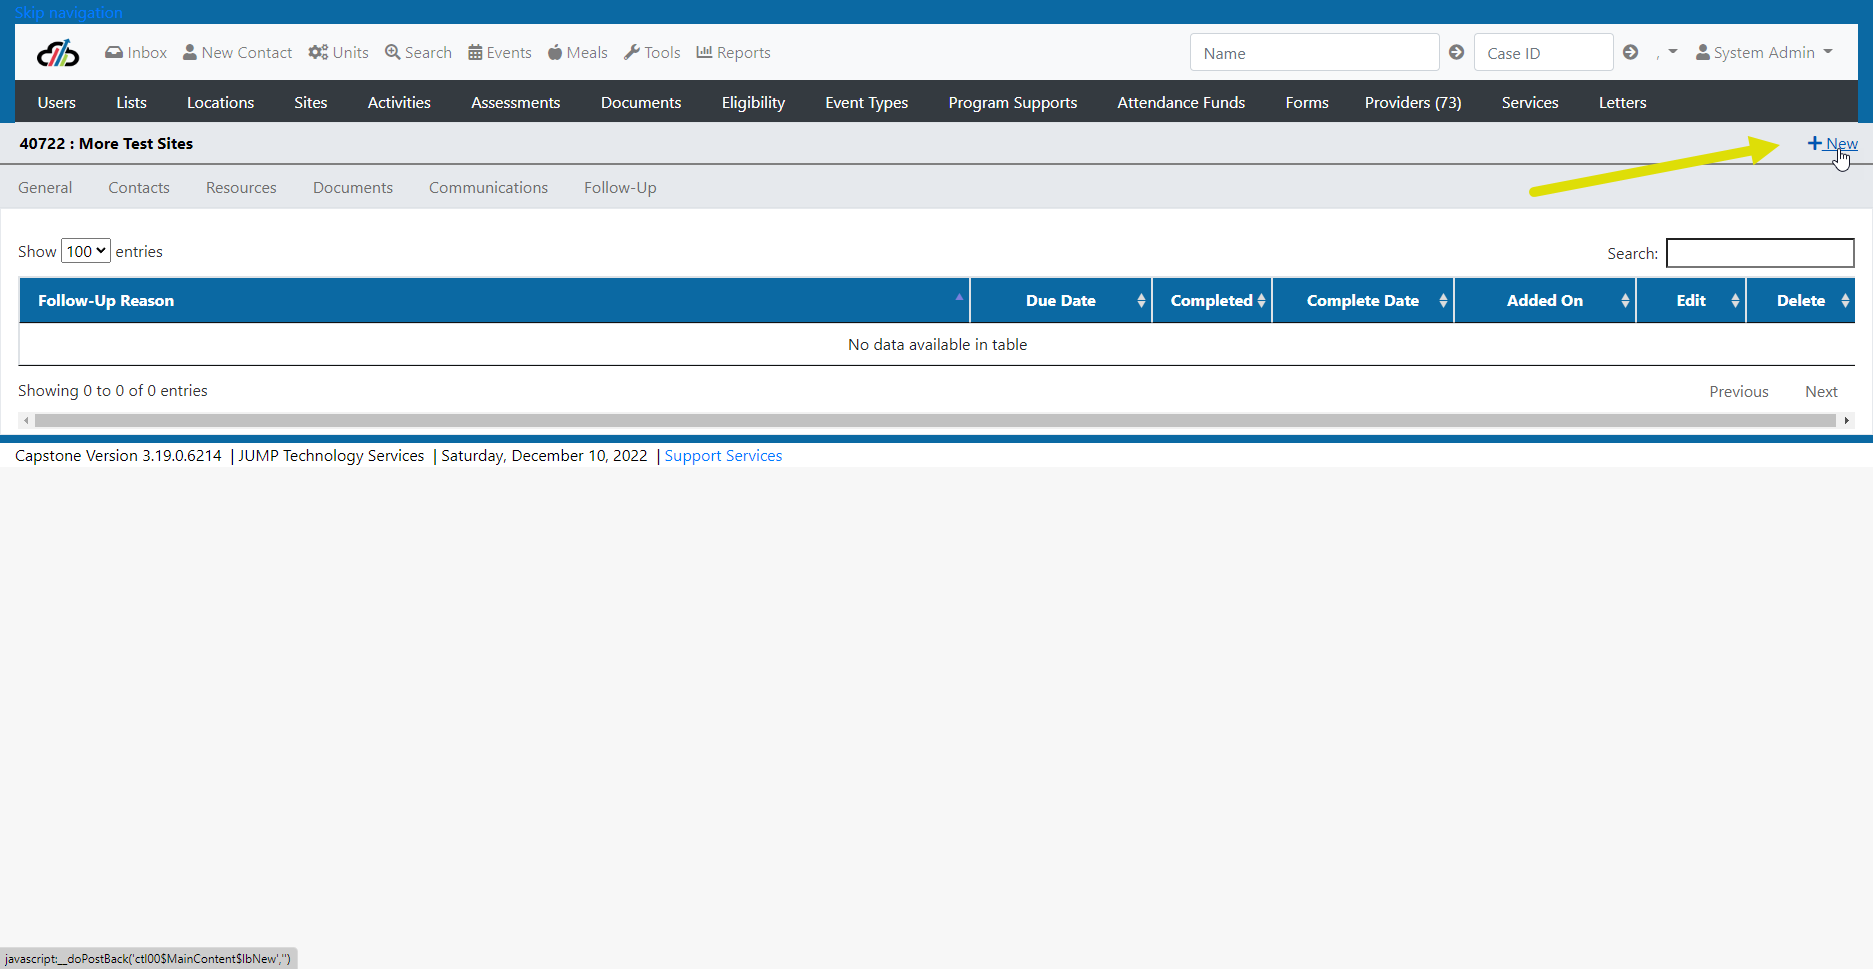
Select + New (located in the top right hand corner of the page)
Enter the name of the person the Follow Up Task is "Assigned to:" NOTE the list in the drop down is populated from the person (s) who have provider management access.
Enter the "Follow-Up Reason" NOTE: The Follow-Up Reason drop down is populated list management
Enter the Due Date
You will come back to this screen after the task is complete and mark it Complete and add the Completion Date. This will remove the name and Follow Up Date from the General Tab Search.
Merge Providers
Who can merge providers using the Merge Providers Tool? This varies by Program. Some Programs only allow System Administrator access to Merge Providers, while others have this tool available to both System Administrators and Provider Management roles.
To Merge a Provider, take the following steps.
Important Note: Only sites can be merged. If you have duplicate agencies and sites, merge the sites until the agency doesn't have any active sites. Then Inactivate the duplicate agency.
- From Tools, Select Provider Merge.

Merge Provider 1
- Type in the Provider you wish to Inactivate.
- Confirm the Provider Address and ID.
- Type in the Provider you wish to Keep.
- Confirm the Provider Address and ID.
- Select +Merge at the top right corner.

Merge Provider 2
#PendingLogs #PendingForms #AllToDo #Alerts #Communications
#DocumentsTabSiteAdmin #UsersTabSiteAdmin #LocationsTabSiteAdmin #Workgroup
#ContactMerge #CompleteLog #CompleteAssessment
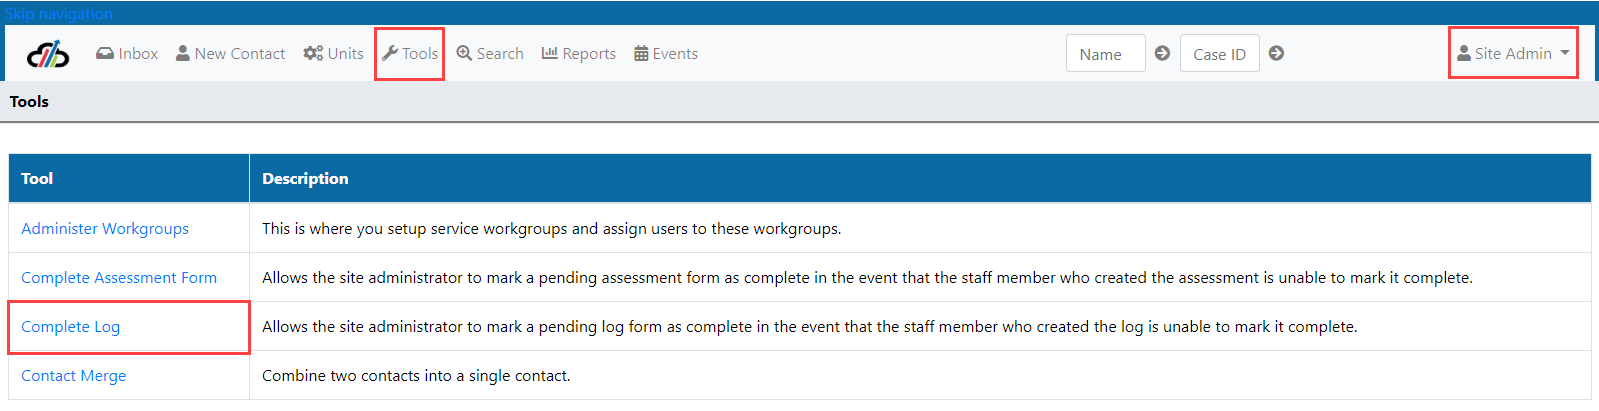
Site Administrator Tools
The Site Administrator has the capability to manage their site, users, and site locations for events.
Site Admin - Main Menu
Upon logging in to Capstone as a Site Administrator, the Site Admin will see the shortcuts menu at the top of the screen with the menu items:
- Inbox,
- New Contact,
- Search,
- Events
- Transportation
- Childcare
- Tools
- Reports
- Name Quick Search
- Case ID Quick Search
- Your name with a down arrow next to it which allows you to get to your account information
- Role – This is the role you are currently in; you can change the role by selecting the down arrow next to the Role shown.
The Quick Search Menu tabs are discussed in other sections of the User Manual. To find information about these tabs please search the User Manual for the Tab Name.
Site Admin Inbox-User Navigation Menu
Below the Quick Search Menu is the User Navigation Menu. Remember, the User Navigation Menu changes based on what Role you are in within the system.

The Site Administrator User Navigation Menu shows:
1. Pending Logs Tab - The site administrator can see all pending logs for the site.

2. Pending Forms Tab - On the Pending Forms tab, the site administrator can see all pending assessments for the site.
. 
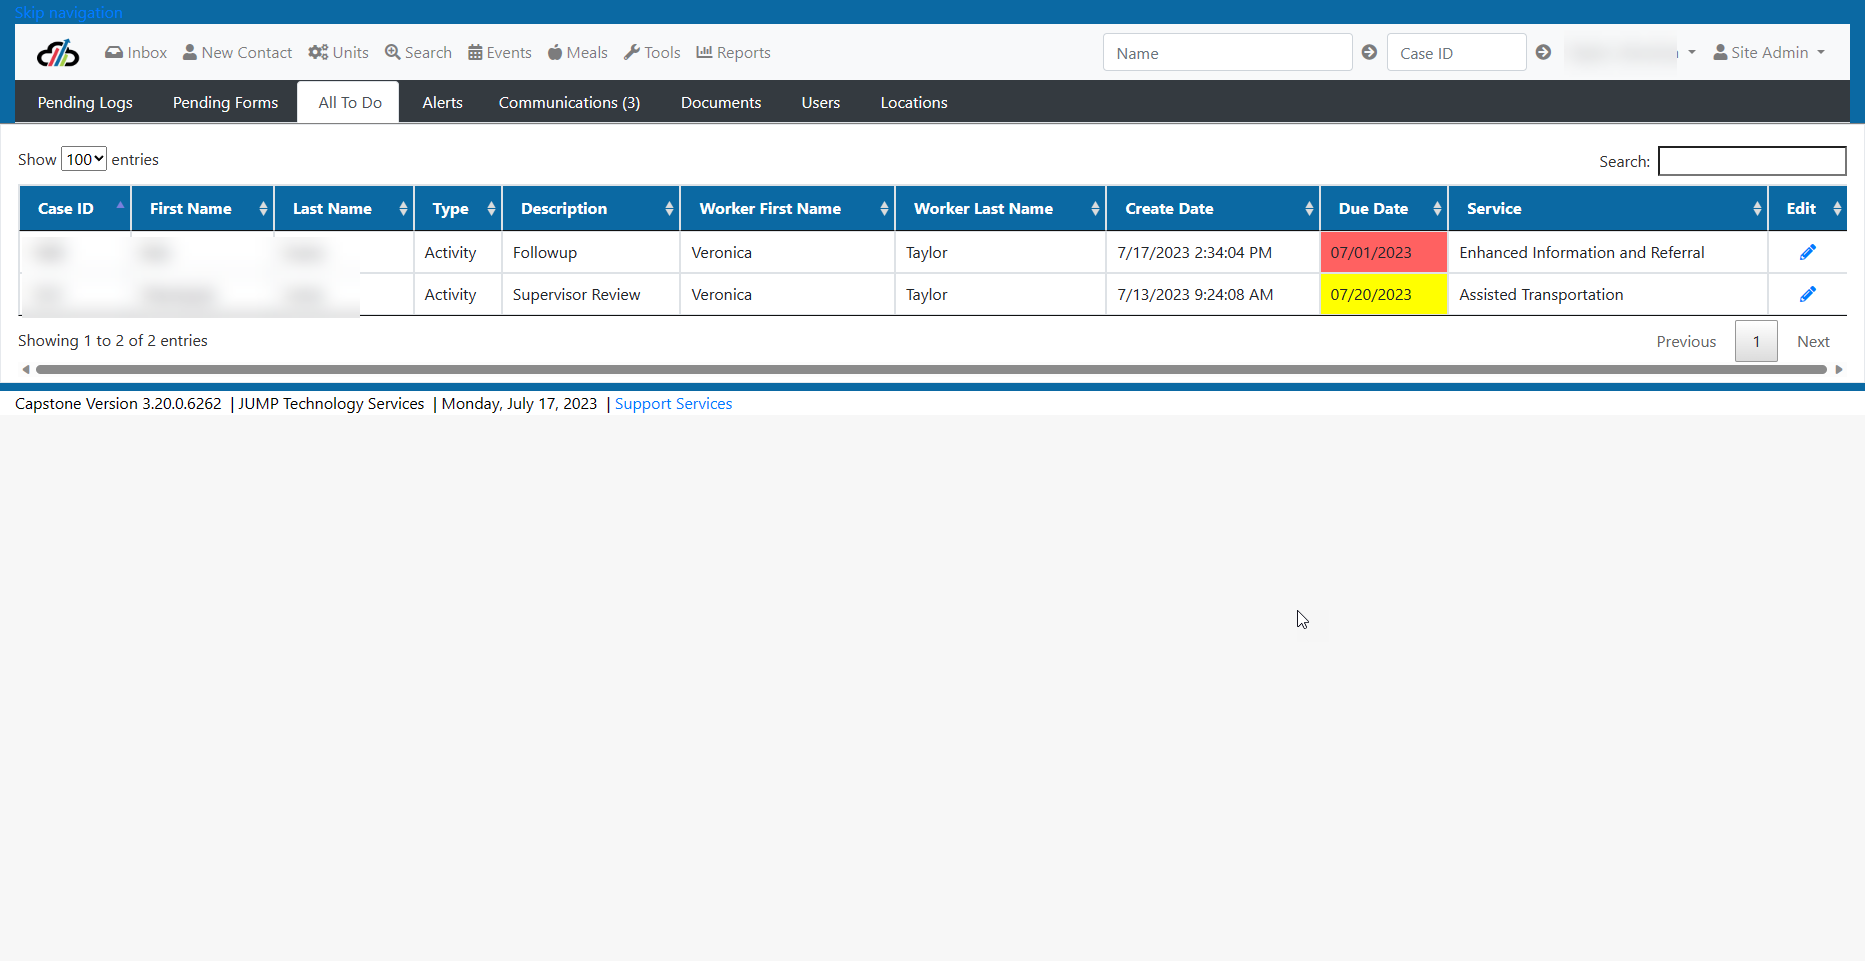
3. All To Do - On the All To Do tab; the user can see all incomplete to do items for their site. Note that the Due Date for Activities coming due in the next 7 days turns yellow. Activities whose due date has passed is shown in red.
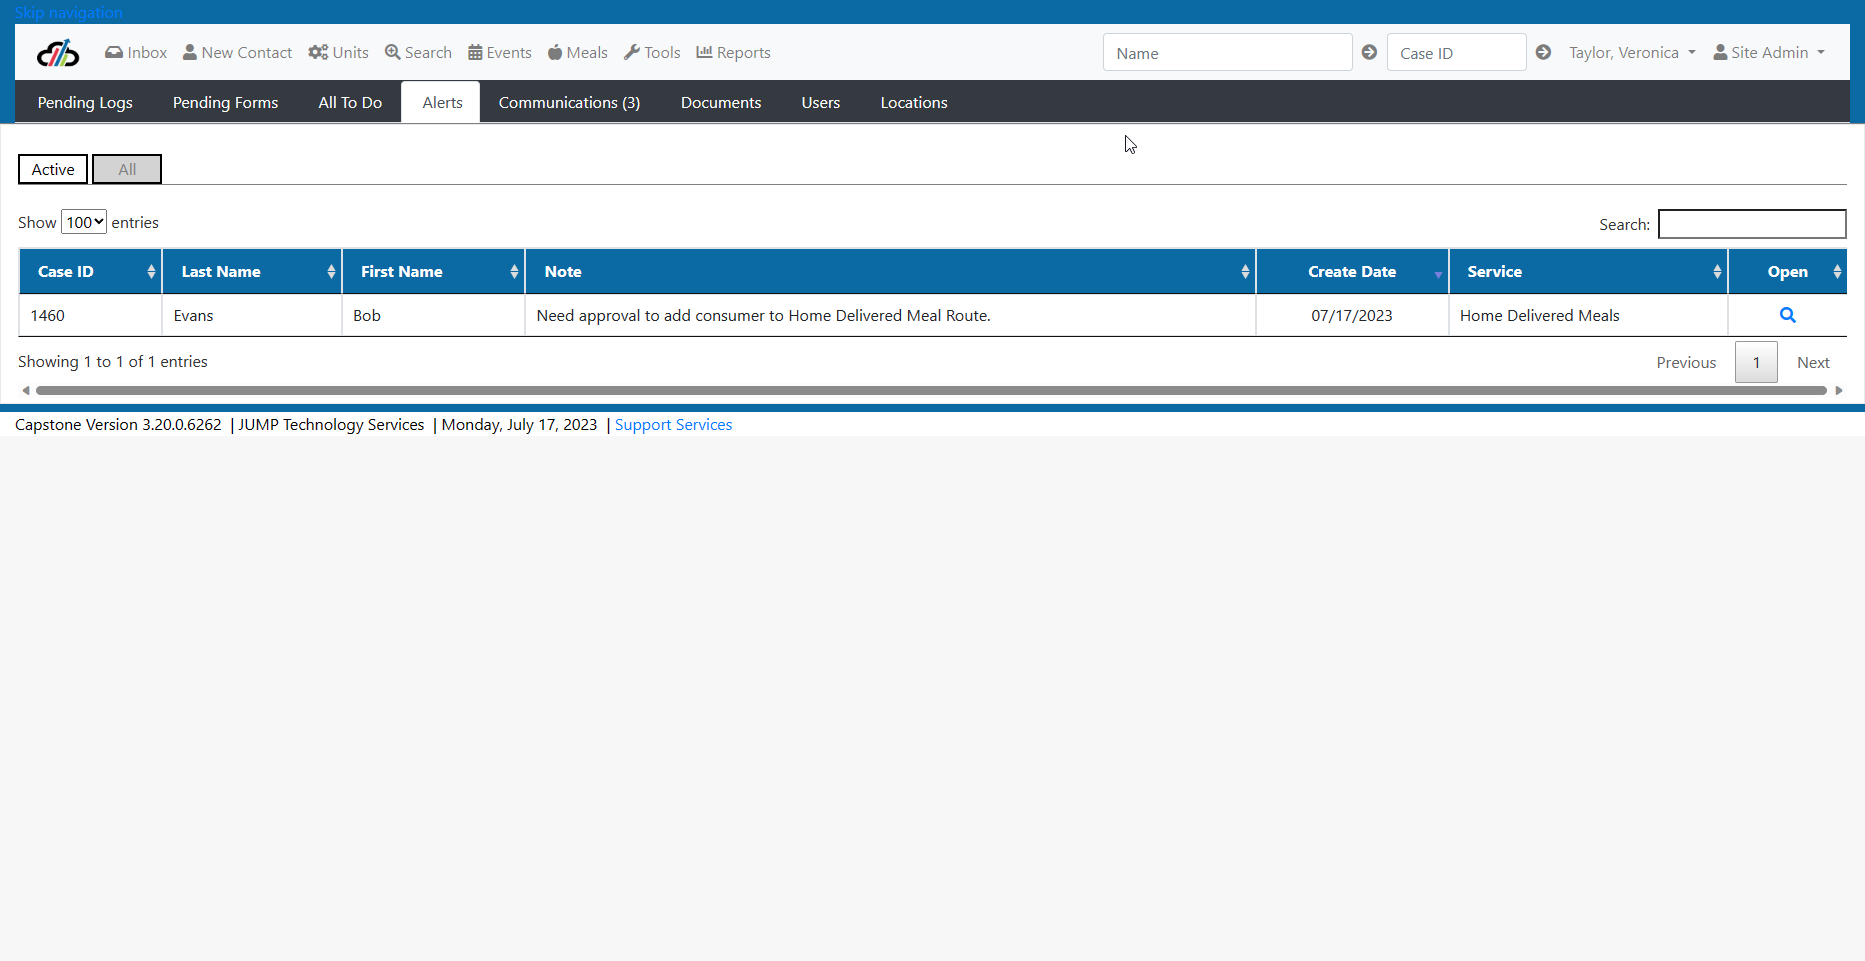
4. the Alerts Tab - shows alerts that have been sent to the logged in user.
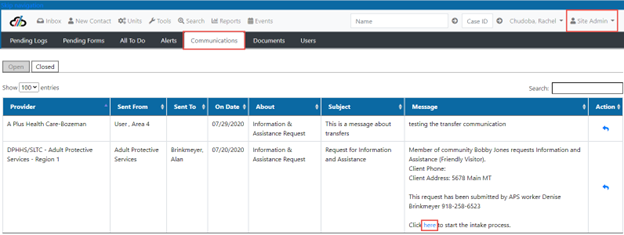
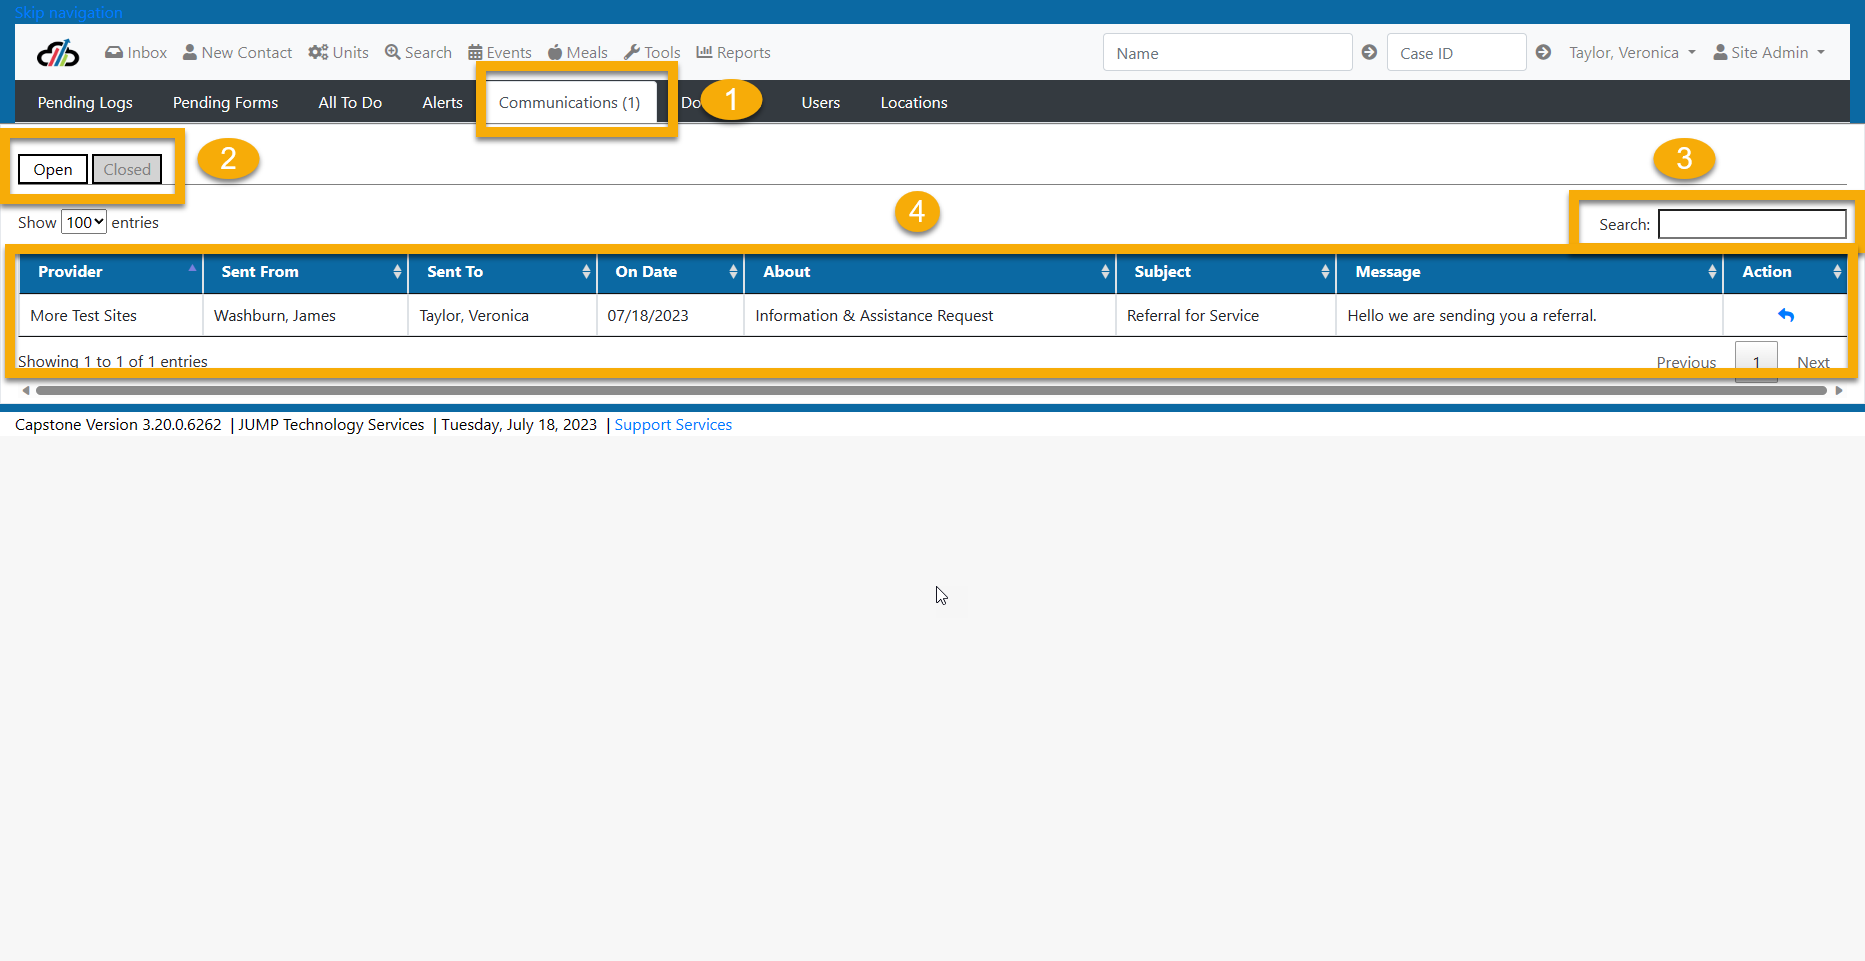
5. Communications Tab - The Communication Tab shows communications from providers.
6. Documents Tab - The Documents Tab shows provider documents that have been uploaded into the case file by the Site Administrator.
- Verify you are in Site Administrator Role
- Verify you are in a case
- Select +New
- Select the site from the drop down menu
- Select the Document Type
- Enter the Document Description
- Choose the file to upload
- Save
Site Admin - Documents Tab Steps 1-3
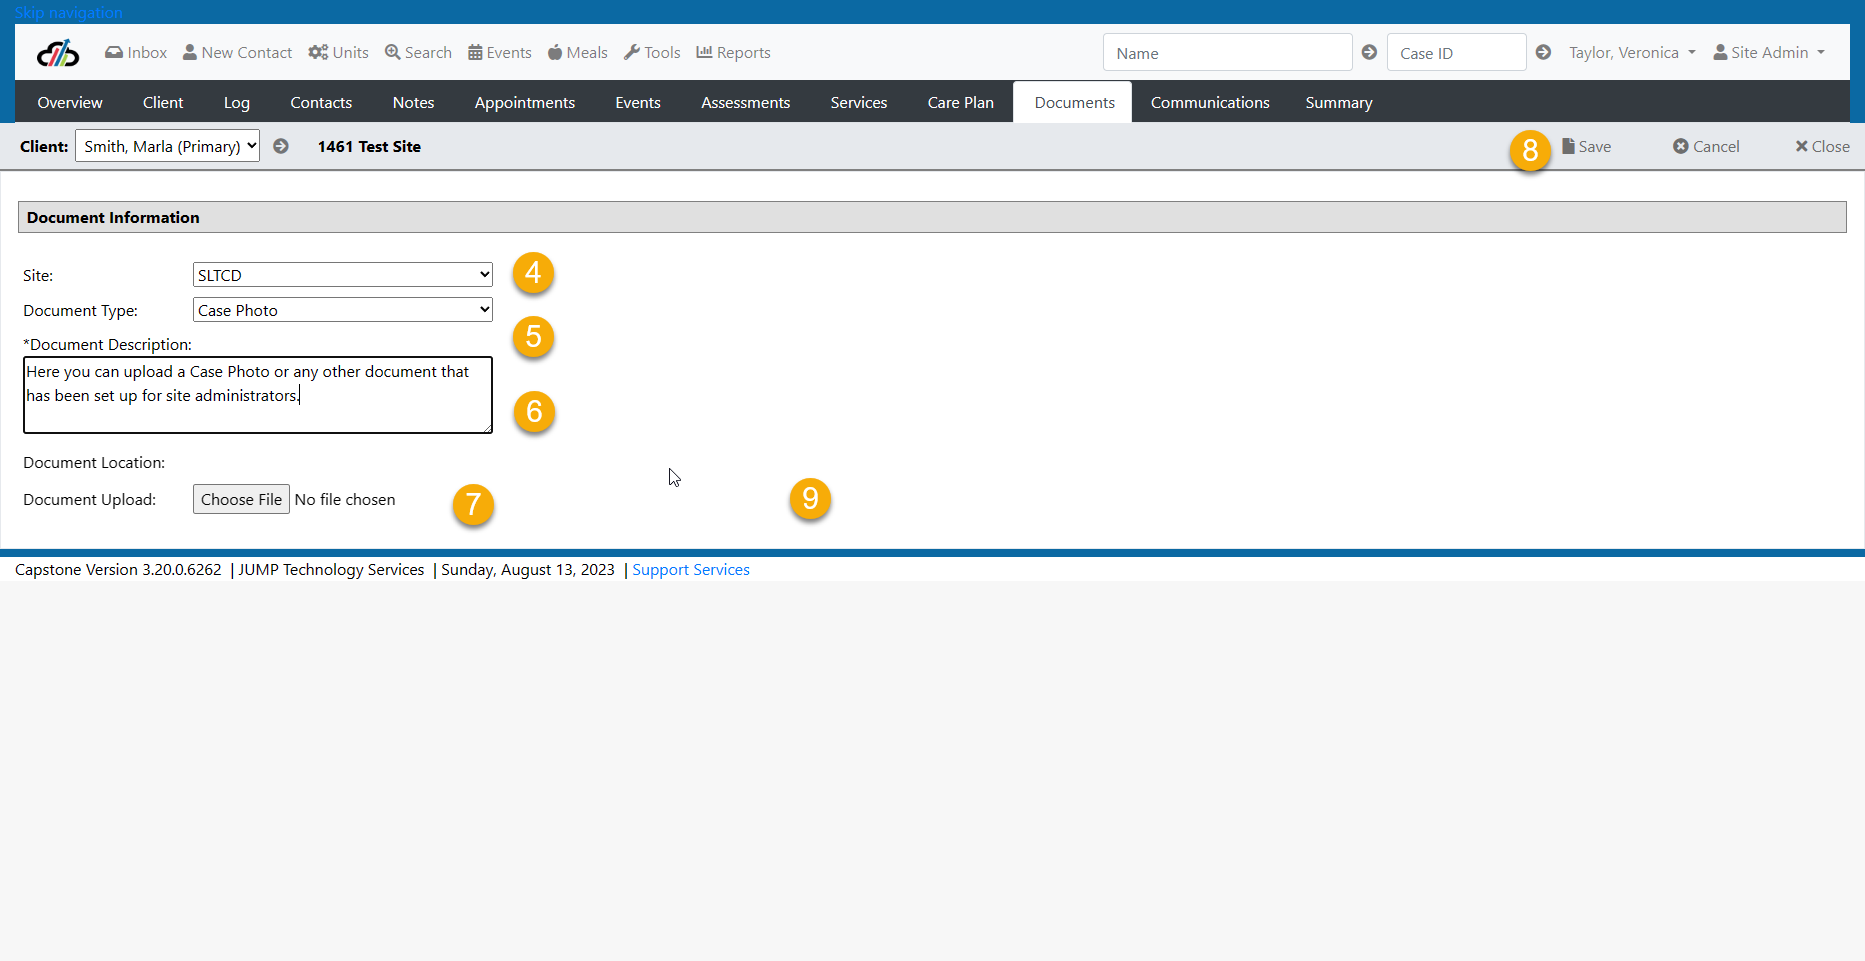
Site Admin - Documents Tab Steps 4-8
7. Users Tab - The Users Tab allows the Site Administrator to manage roles for users who are affiliated with their Site. The Site Administrator cannot add new users.
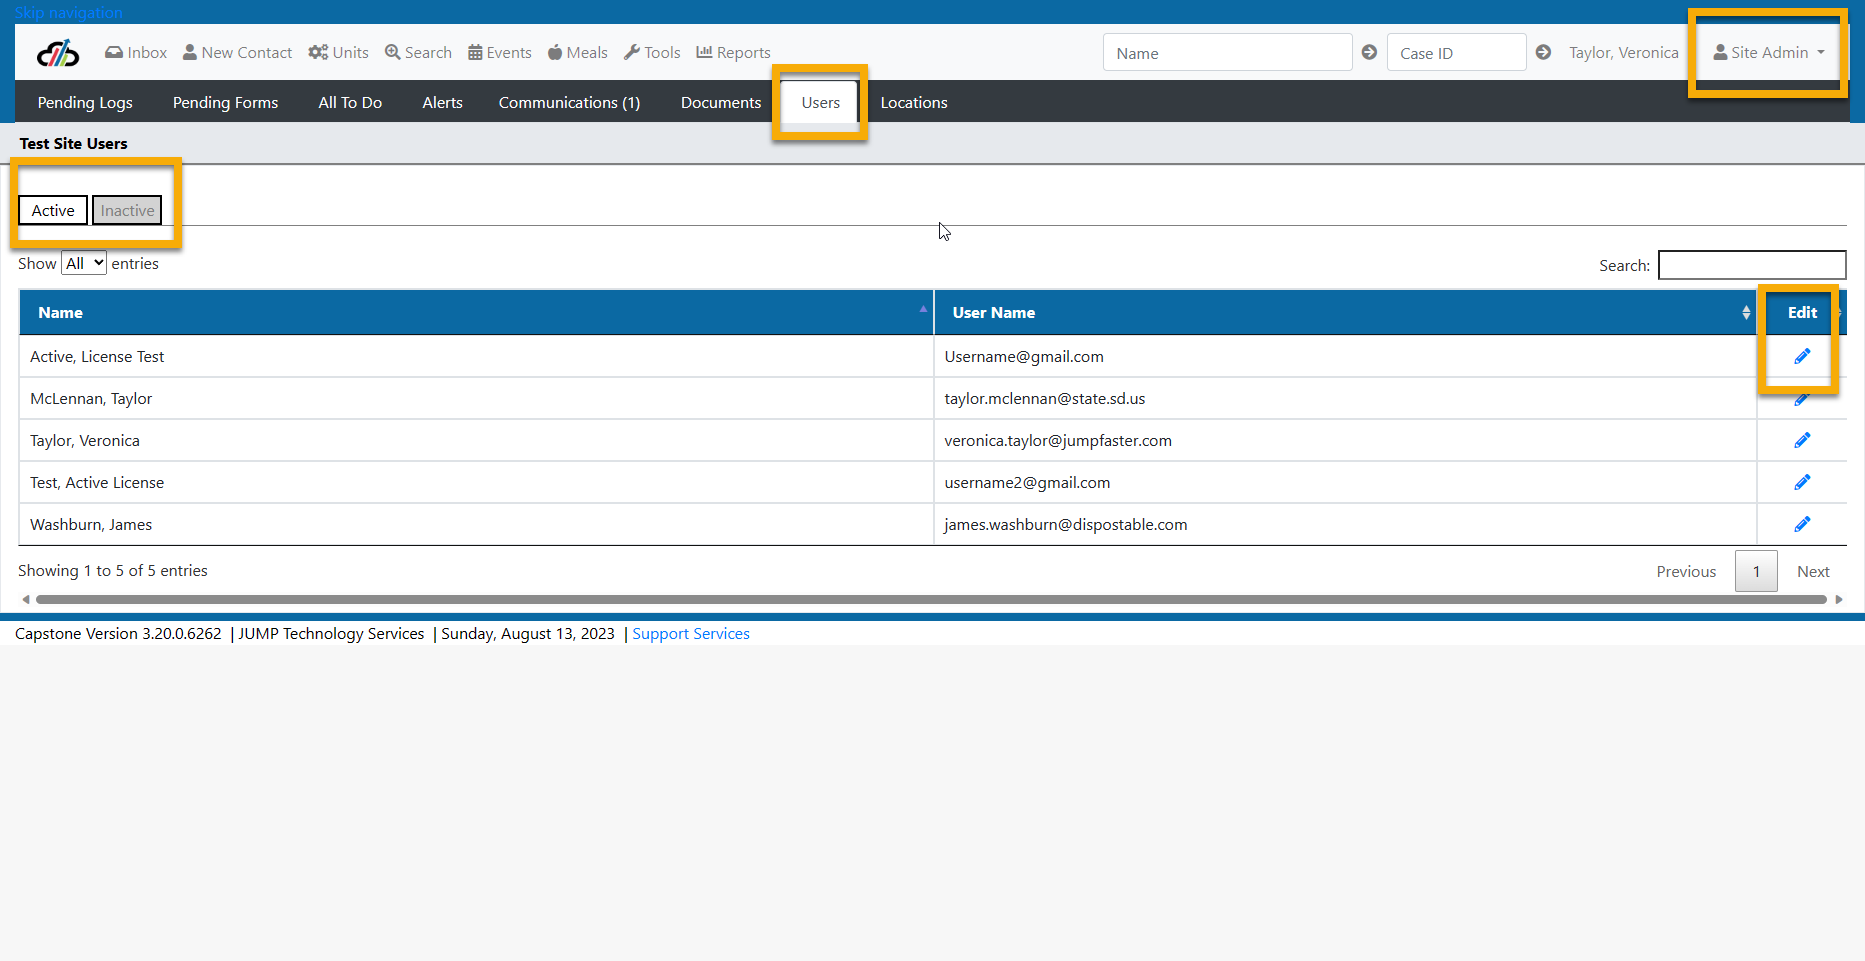
Site Administrator - Users Tab
8. Locations Tab - The Locations Tab allows the Site Administrator to manage the Room Locations for their Site.
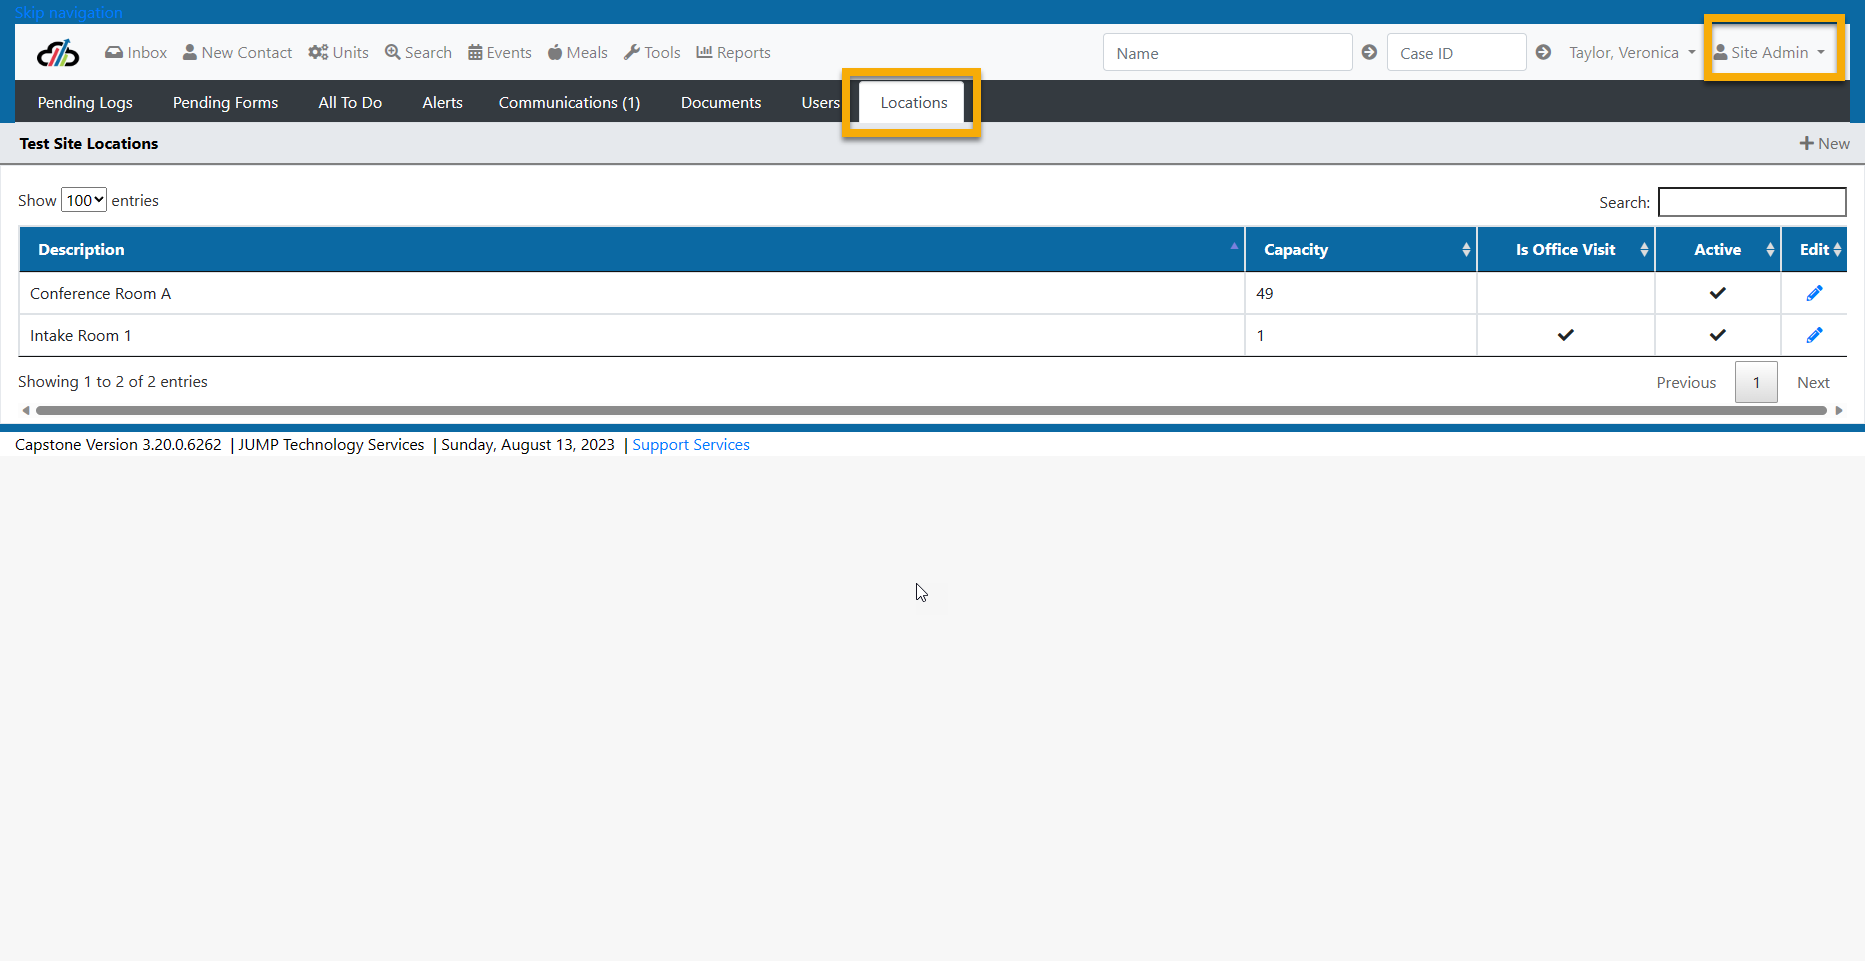
Site Administrator - Locations Tab
NOTE: Many of the functions described below are dependent on the setup of Workgroups. Workgroup setup is a Site Administrator function. Workgroups can be as large or small as needed to ensure visibility for the users involved in the programs.
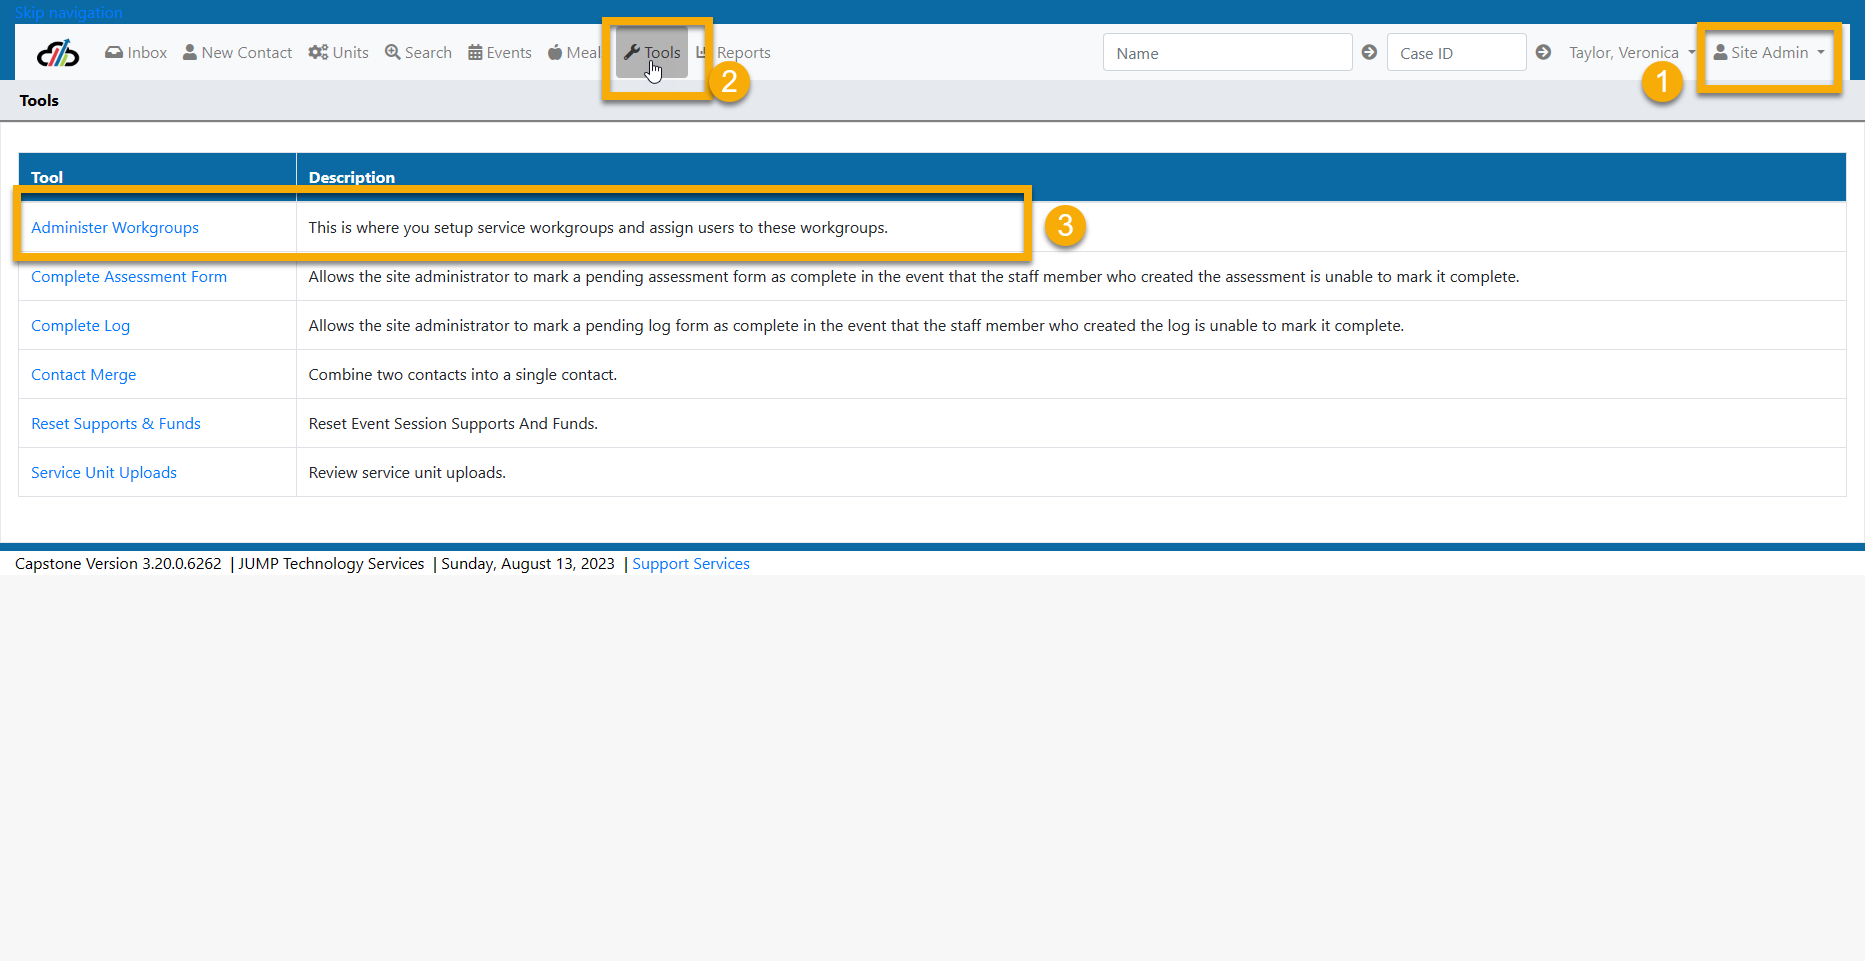
- Verify you are in the Site Administrator role. (See screenshot Administer Workgroups 1)
- Click the Tools icon in your shortcut menu.(See screenshot Administer Workgroups 1)
- Select Administer Workgroups (See screenshot Administer Workgroups 1)
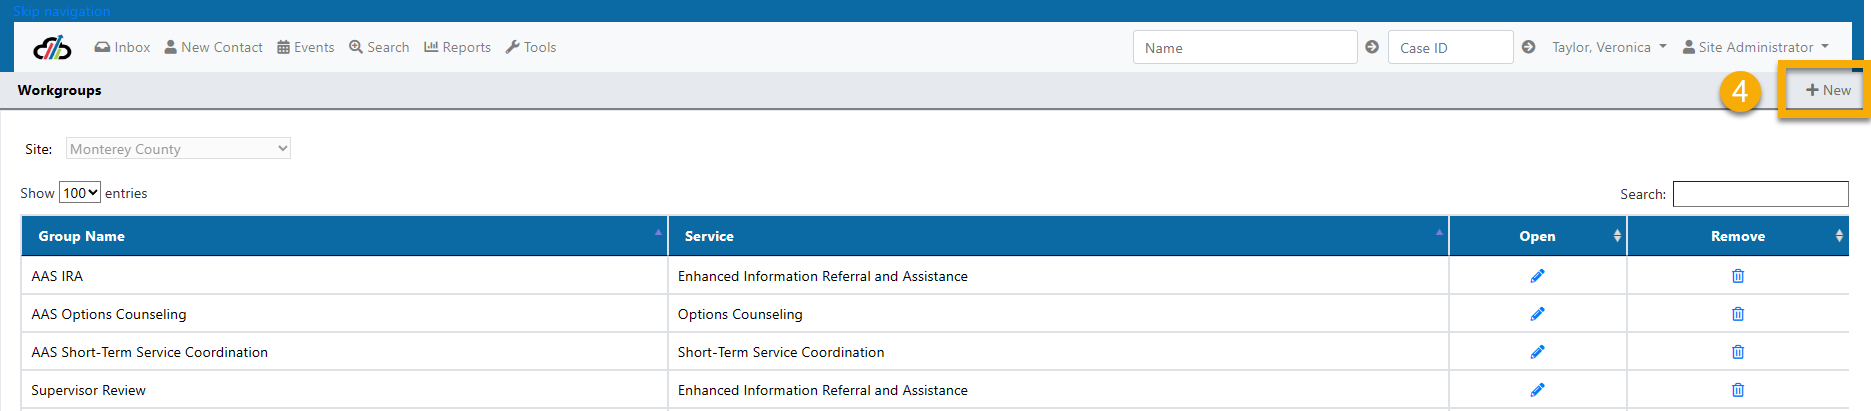
- Select + New to create a new workgroup. (Note if the Service appears in the grid, you have already created a workgroup. (See screenshot Administer Workgroups 2)
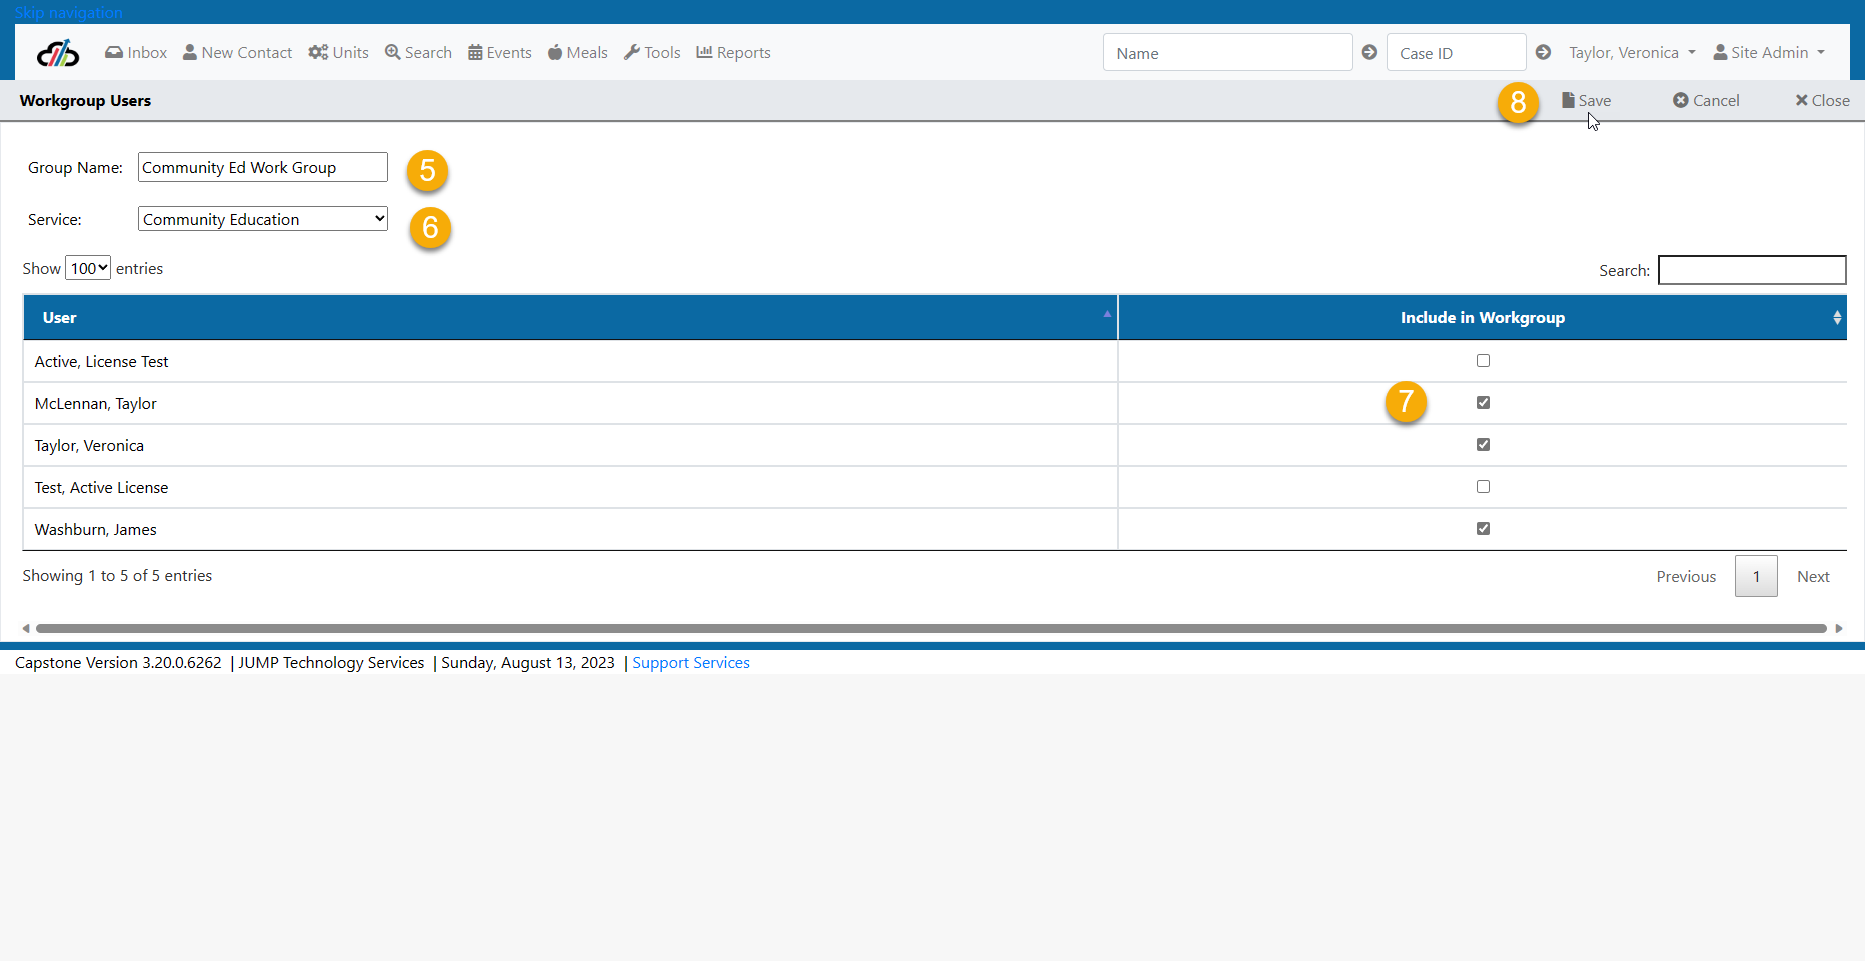
- Add the Group Name (See screenshot Administer Workgroups 3
- Select the service from the drop-down (See screenshot Administer Workgroups 3)
- Select the users from your Site to include in the workgroup. The user list shown is all active users who have been set up for your site. (See screenshot Administer Workgroups 3)
- Click Save.(See screenshot Administer Workgroups 3)
Administer Workgroups - Steps 1-3
Administer Workgroups Step 4
Administer Workgroups - Steps 5-8
Editing a Workgroup
- From the list of Groups click the pencil to edit or the trashcan to delete.
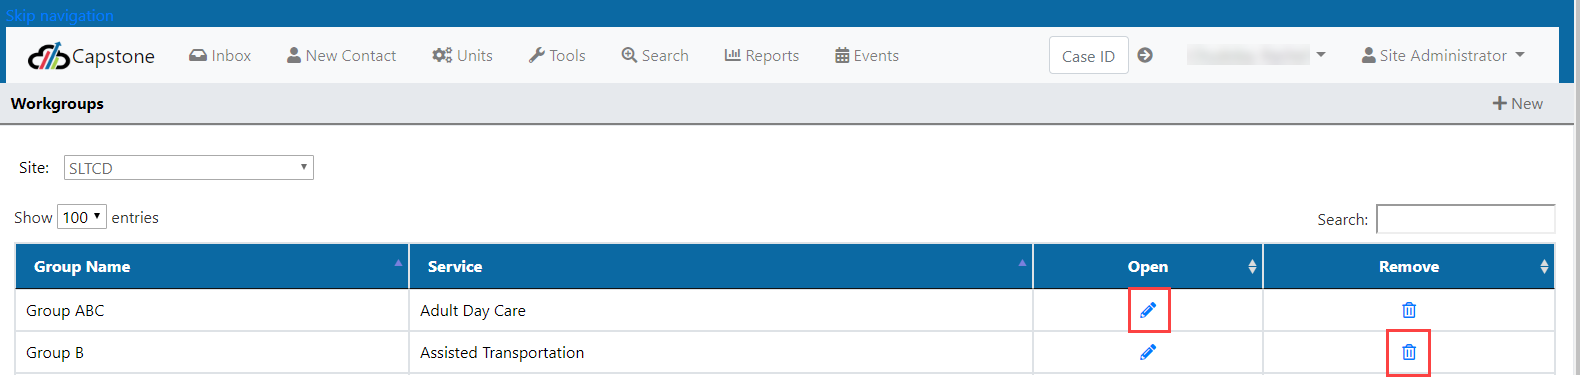
- Select or deselect users who should be associated to the workgroup.

- Click Save.
Site Administrator Tools - Complete Log
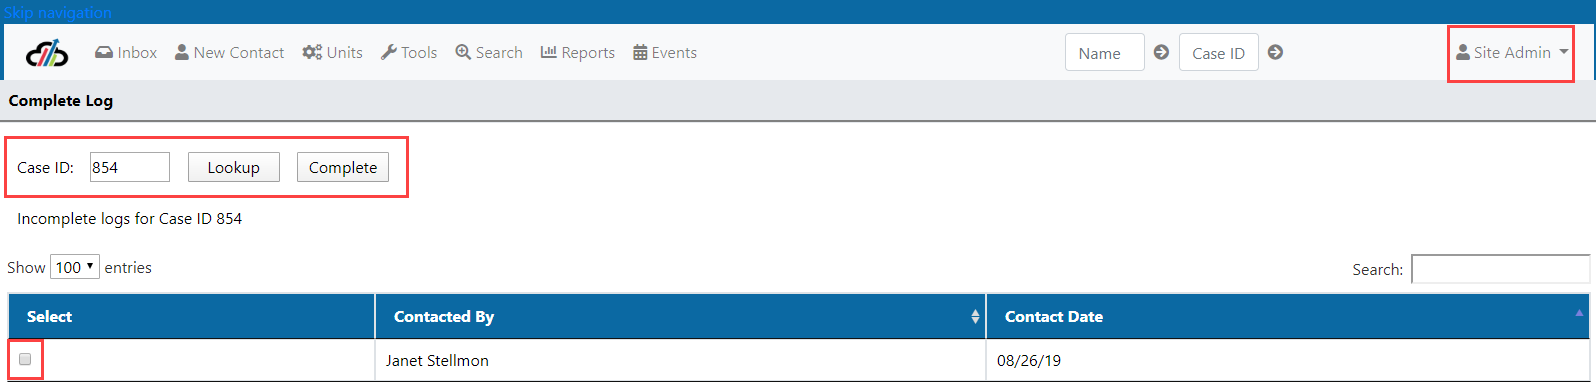
The Complete Log tool allows the Site Administrator to complete logs that were left open by staff that is no longer with the organization. Select Tools and Complete Log
Enter the Case ID that has the log you wish to complete and Lookup. You can then select the log that needs to be complete and select Complete.
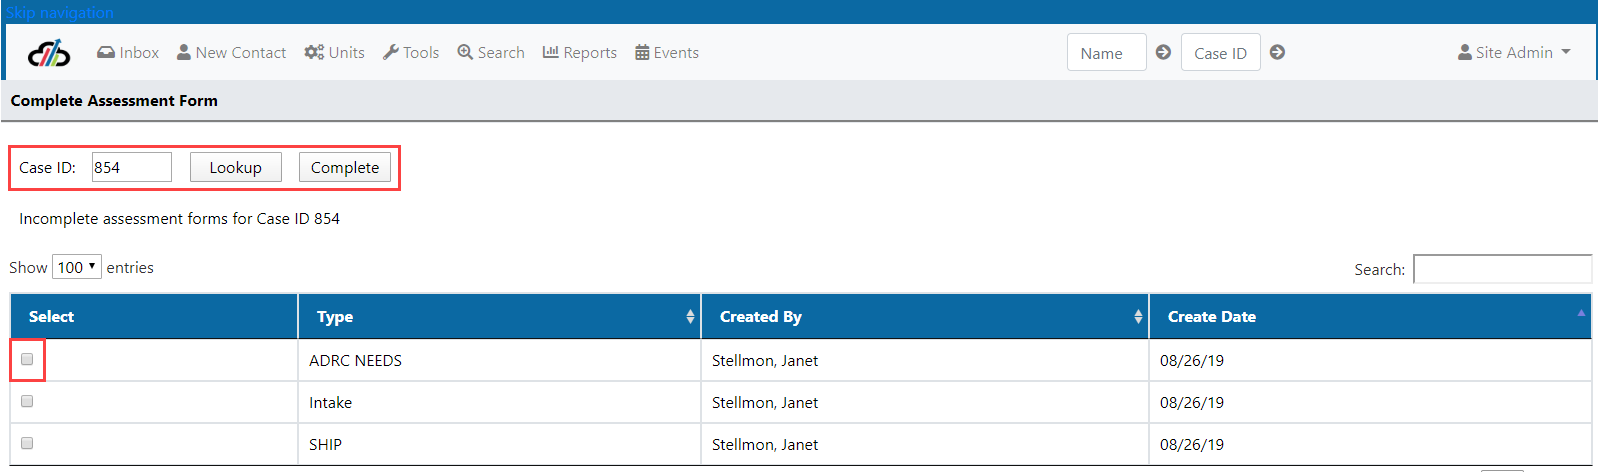
The Complete Assessment Form tool allows the Site Administrator to complete forms that were left open by staff that are no longer with the organization. Select Tools and Complete Assessment Form.
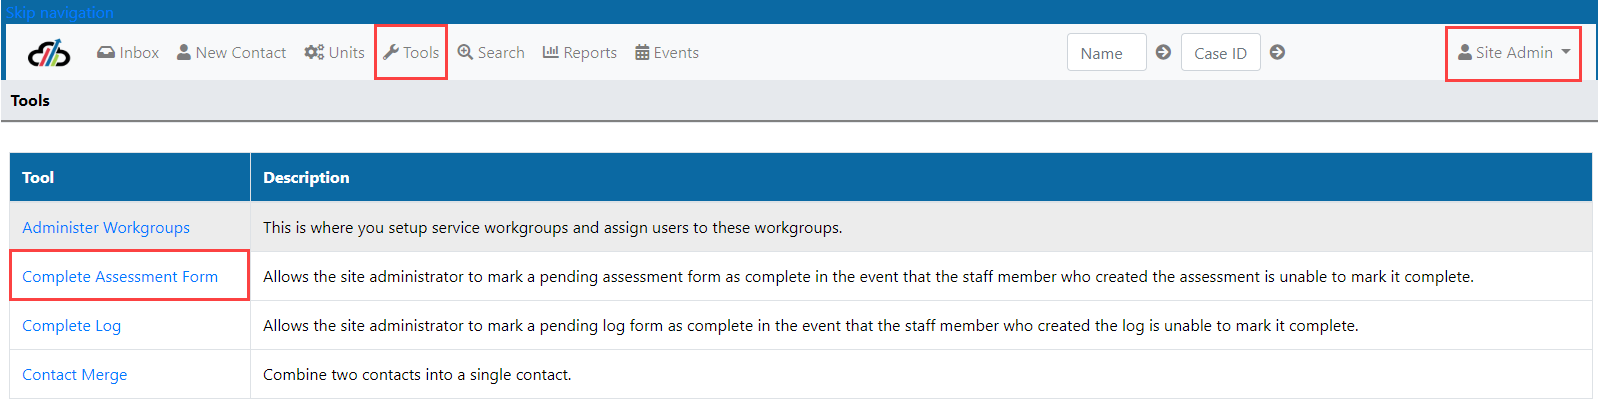
Enter the Case ID that has the form you wish to complete and Lookup. You can then select the form that needs to be complete and select Complete.
#UsersTabSysAdmin #AddingUserCredentials #AddNotestoCapstoneUsers
#ListsTabSysAdmin #SitesTabSysAdmin #ActivitiesTabSysAdmin
#AssessmentsTabSysAdmin #DocumentsTabSysAdmin #EligibilityTabSysAdmin
#EventTypesSysAdmin #FormsTabSysAdmin #LocationsTabSysAdmin
#LettersSysAdmin #ReassignSiteSysAdmin #Reset Supports and Funds
System Administrator Functions
The system has several features for System Administrators to manage users, lists and workflow.
Note: Confirm that you are in the System Administrator Role.

Users Tab
The Users Tab allows the System Administrator to:
1. Toggle between Active and Inactive users
2. Add new users - Select +New to create a new user
3. Search existing users
4. Manage Active/Inactive users by clicking on the pencil icon
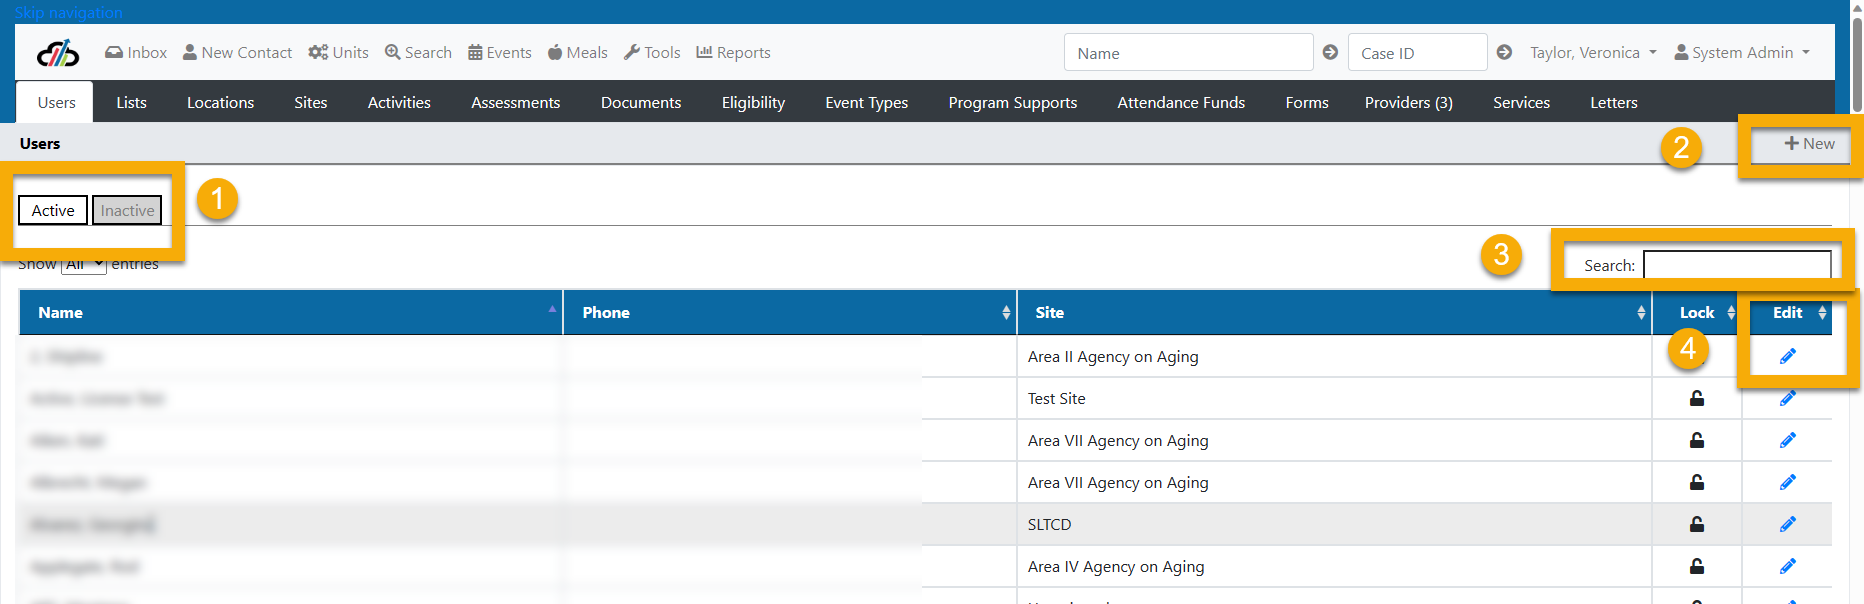
User Tab Functionality
New Users
Maximum Licenses Allowed Error
- Capstone users must have a license in order to utilize the system.
- If your organization has reached the maximum number of licenses allowed, you will receive a red error message when you try to add a new user. (See screenshot User Tab - Maximum License Allowed)
- This means you will either need to deactivate licenses or purchase additional licenses.
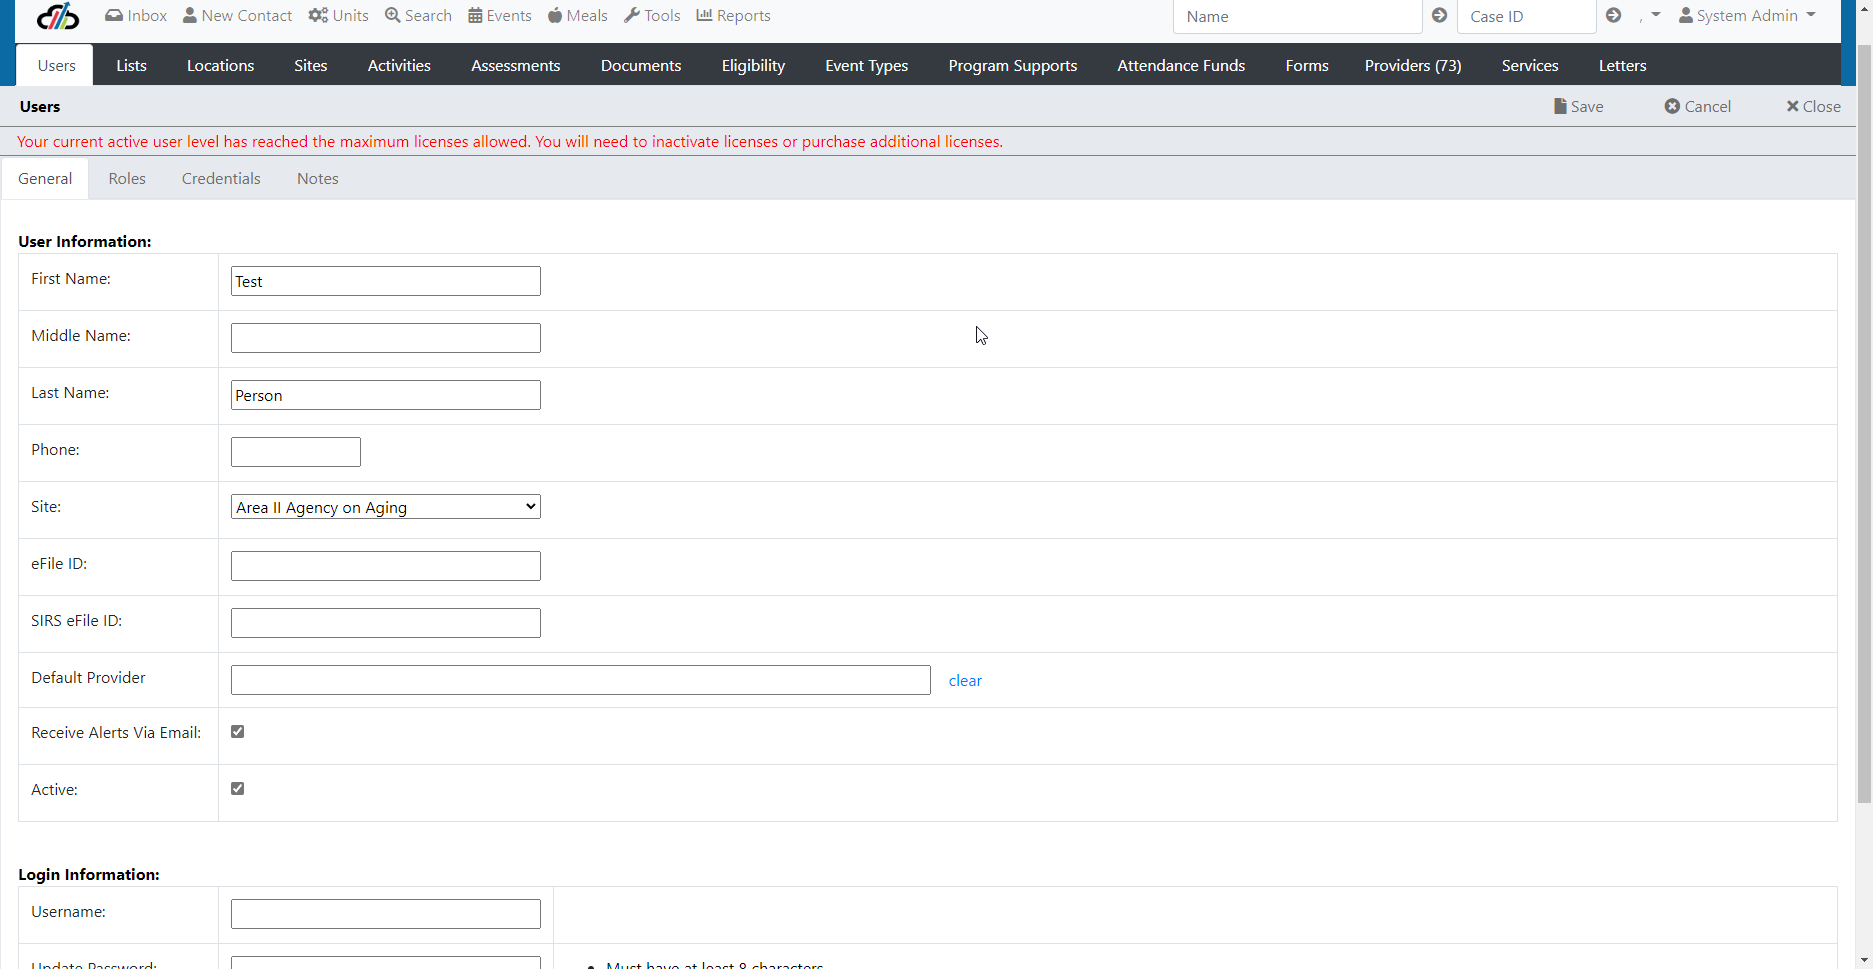
To add a new user:
1. Verify that the user is not already in the list, look in both Active and Inactive users.

If the user is not already in the system,
2. Select the +New in the top right-hand corner of the screen.

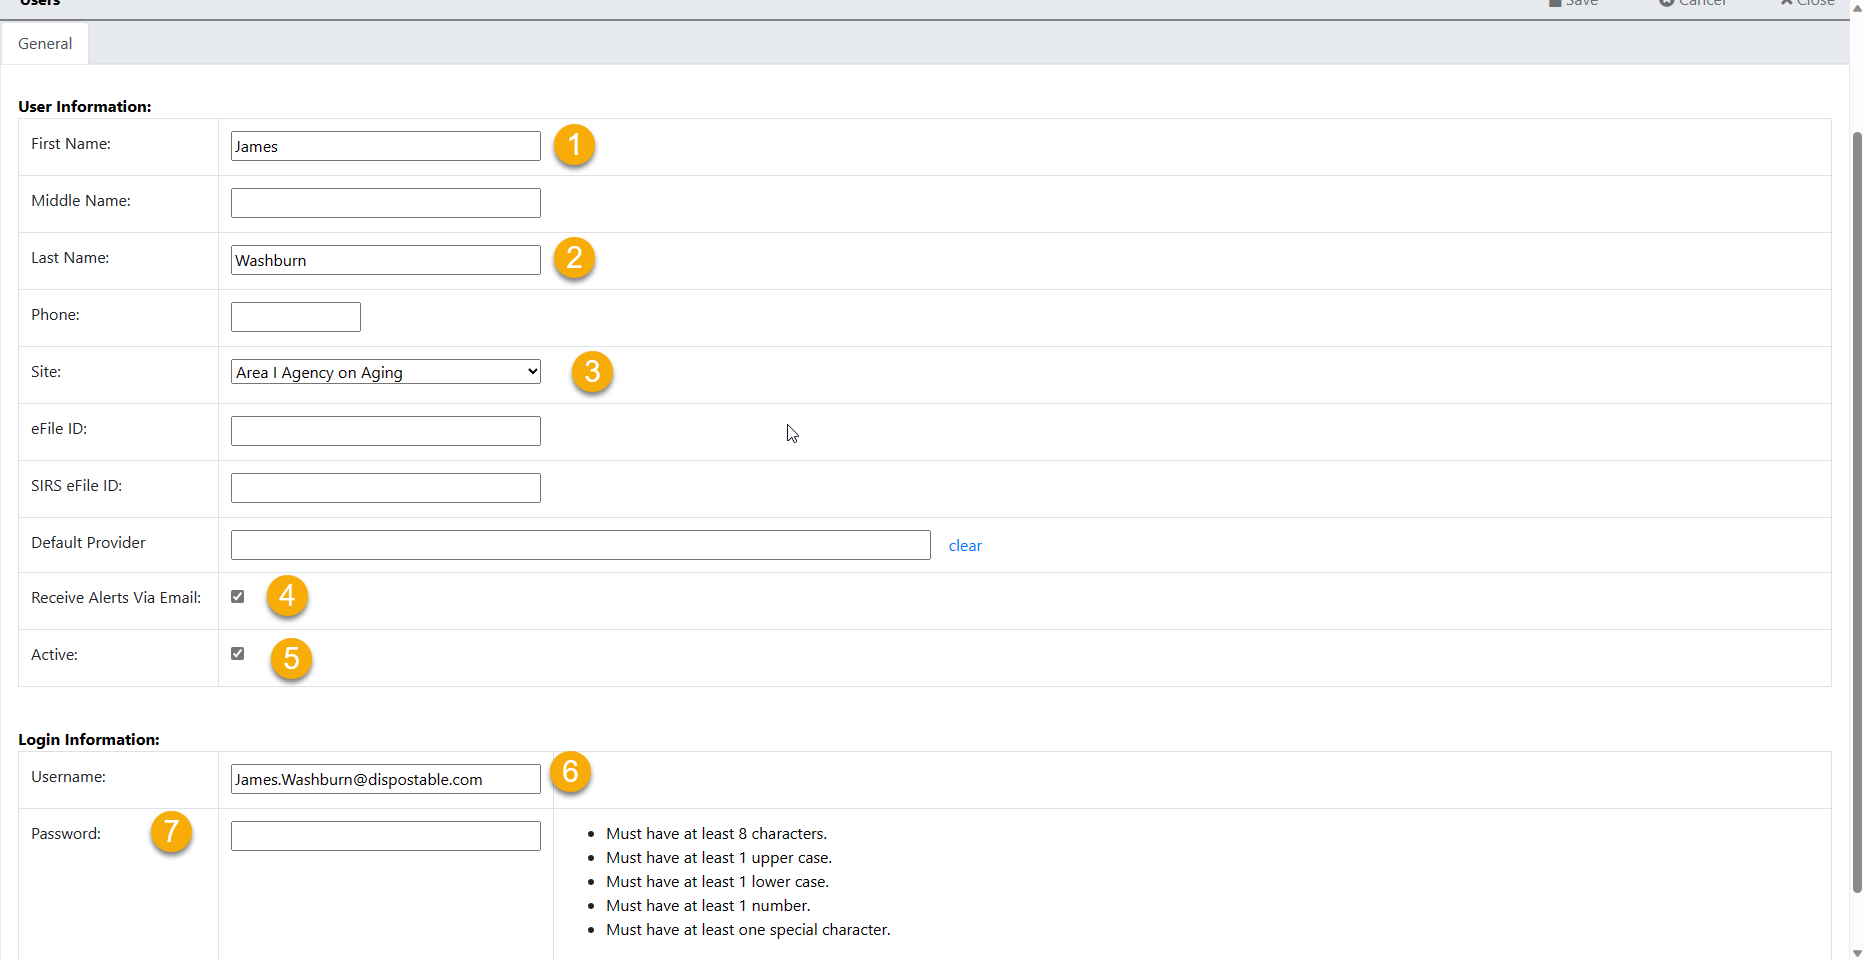
3. Enter - at minimum:
1. First Name
2. Last Name
3. Site
4. Email alerts preference (check mark the box if the user wants to receive emails)
5. Mark the active indicator
6. Add the user's email address as the User Name
7. Create a temporary password.
(Note you will need to notify the user of the password. Upon signing in the first time, the user will want to change the temporary password to a password of their choosing. See the Login section of this manual for instructions to the user)
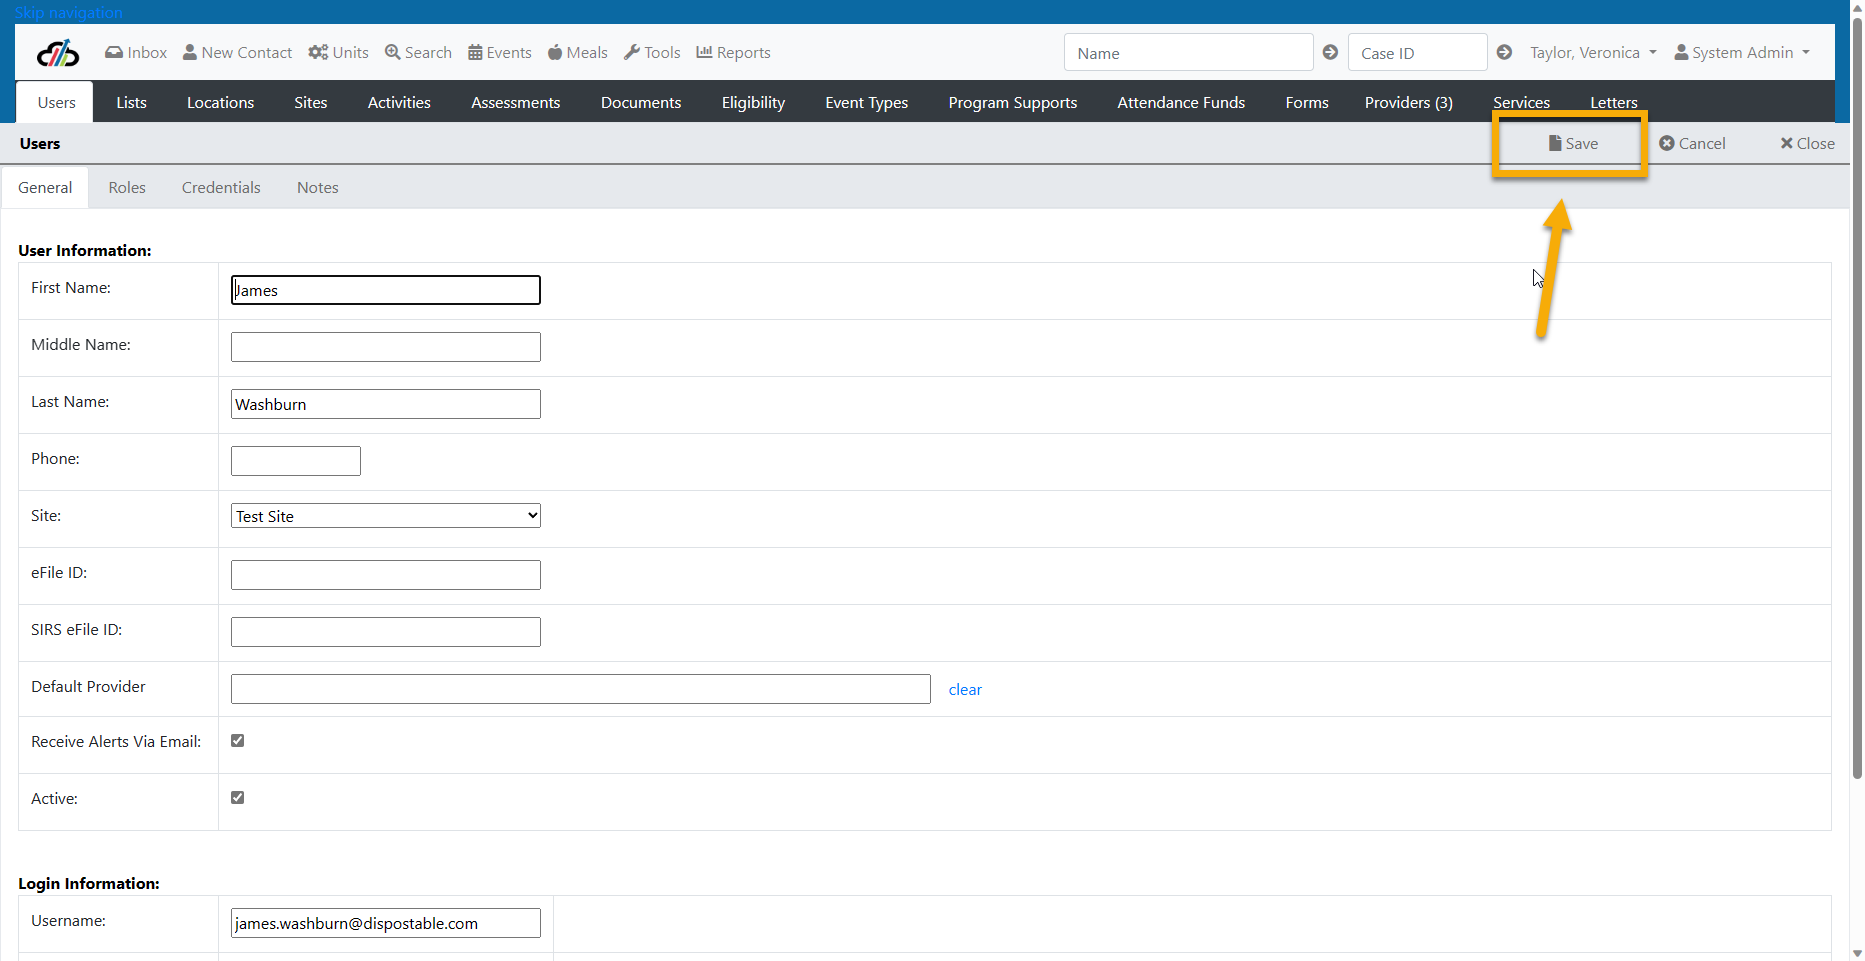
4. Save - once you save the information, the system will allow you to add user roles, credentials and notes about the user.
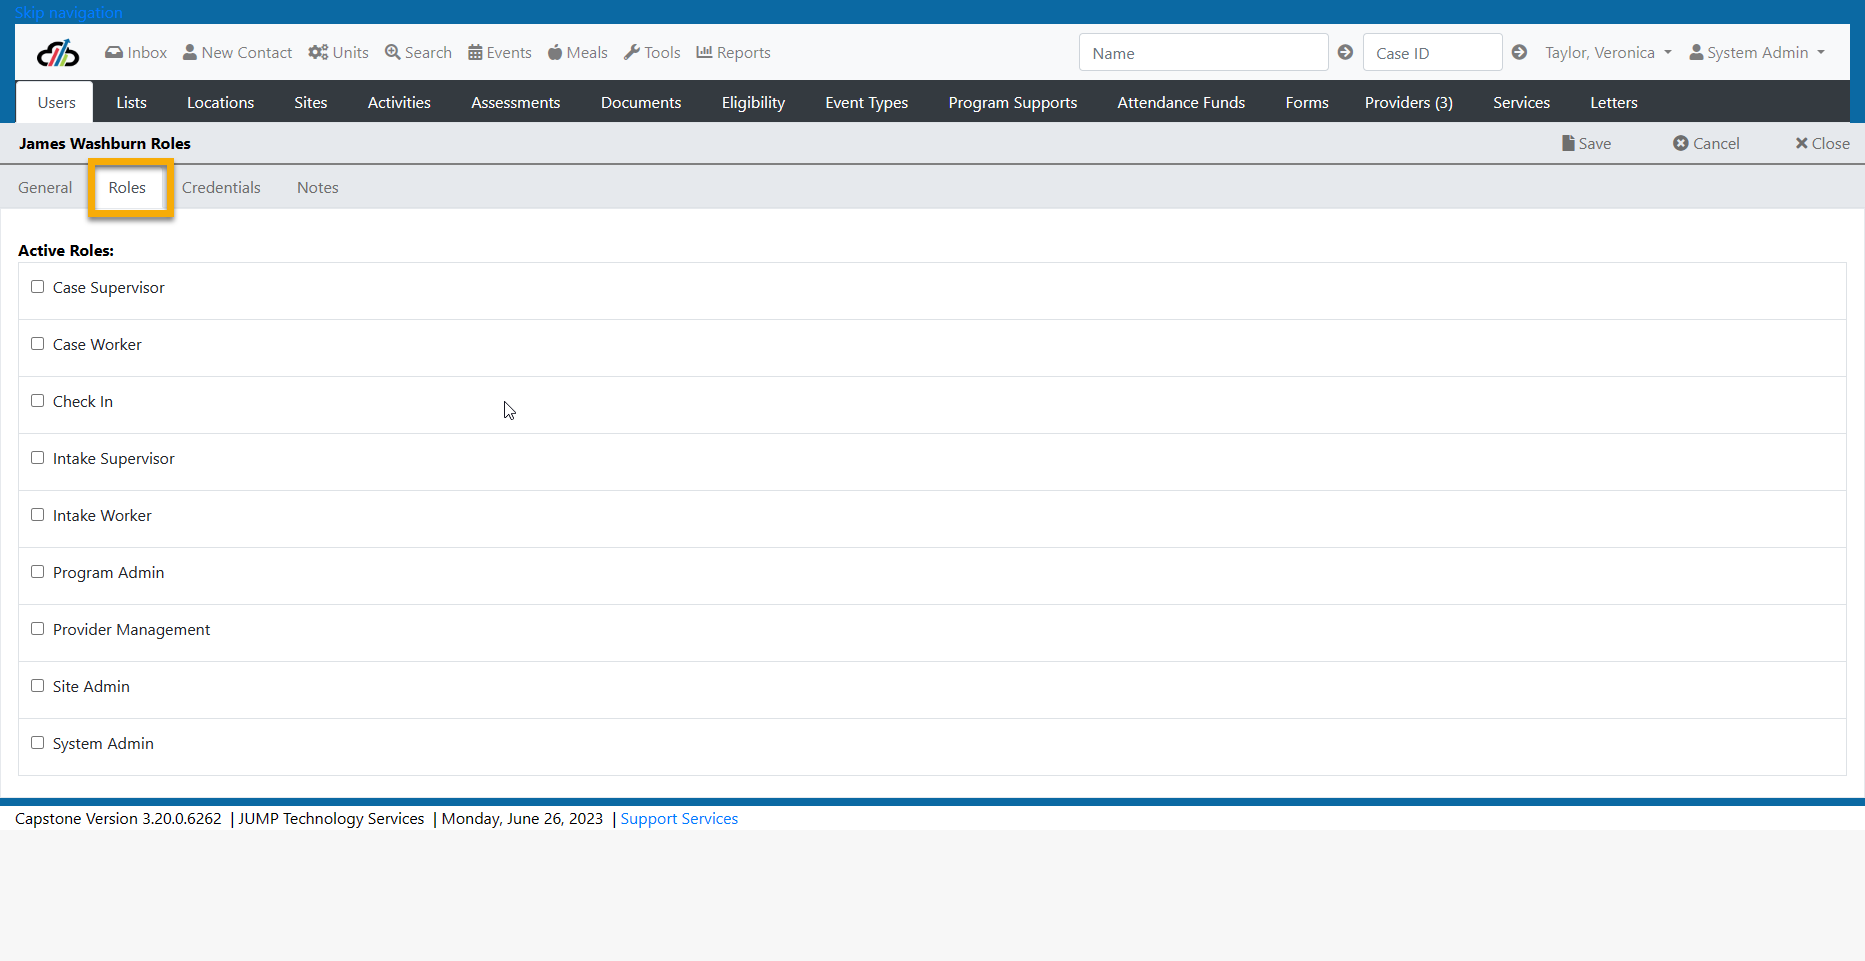
5. Add User Roles - a user must have at least one role in the system. Roles should correspond with the user's job function.
In Capstone, users may have one or more roles that correspond to their job functions. Users should have the least amount of access necessary to complete their assigned duties.
Intake Worker – The Community Relations and Intake Specialist (CRIS) is a key role in the success of Family Expectations and True Dad’s. This professional is responsible for the recruitment of program/study participants. This CRIS will be responsible for engaging in recruitment activities, maintaining effective community partnership relationships, completing intake and enrollment processes, and implementing evaluation processes and data collection tools.
Intake Supervisor – This user role has visibility of all work in process by intake workers for the designated site. This role ensures that all work is completed in a timely manner and may reassign work to another user.
Case Worker – Family Support Coach (FSC) monitors and facilitates workshop completion and provides individualized support to couples enrolled in the Family Expectations (FE) or True Dad’s (TD) program through reminder phone calls, consistent follow up and assessment of couple’s relationship challenges and immediate needs. The FSC will connect couples with community resources especially related to employment and mental health. As needed, the FSC will also reinforce the use of skills learned in workshops and serve as a liaison between couples and the Family Expectations Educators (FEE).
Case Supervisor – This role oversees case workers and the clients assigned to them. This role has reassignment privileges.
Program Admin – This role has the ability to run reports for one or more programs under a site. This role also has the scheduling tool for scheduling meeting space.
Provider Management - The Provider Management role is specific to Provider setup and management. The user with this role will provide setup support, communication, and resource management.
Site Admin – This role has special privileges to set up work groups and other custom tools and functions that are specific to a site.
System Administrator – This role is restricted to users who will be able to activate other users, reset password, configure lists, and other setup functions. Typically, this is someone at the Program Site.
-
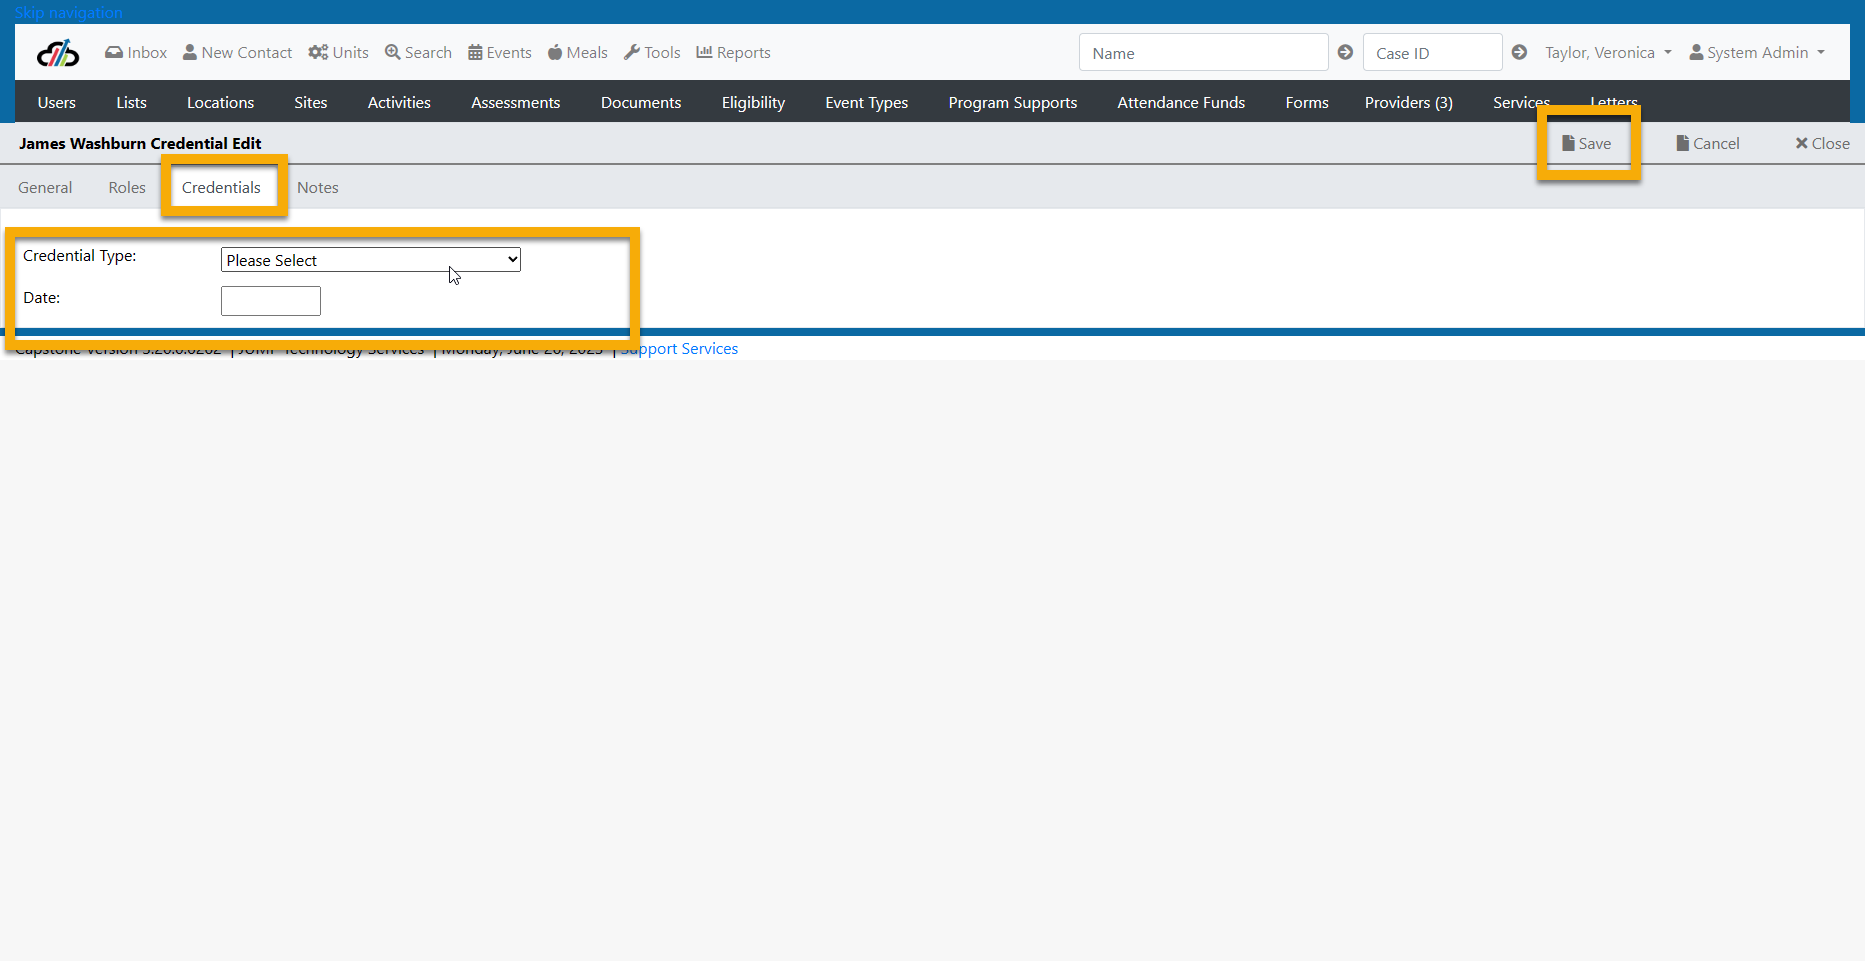
User Credentials is a place where you can add user training and certifications by clicking the +New in the top right-hand corner of the screen. (See User Tab - New Credentials and User Tab - Edit New Credentials)
-
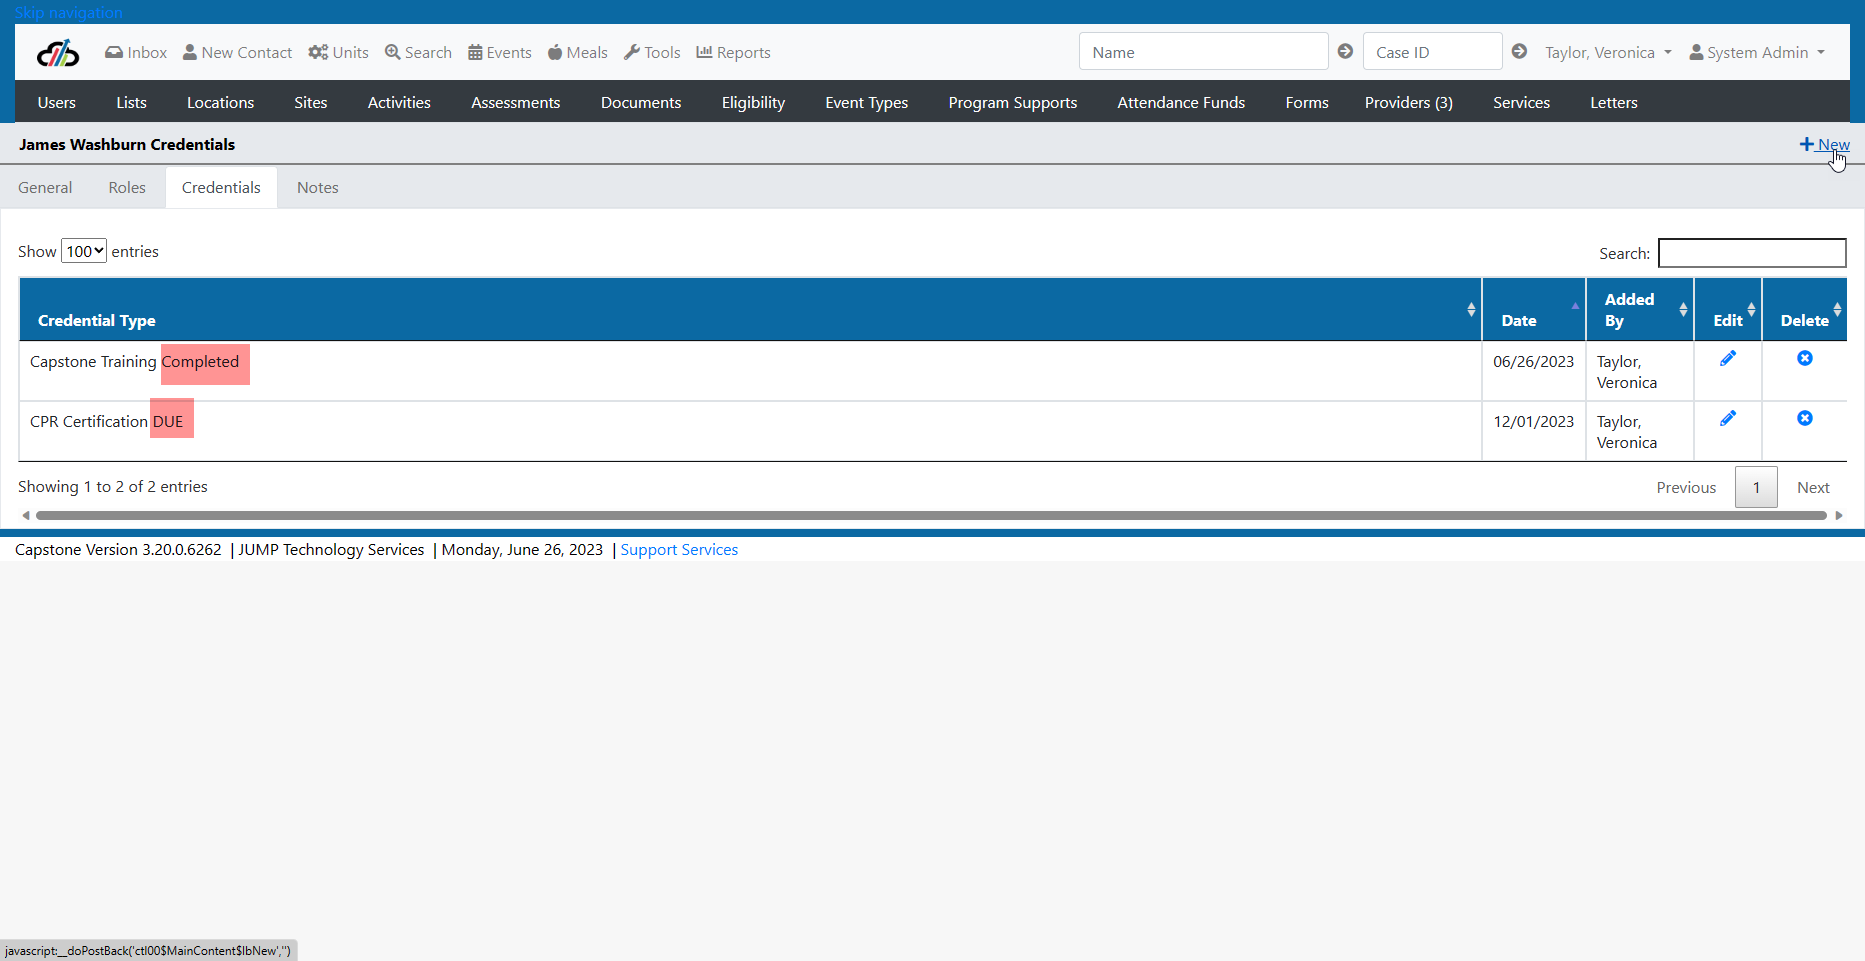
Some customers use this to track credentials earned, where others use it to track credentials due. It is up to you to determine how you want to use this feature. (See User Tab - Credentials Usage)
-
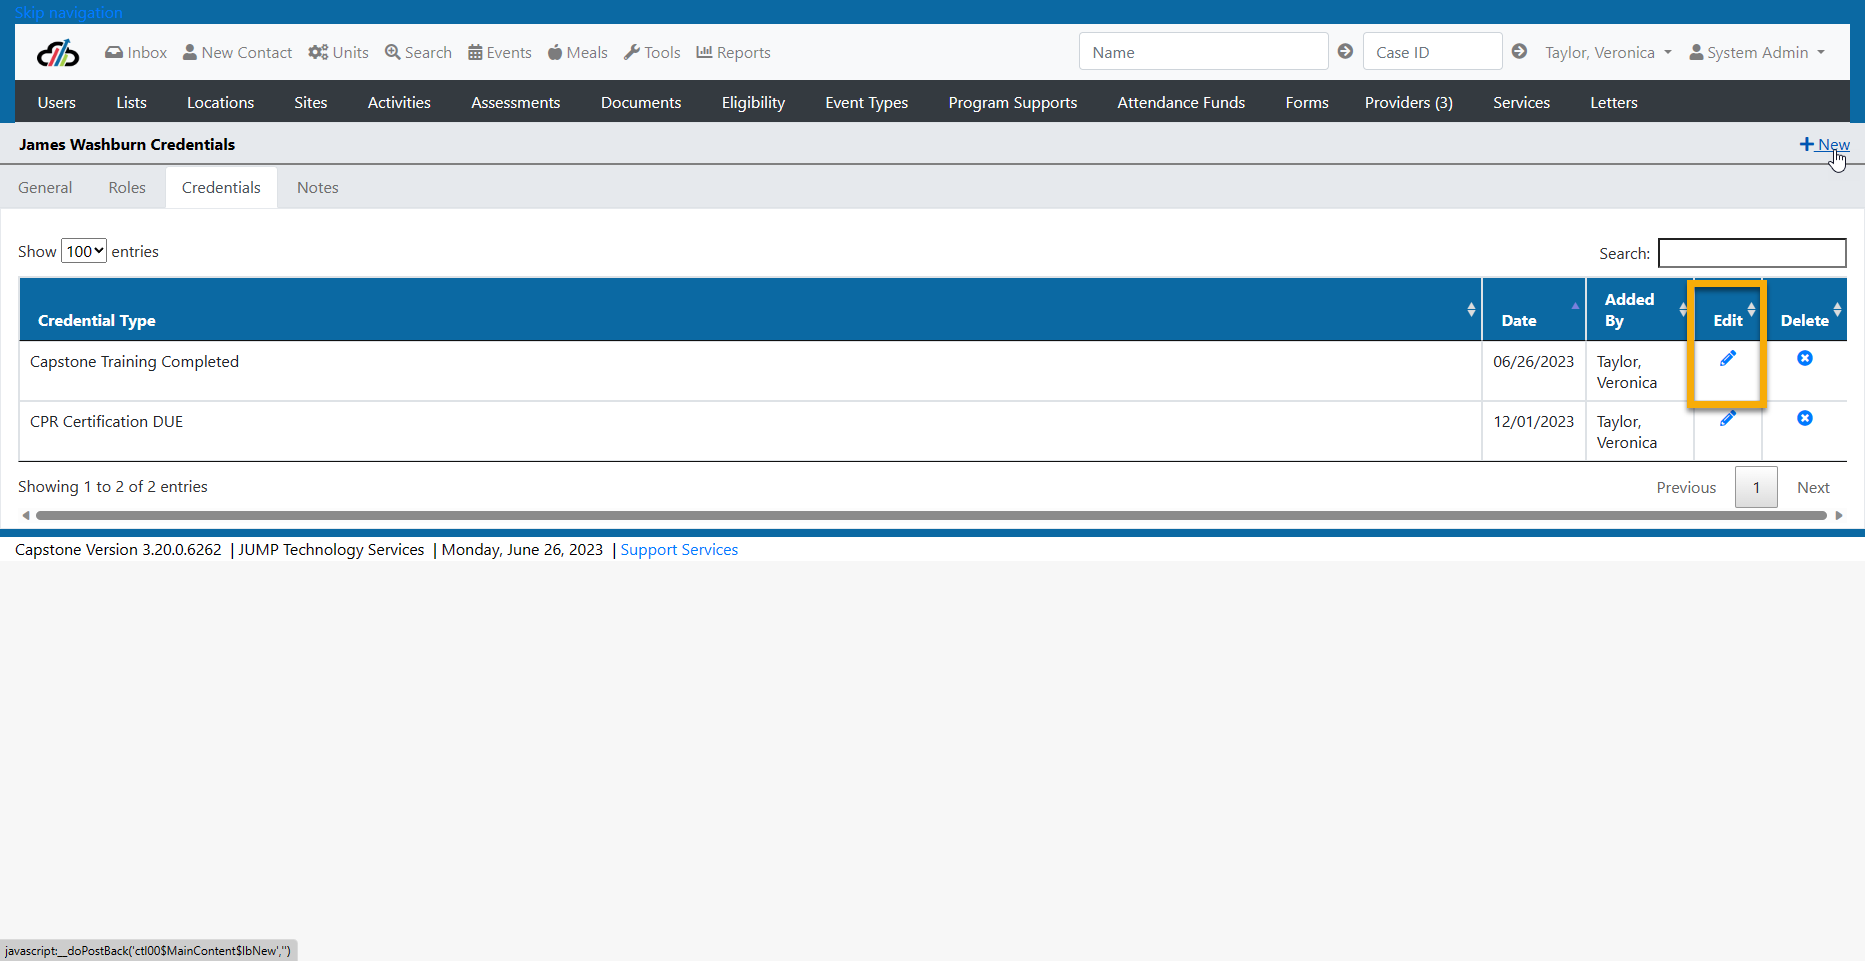
Credentials can be edited and deleted. (See User Tab - Editing Existing Credentials)
-
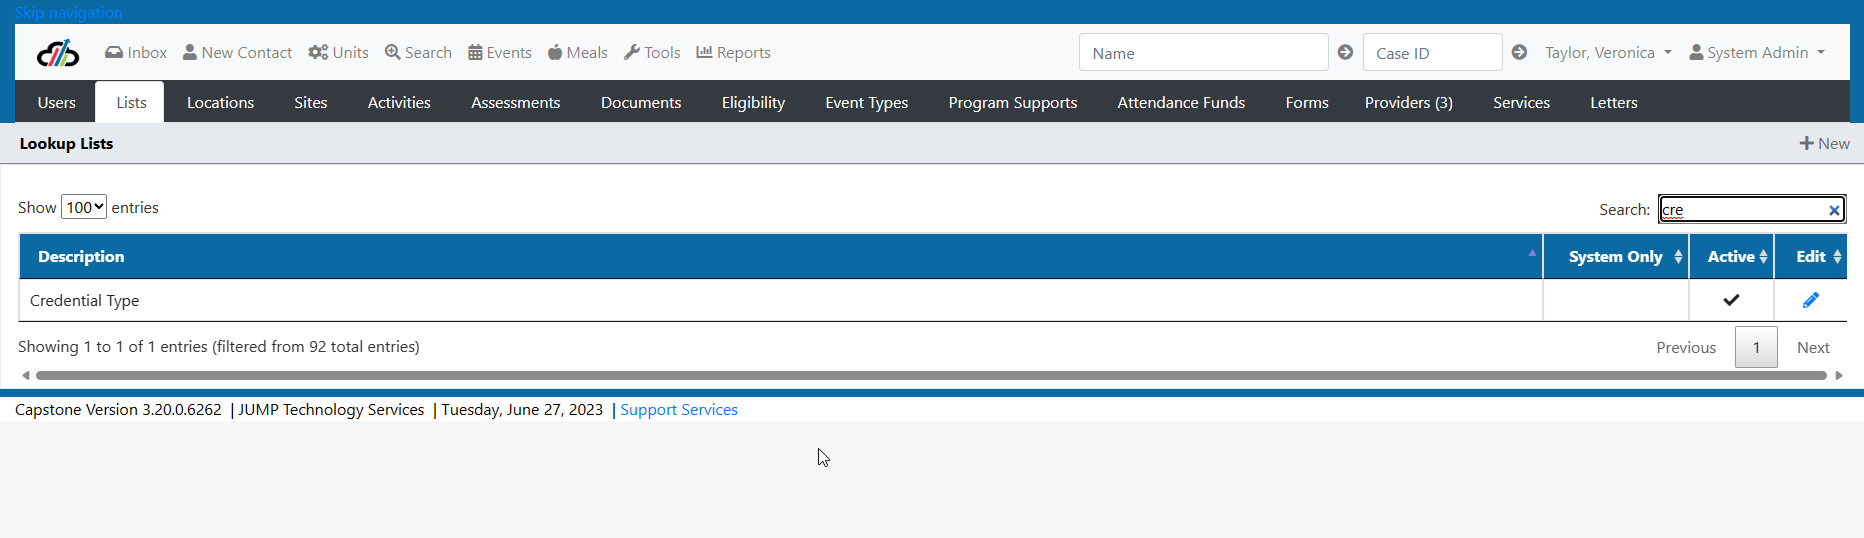
The drop-down list for credentials is configurable and can be managed through the List Tab. (See User Tab - Credentials List)
-
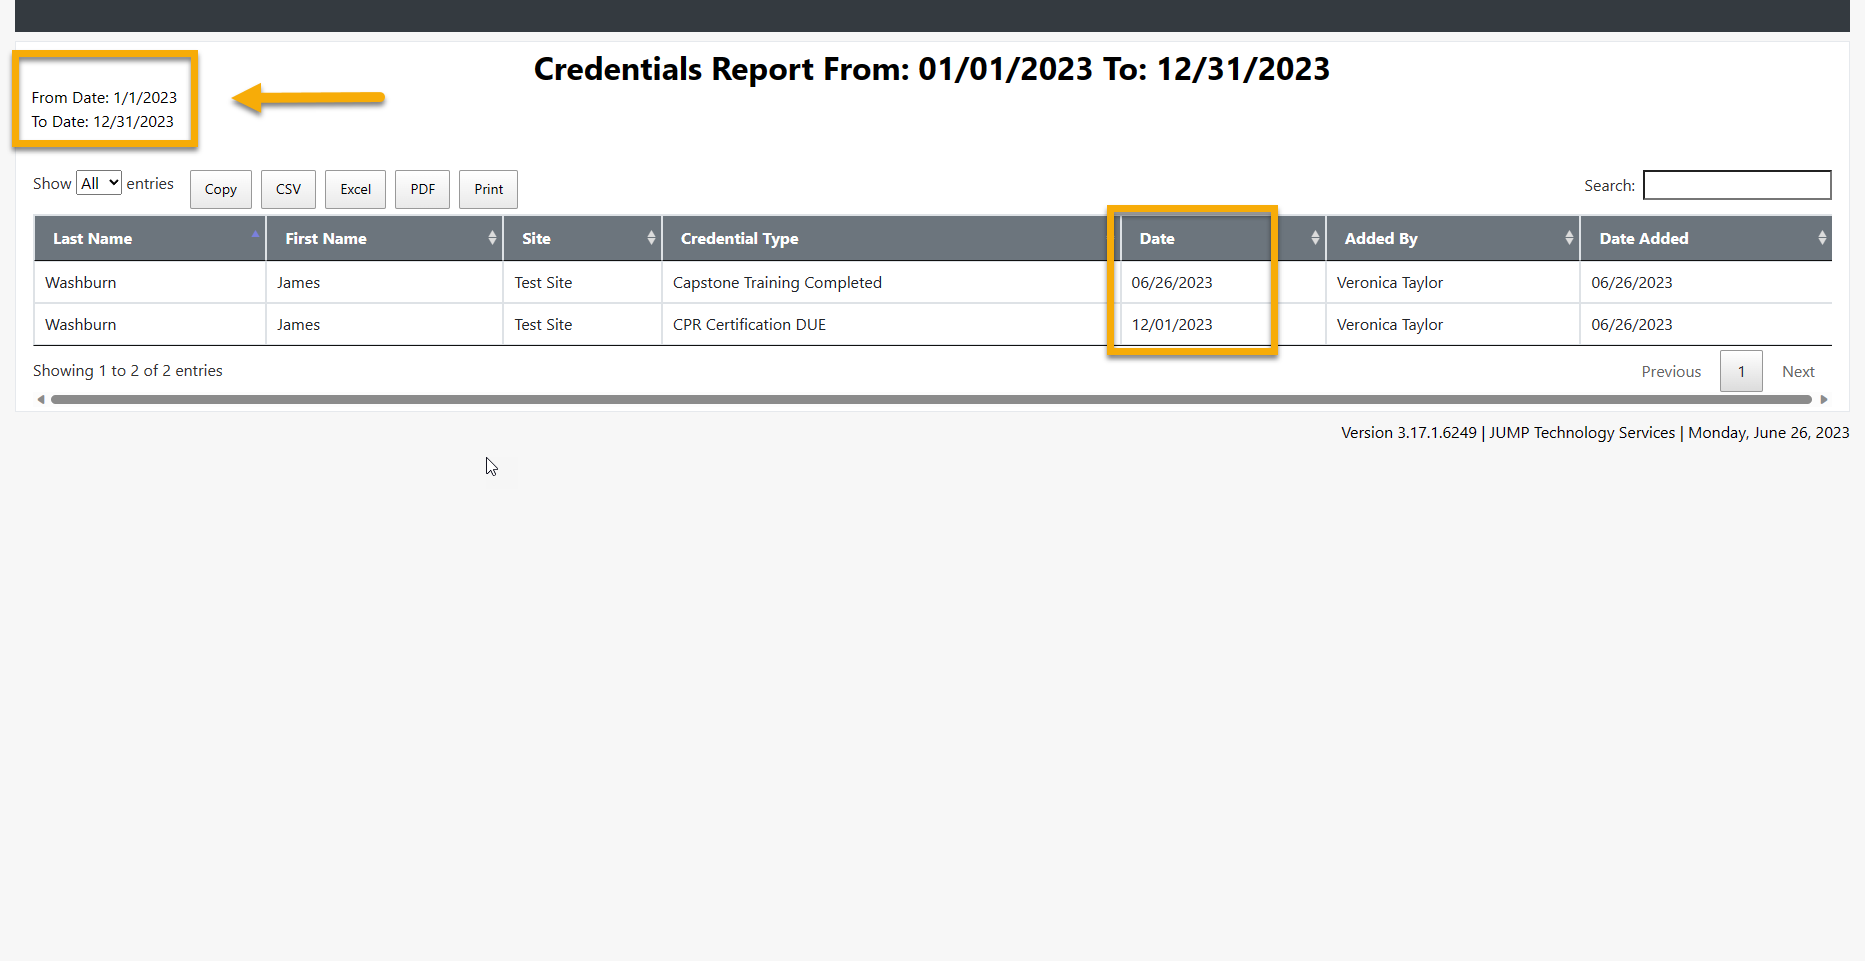
A Credentials Report is available through the Reports Tab which allows you to see user credentials based on a specific time frame. Some customers run this report weekly, some monthly, and others annually depending upon their individual goals.
For more information about the Credentials Report, consult your Reports Manual. (See User Tab - Credentials Report)
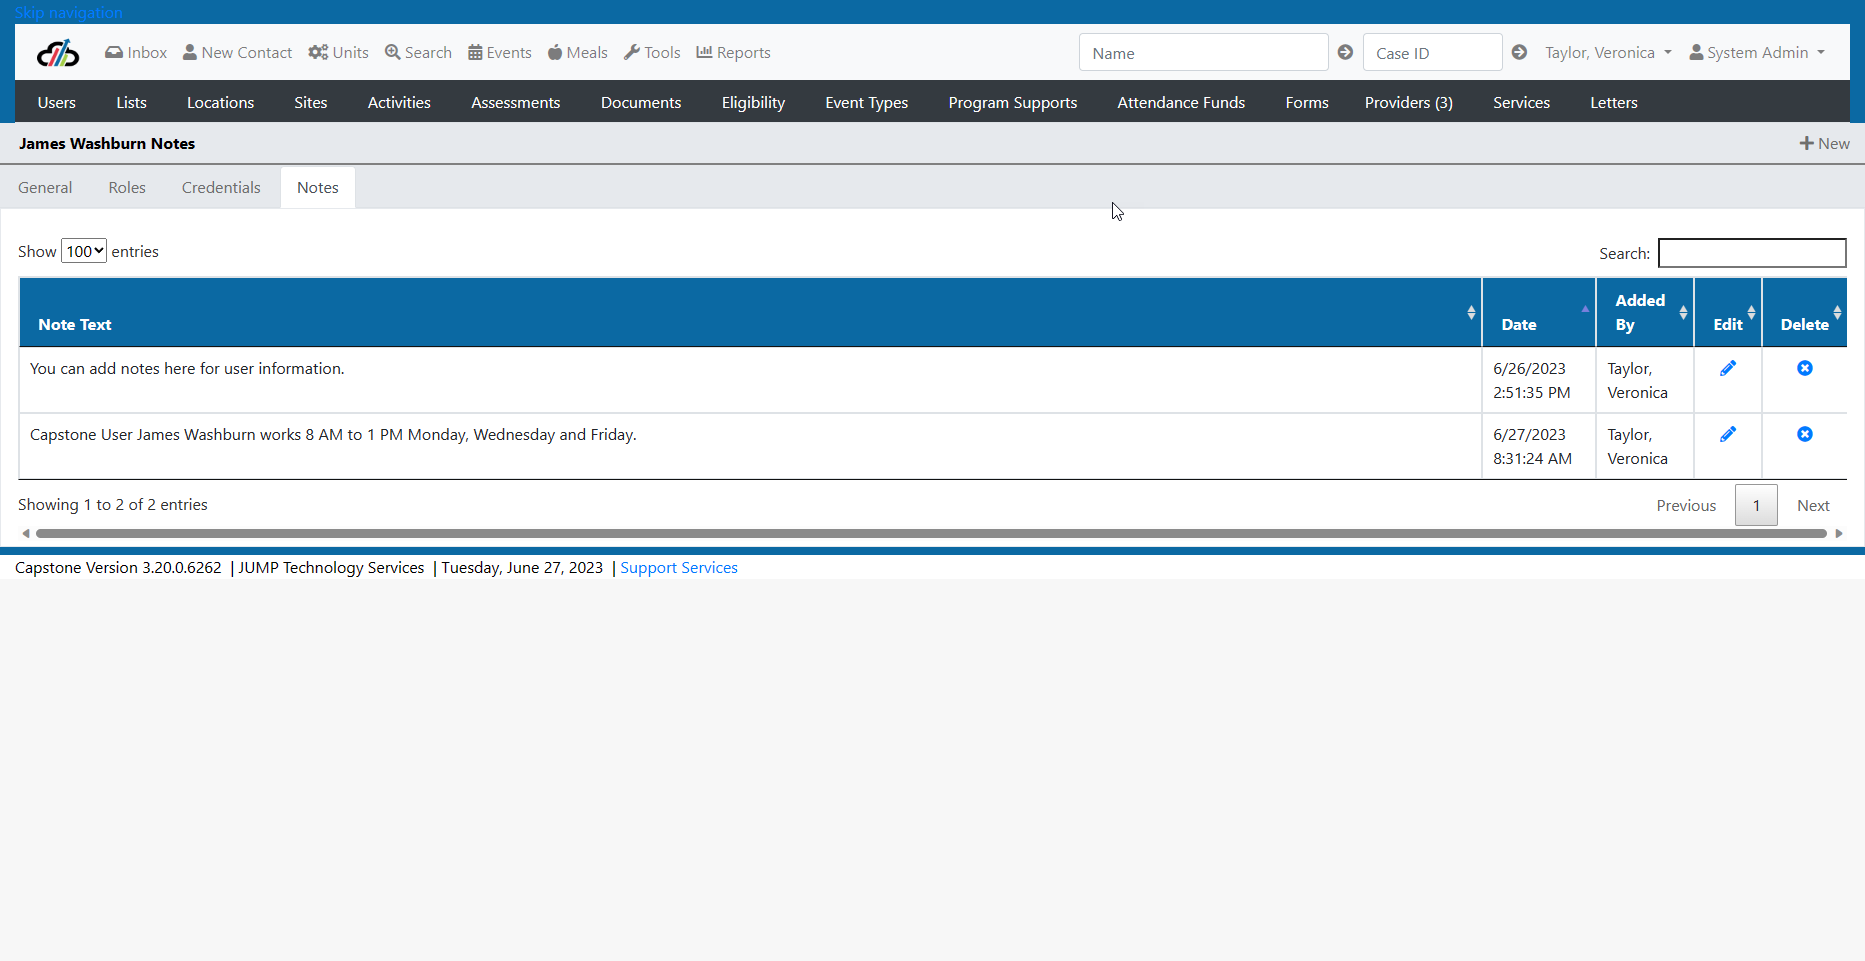
Adding a note to a user profile allows you to capture any information specific to that user. The note can be edited or deleted as necessary. For example, if you wanted to note that this user works 8 AM to 1 PM Monday, Wednesday and Friday, you could do so using the Capstone User Notes.
Editing Users
To edit user information, select the pencil icon.
System Administrators can manage items which appear in drop-down menus through "Lists". Things to note:
- Lists should not be changed unilaterally.
- Discussion among the key personnel in your organization and with JUMP personnel will yield the best results.
- Some list items impact reports.
- Not all List items are available for edit. Some List items are strictly System Only and may vary from customer to customer based on customer needs and contracts. (See screenshot List Tab - Overview)
- As with all good system stewards, JUMP reserves the right to update, edit and remove access to any and all lists.
Editing a List Value
- To edit a list item, select the pencil icon. (See screenshot Lists Tab - Edit)
- System Administrators have the ability to Rename or Inactivate Category Details. (See screenshot Lists Tab Edit 2)
- Use Category Values to add a list value or edit a current list value. (See screenshot Lists Tab Edit 3)
An example of a time a customer wanted to add or change a category value:
Staff needed a place to log "other numbers" for quick reference, such as a state case ID or a reference to an old system.
The System Admin discussed this with JUMP and the System Admin was given the go-ahead to add a new Category Value in Notes.
The System Administrator recognized that the system has multiple types of notes including:
- User Notes (which does not have a drop-down list so it does not appear under the Lists Tab)
- General Case Notes aka Note Type
- Organization Notes
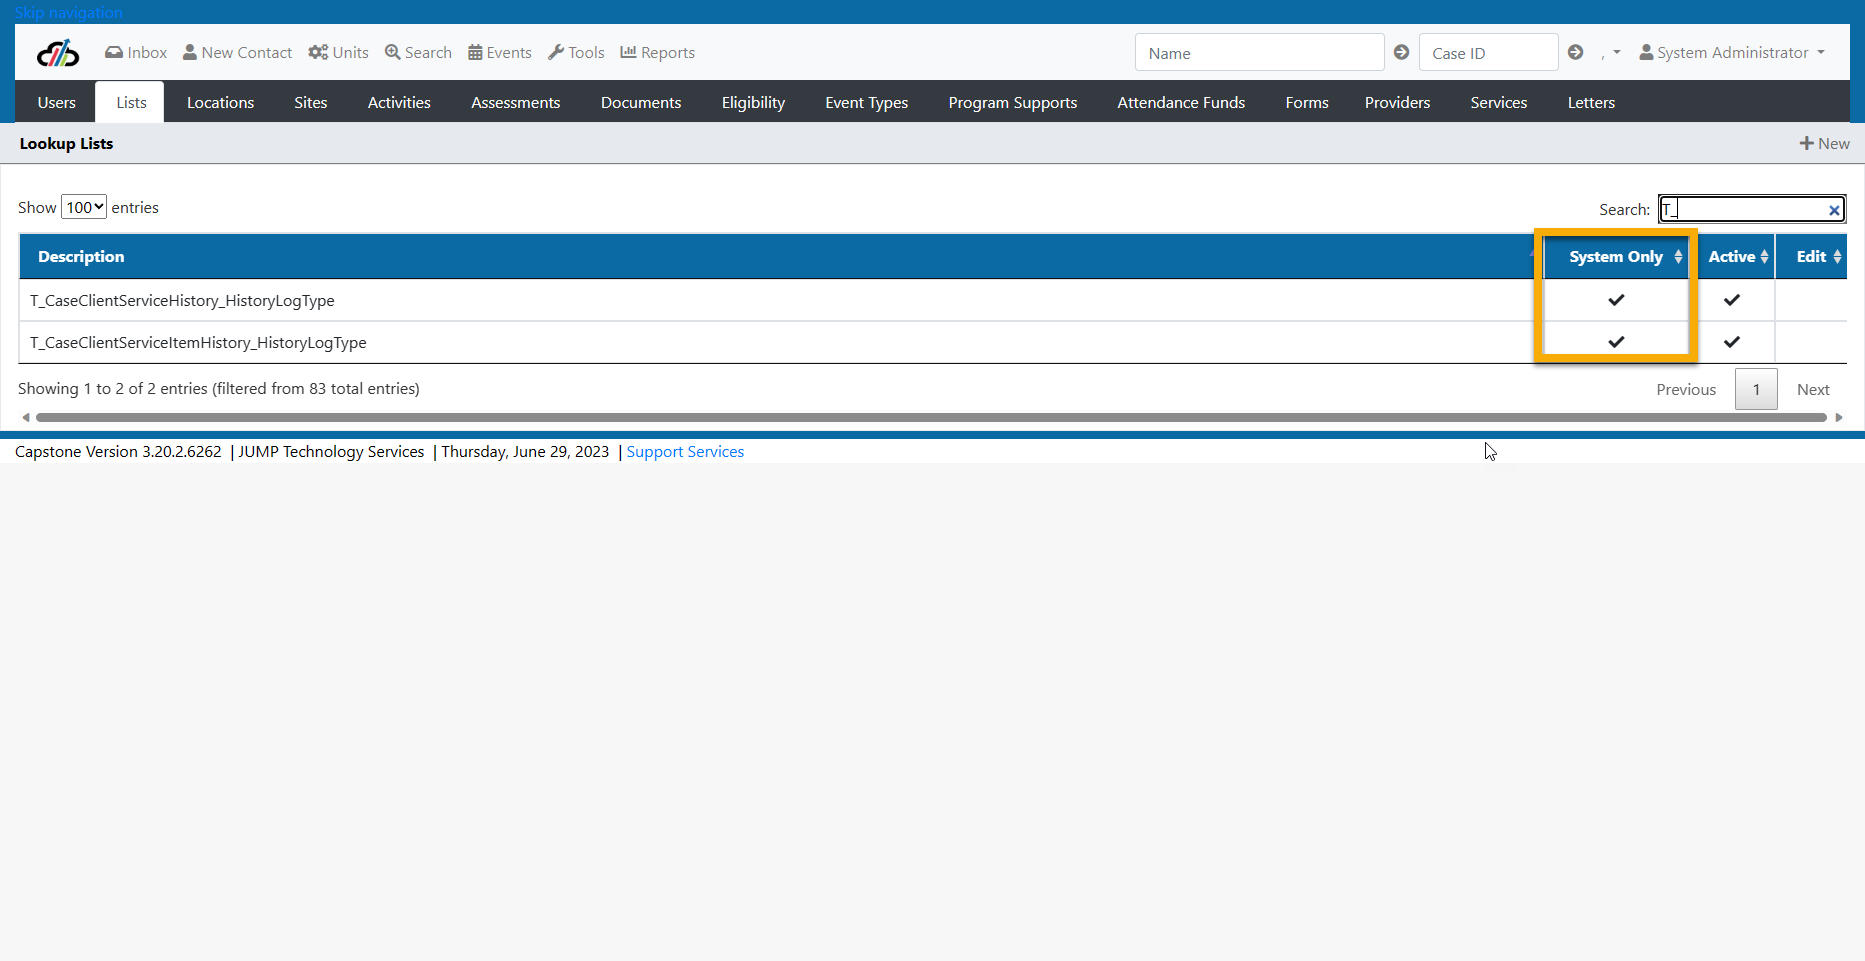
First, the System Administrator navigated to the Lists Tab, and searched the term Note to pinpoint the correct List (See screenshot Lists Tab - Search).
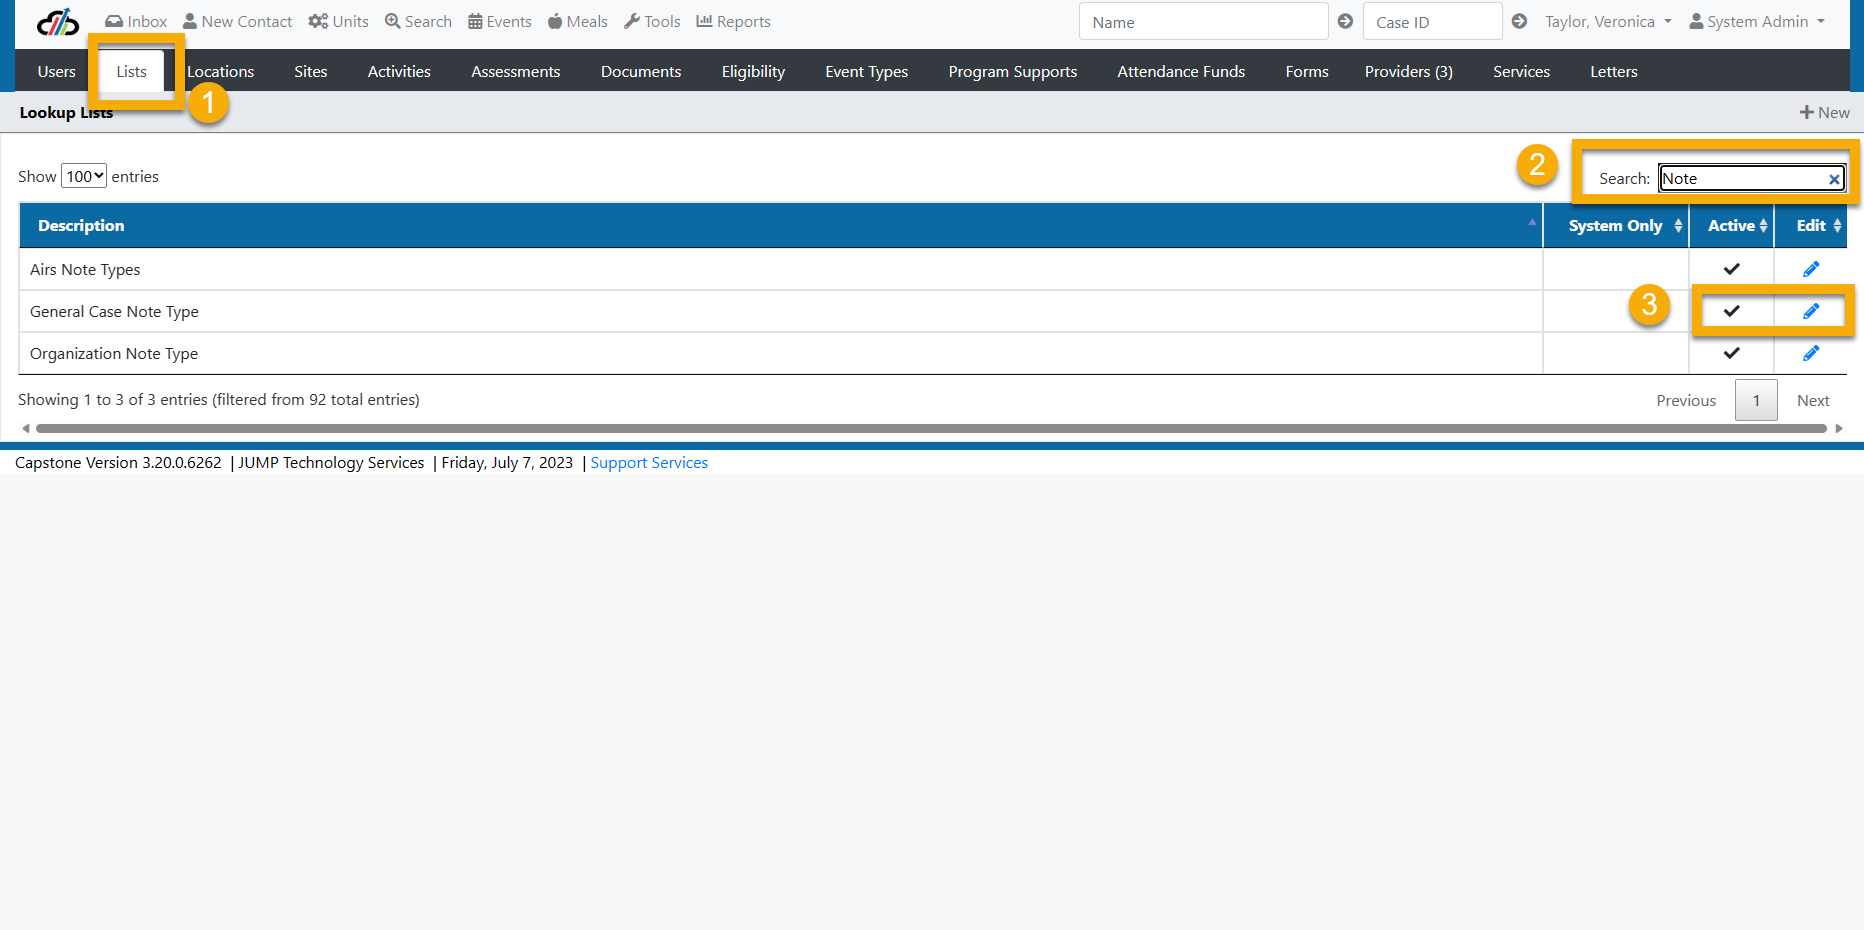
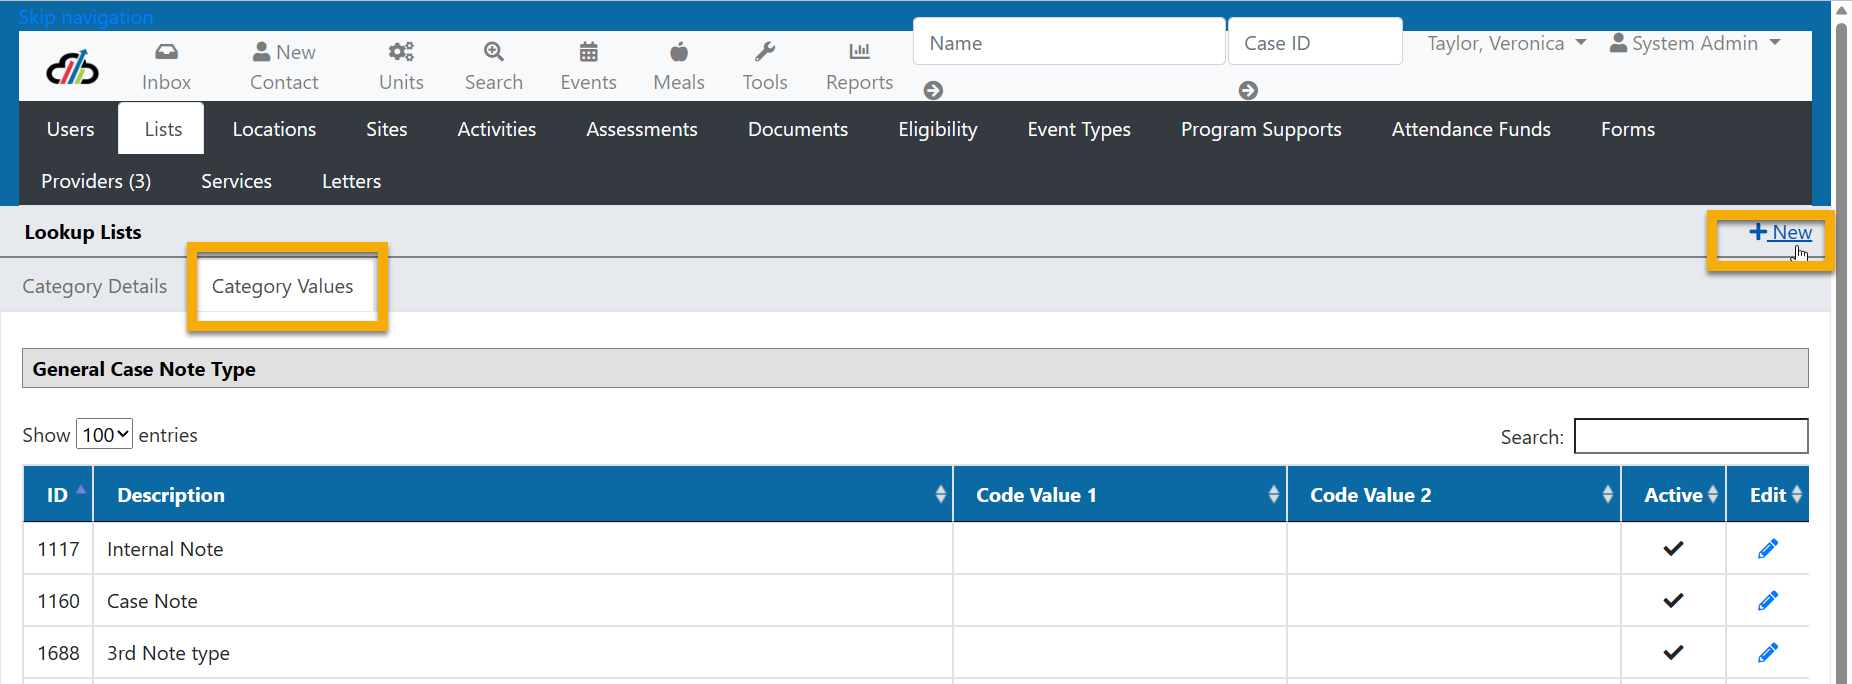
Once the correct list was located, a new category value of "Other Numbers" was added by selecting +New (See screenshot Lists Tab - New Category Value)
Next, the System Admin
1. Added "Other Numbers" as the Value Name (See screenshot Lists Tab - Editing Category Value)
2. Made the Category Value Active by placing a checkmark in the box (See screenshot Lists Tab - Editing Category Value)
3. Saved the Category Value
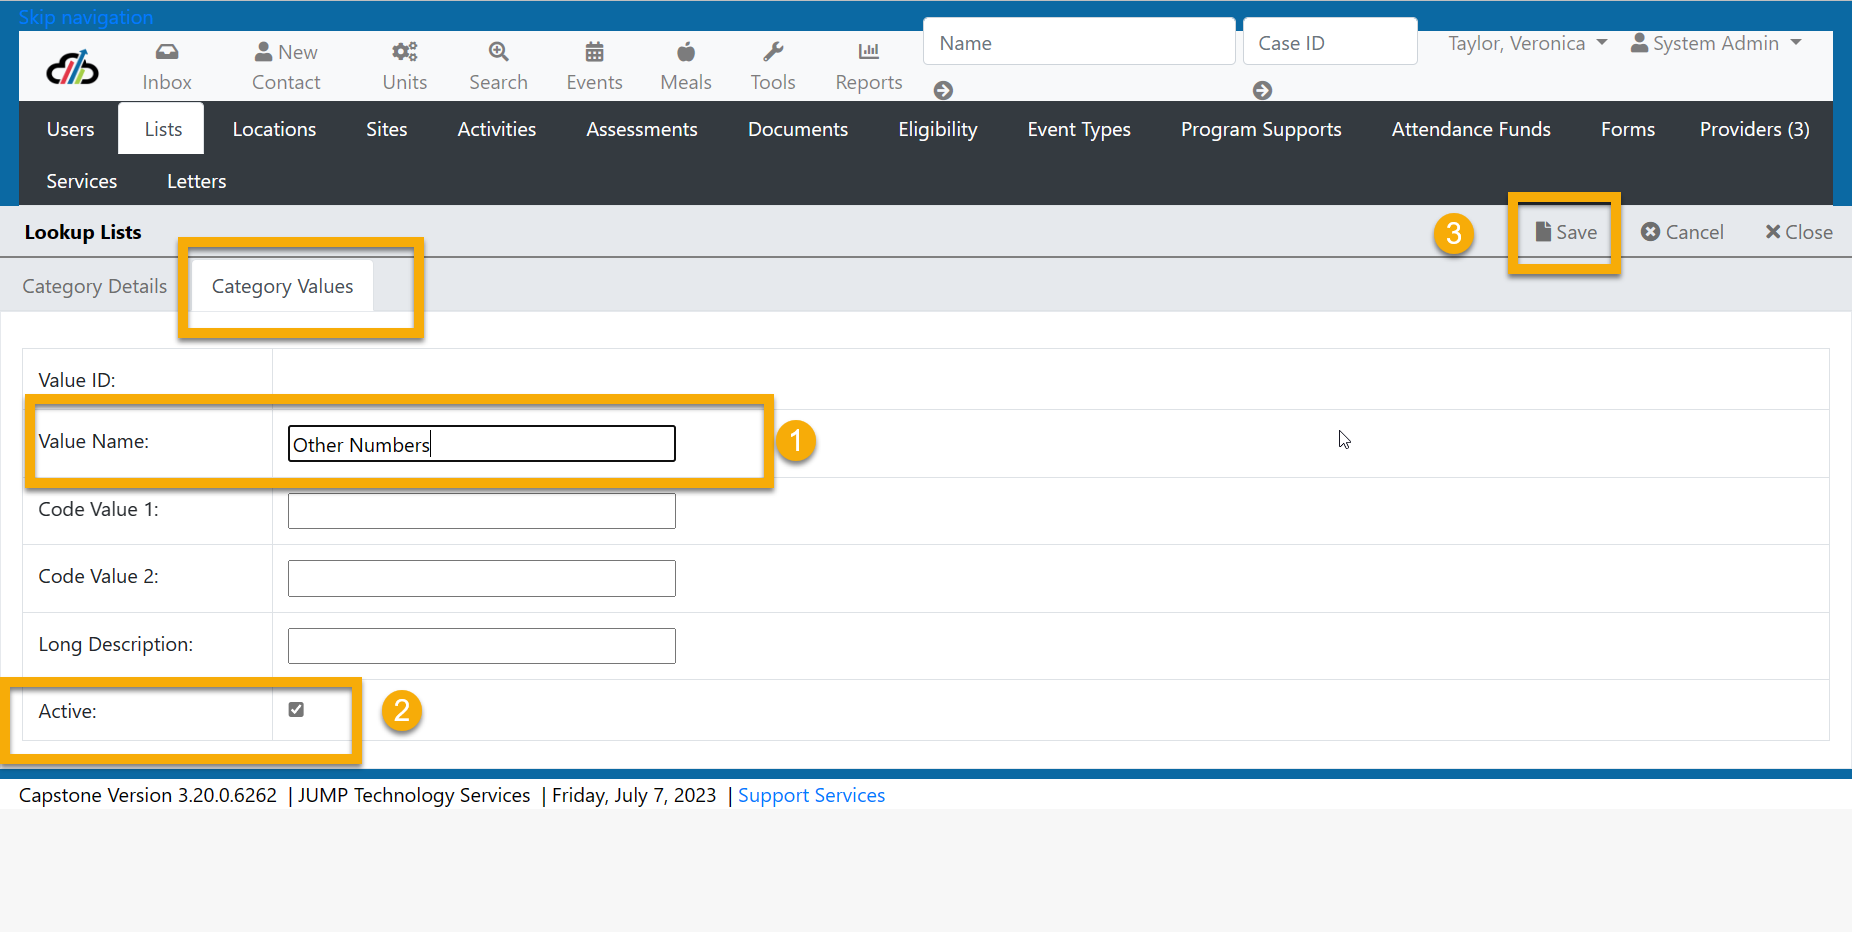
(Lists Tab - Editing Category Value)
Now, users can select Other Numbers from the Notes dropdown when in a client's case.(See screenshot Lists Tab - Notes)

(Lists Tab - Notes)
What is the Program Site and Partner Sites?
A Program Site is the entity that operates the client application, eligibility, and enrollment for different service programs. This is the State Agency or customer who is contracted with JUMP.
A Program site may operate as a service delivery provider or the Program Site may refer all client services to a third-party provider known as a Partner Site. The Program Site may have multiple Partner Sites.
Examples of a Partner Site would be a YMA or Hope Pregnancy Center.
There should only be one Program Site in Capstone as indicated by the Program checkbox. (See screenshot Sites Tab - Program)

Sites Tab - Program
NOTE: You will see the Program Site and Partner Sites listed in two other places in the system.
The first is in User Information on the User General screen. Users must be assigned to a Program or Partner site. (See screenshot Sites Tab - Users)

The second is on the Provider General Tab. Here, you will select either the Program or a Partner Site to govern the providers. (See screenshot Sites Tab - Provider)
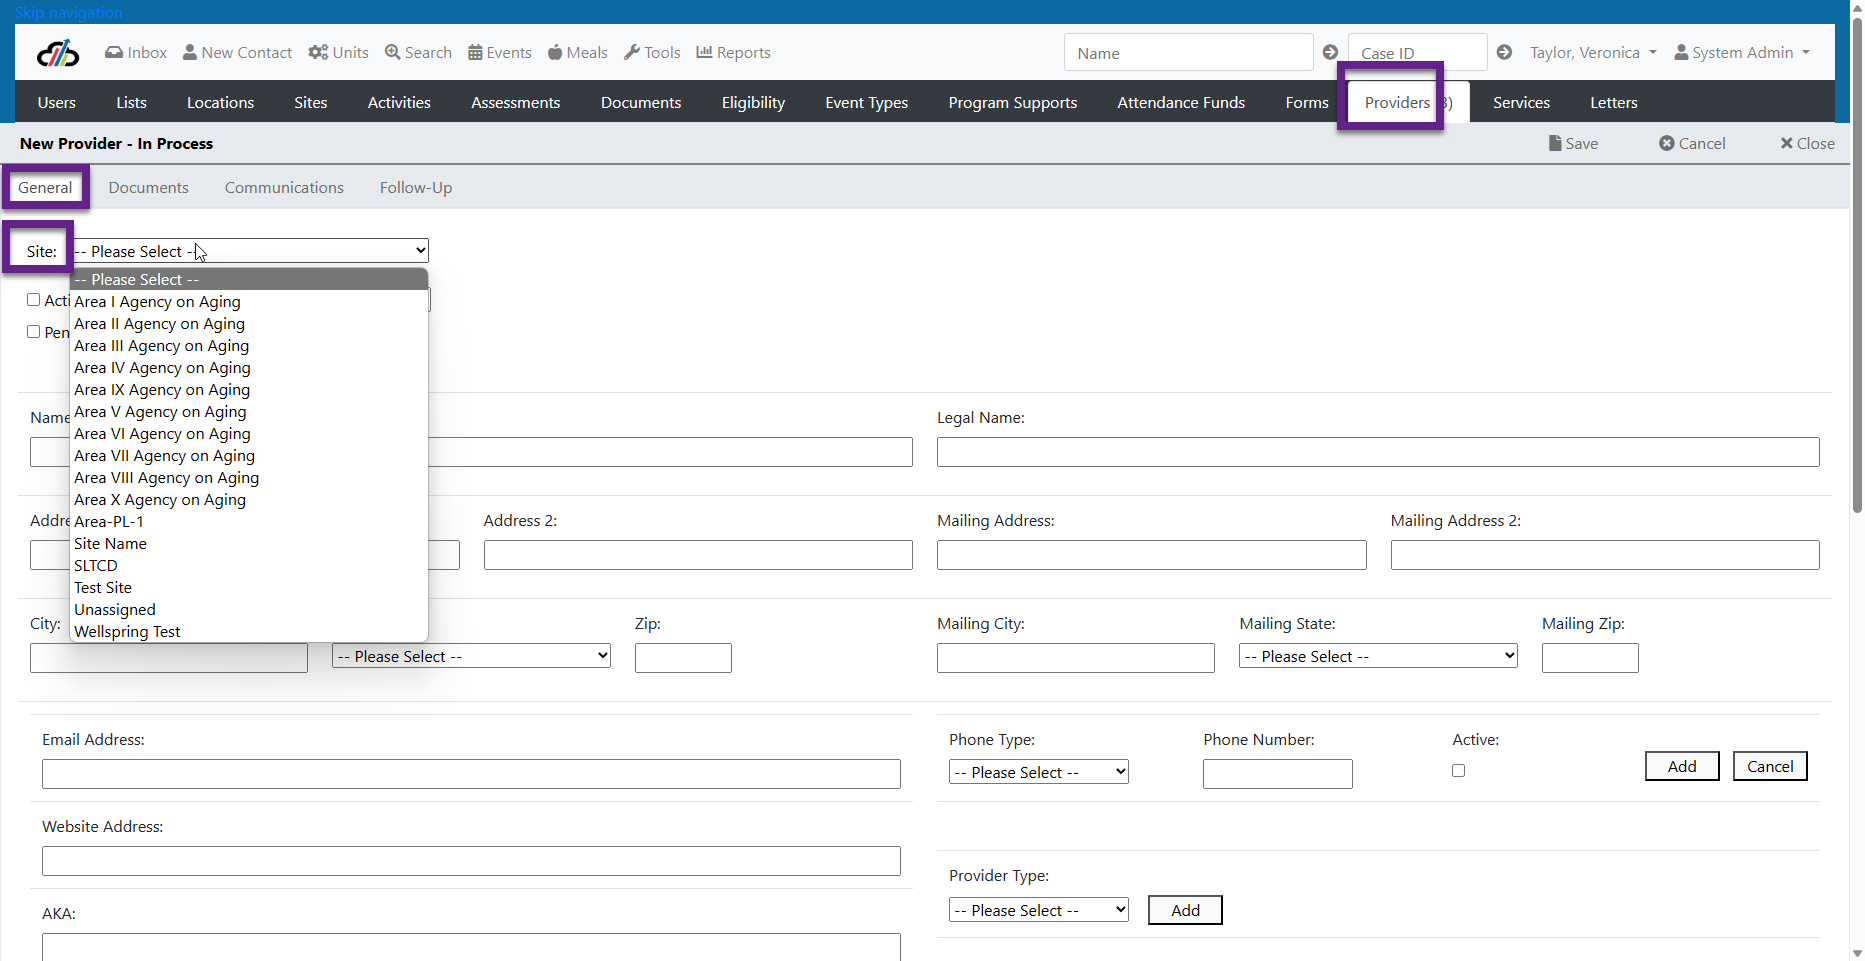
Sites Tab - Provider
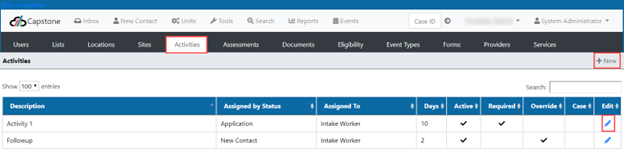
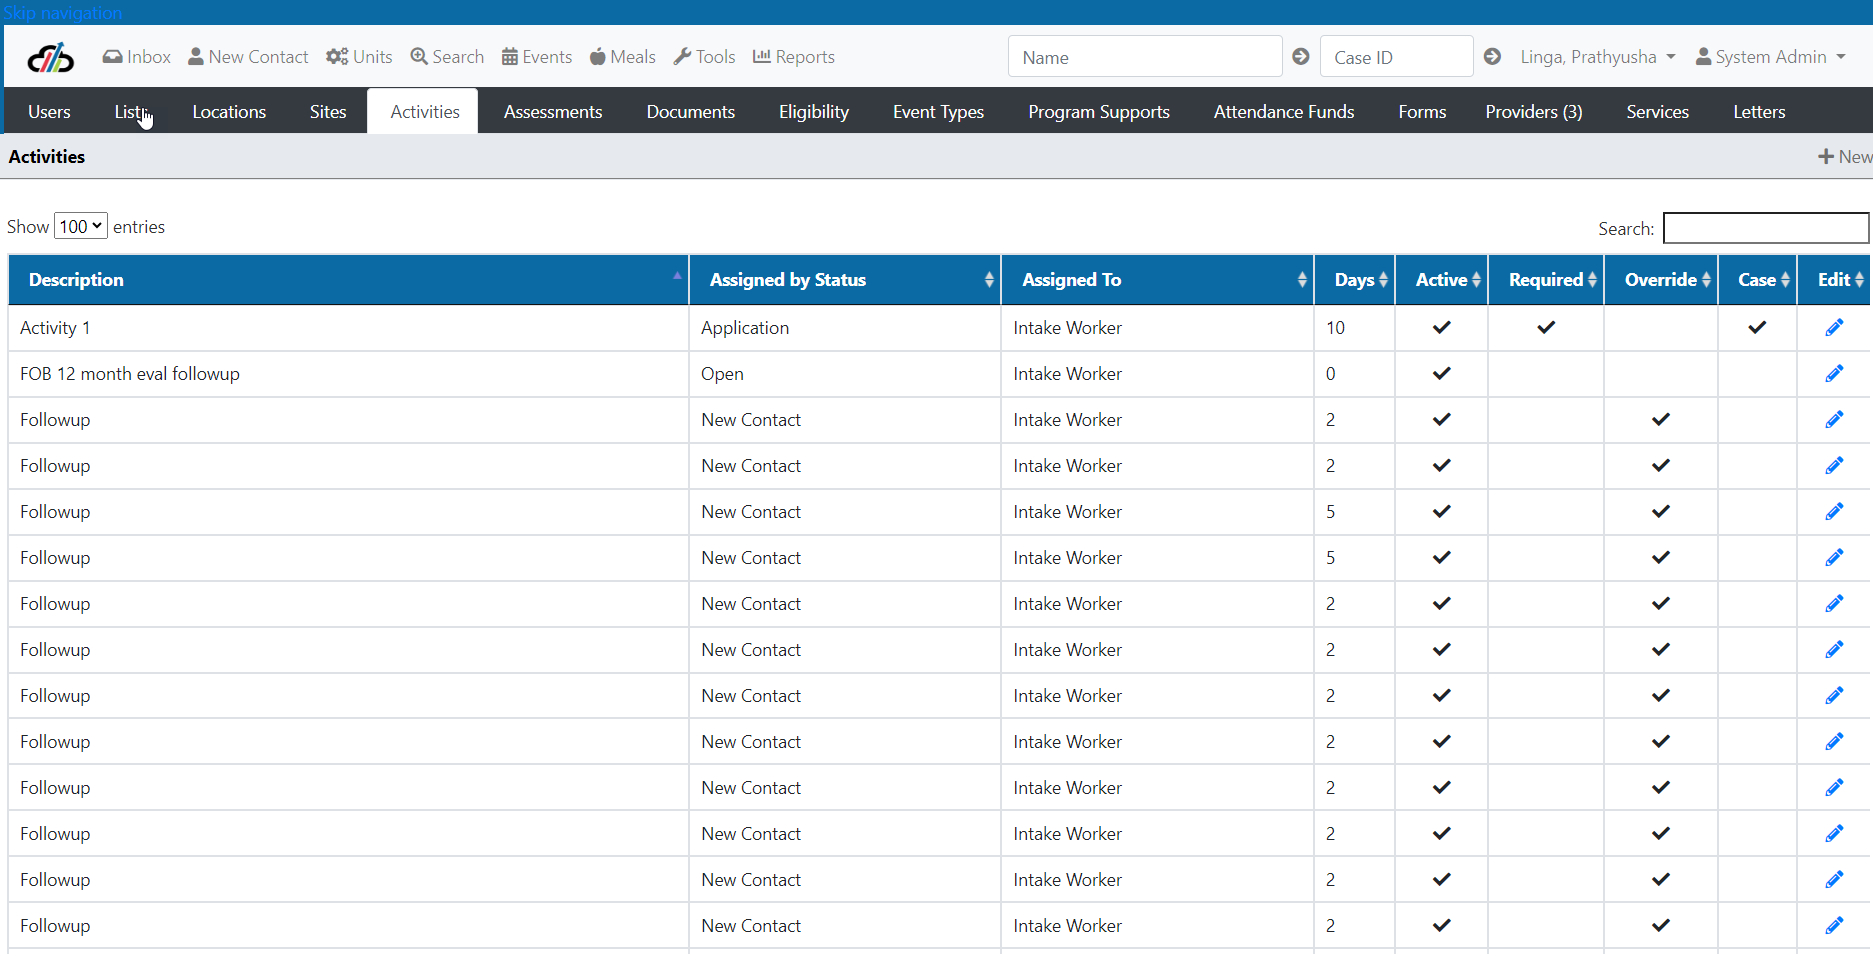
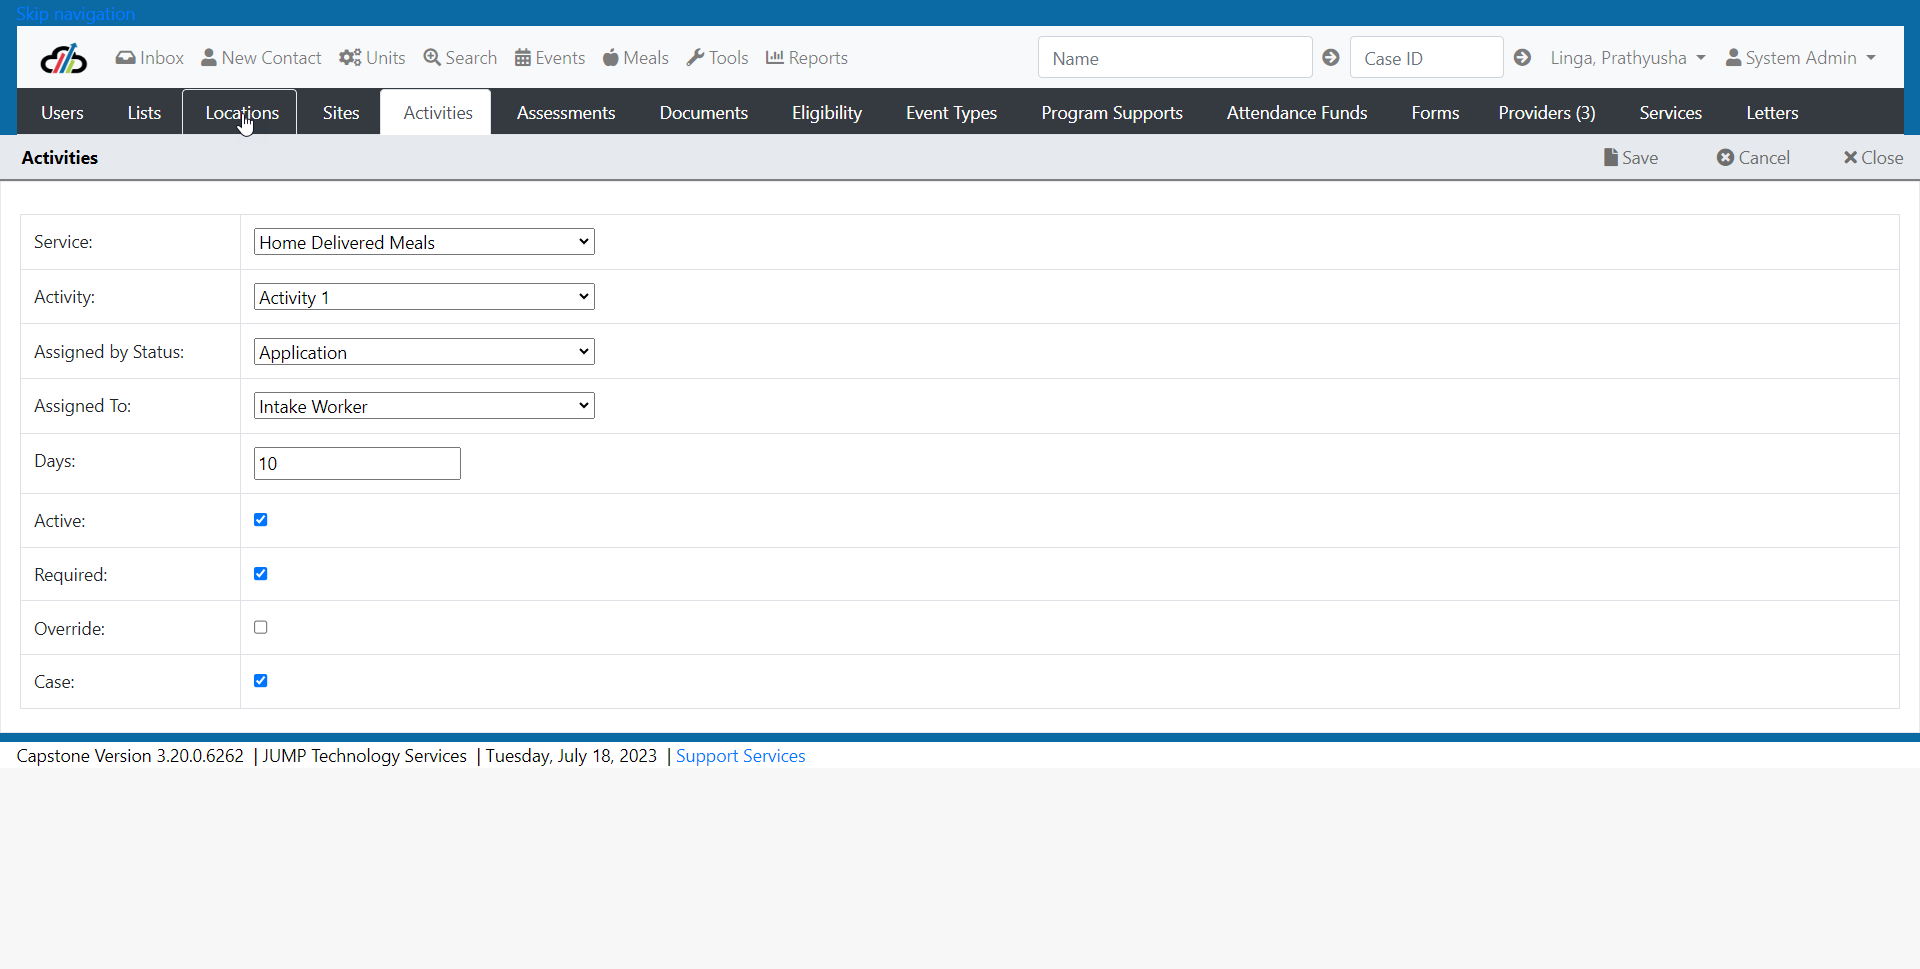
On the Activities tab (See screenshot Activities 1) the System Administrator can add or edit an Activity that is to be completed by staff. The System Administrator will:
- Select the Service the Activity will be tied to
- Select the Activity (NOTE: New Activity Types are added through Lists Management)
- Select the Assigned by Status
- Select the Assigned to Status
- Add the number of allowable days
- Mark the Activity as “Active”
- Mark the Activity as Required when this activity is mandatory
- Allow an override
- Mark whether this is a case management
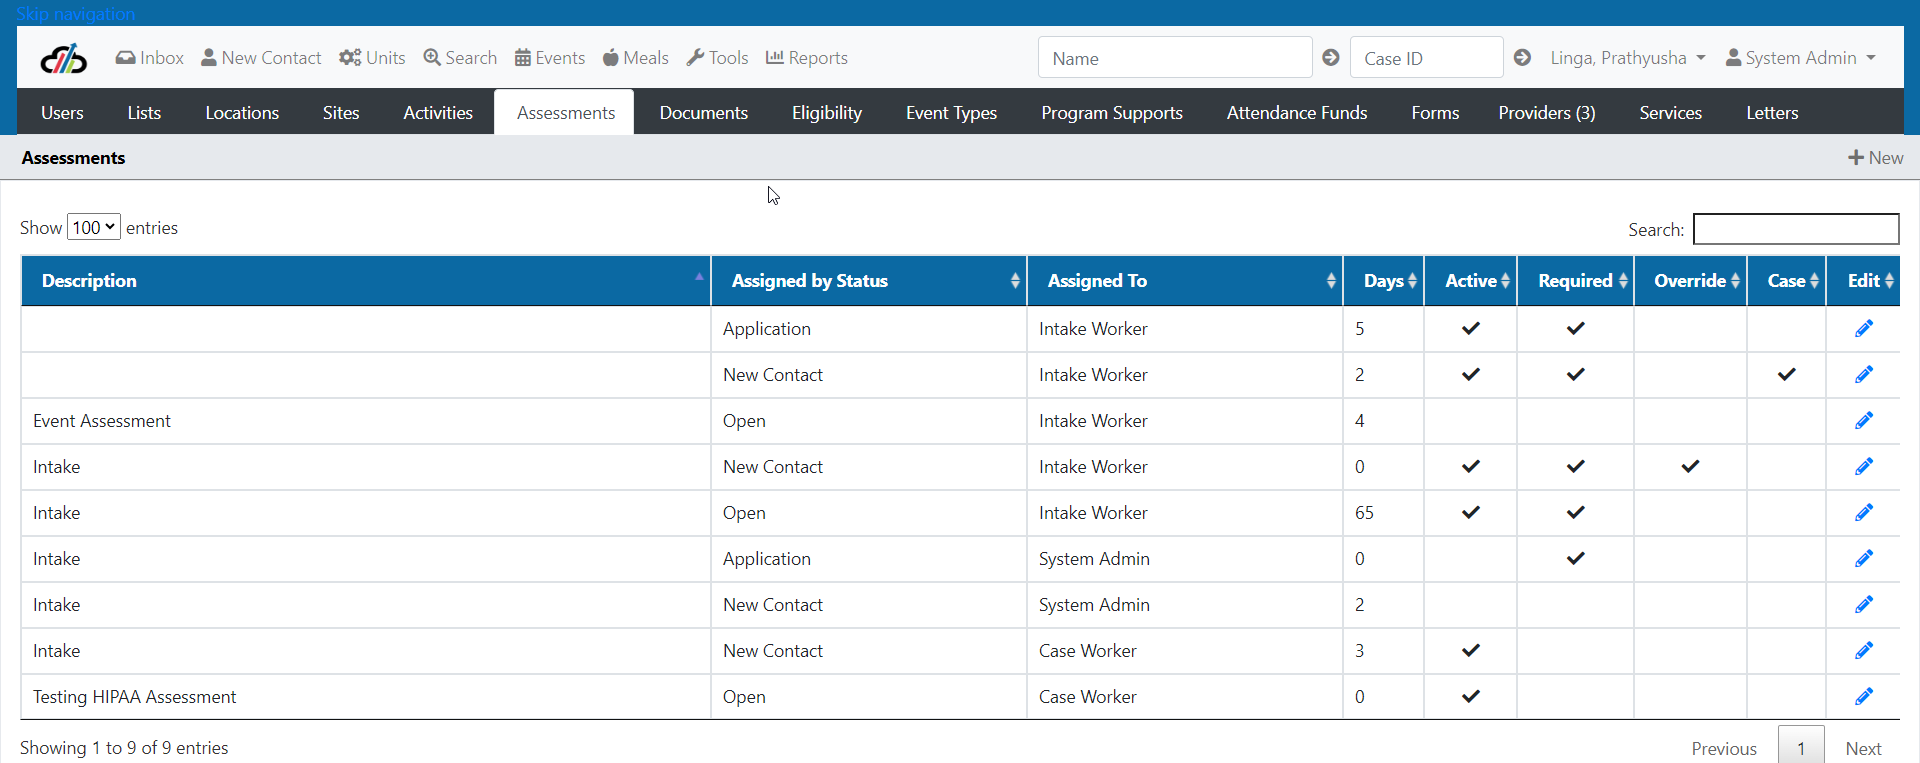
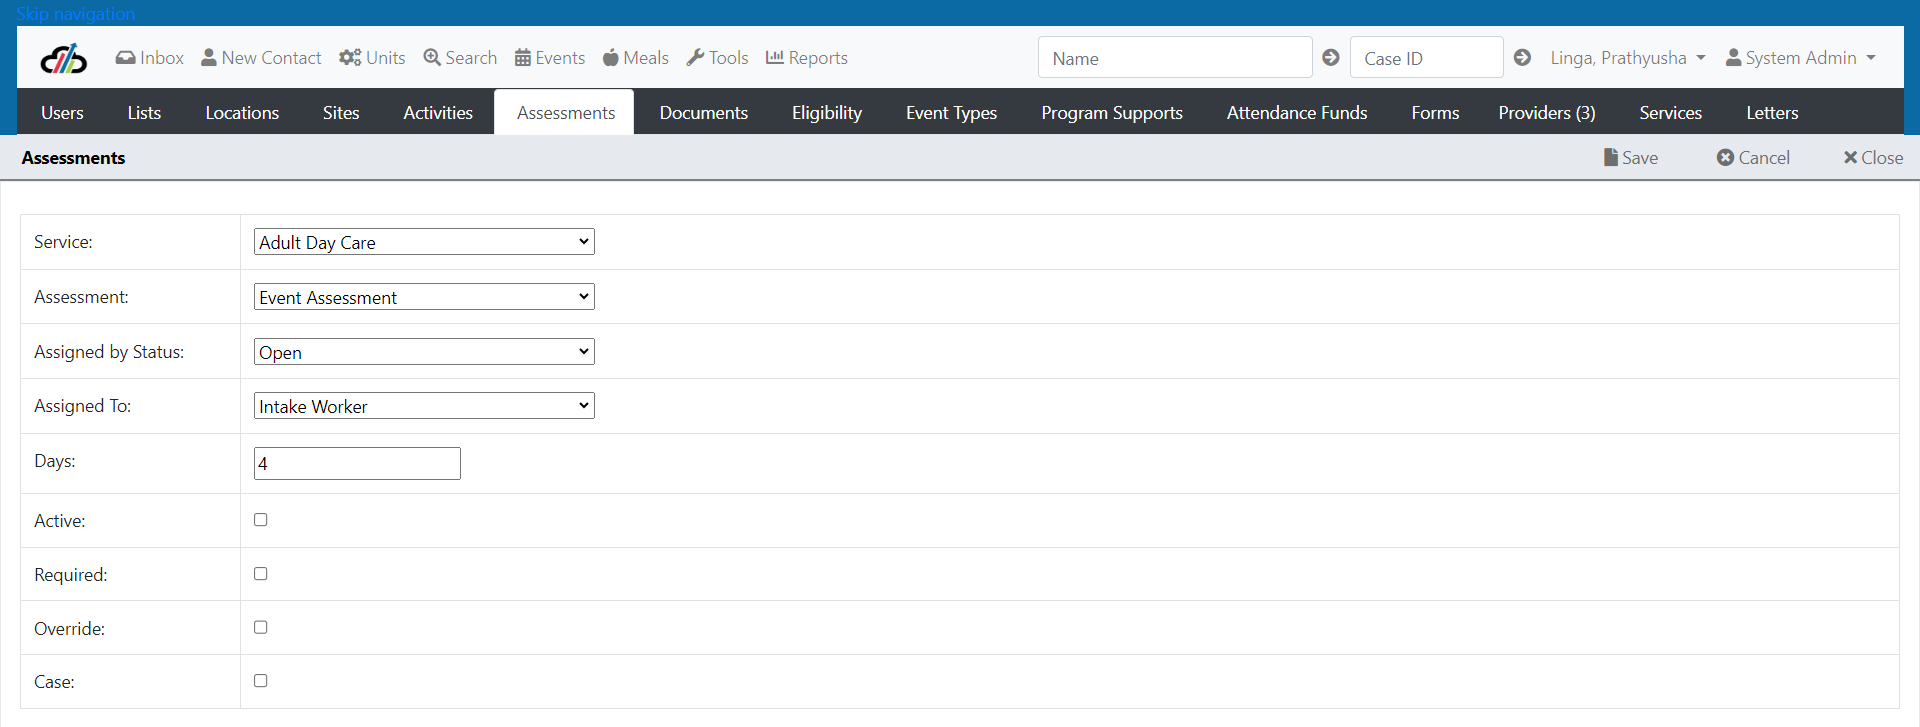
Assessments Tab
On the Assessments tab assessments can be added or edited
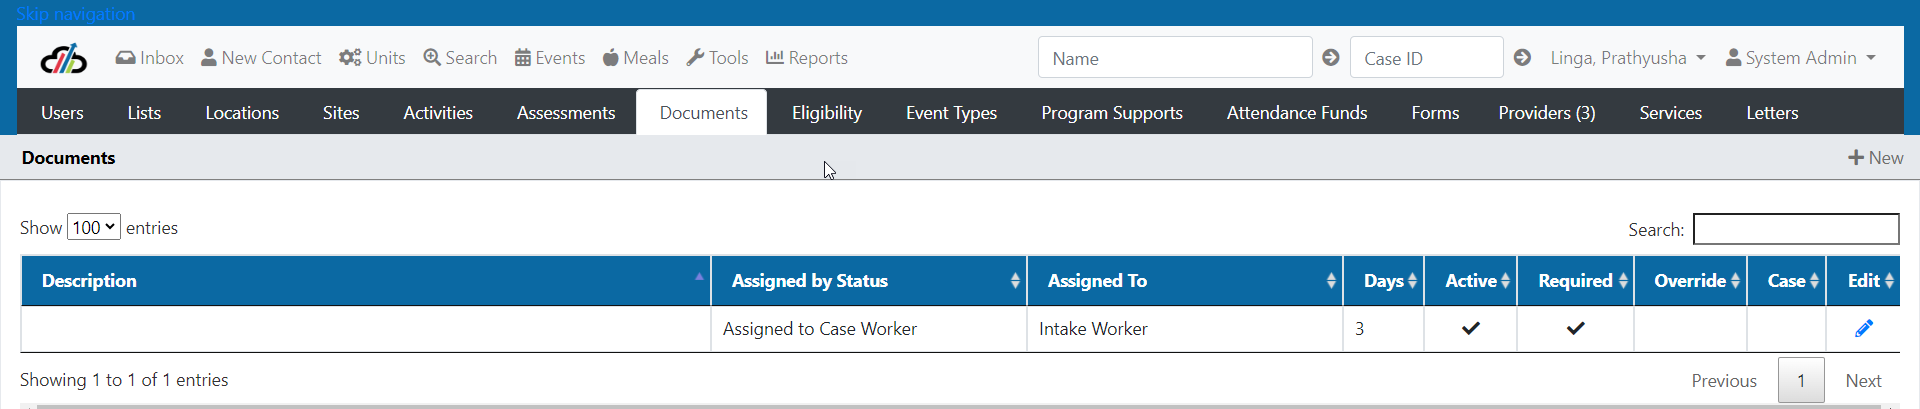
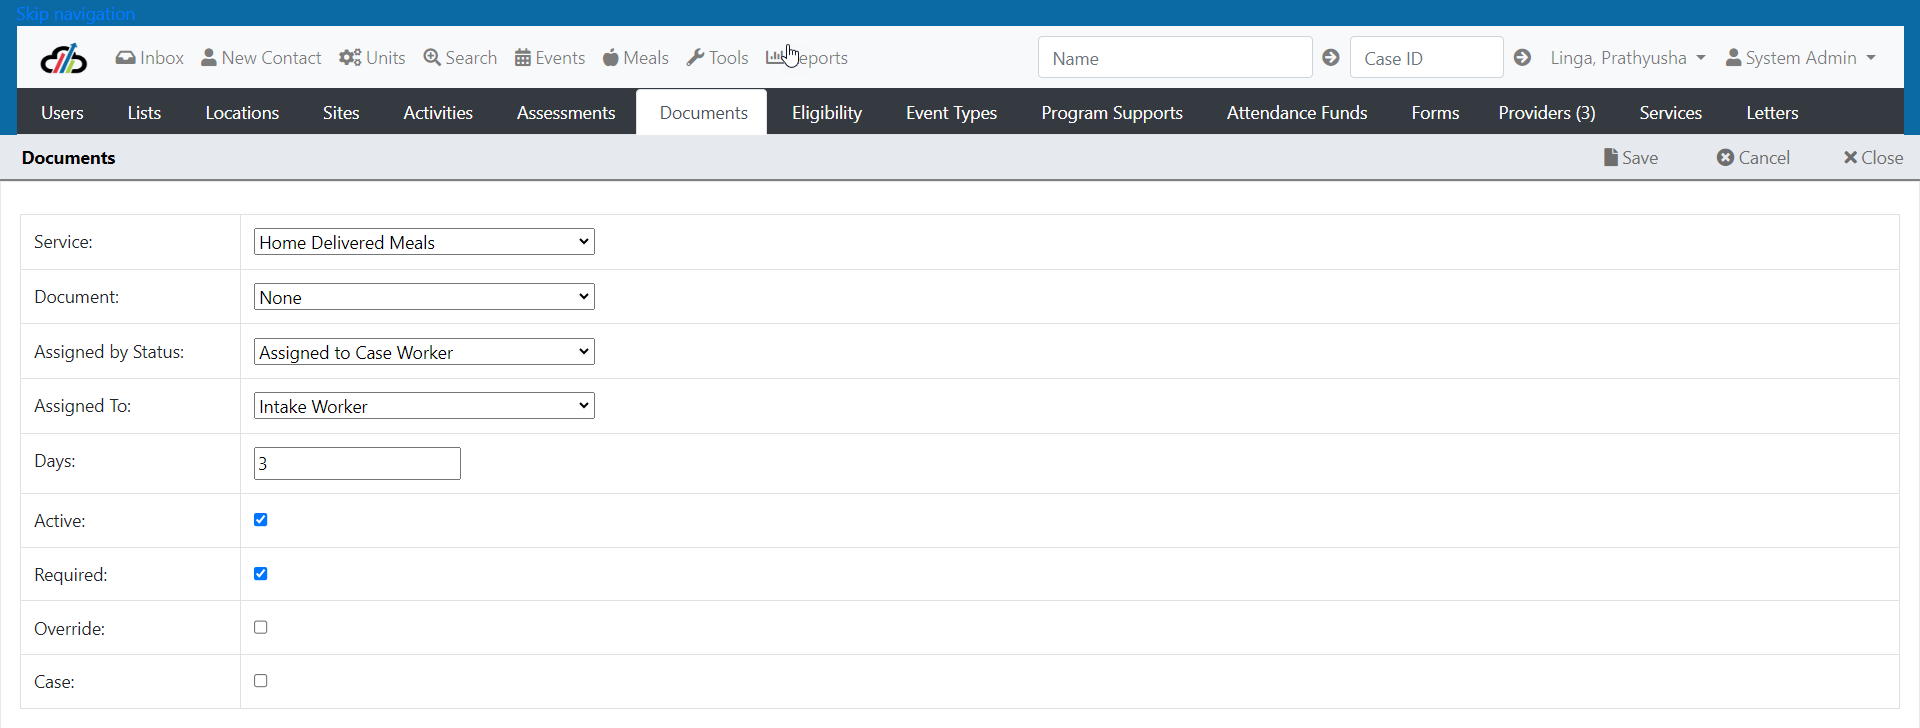
Documents Tab
The Documents tab allows a System Administrator to:
- add a new document using the +New (Note: Document Types are added through the Lists Tab)
- edit documents assigned to services. Set the service, document, assigned by status, assigned to, number of days, active, required, and override.
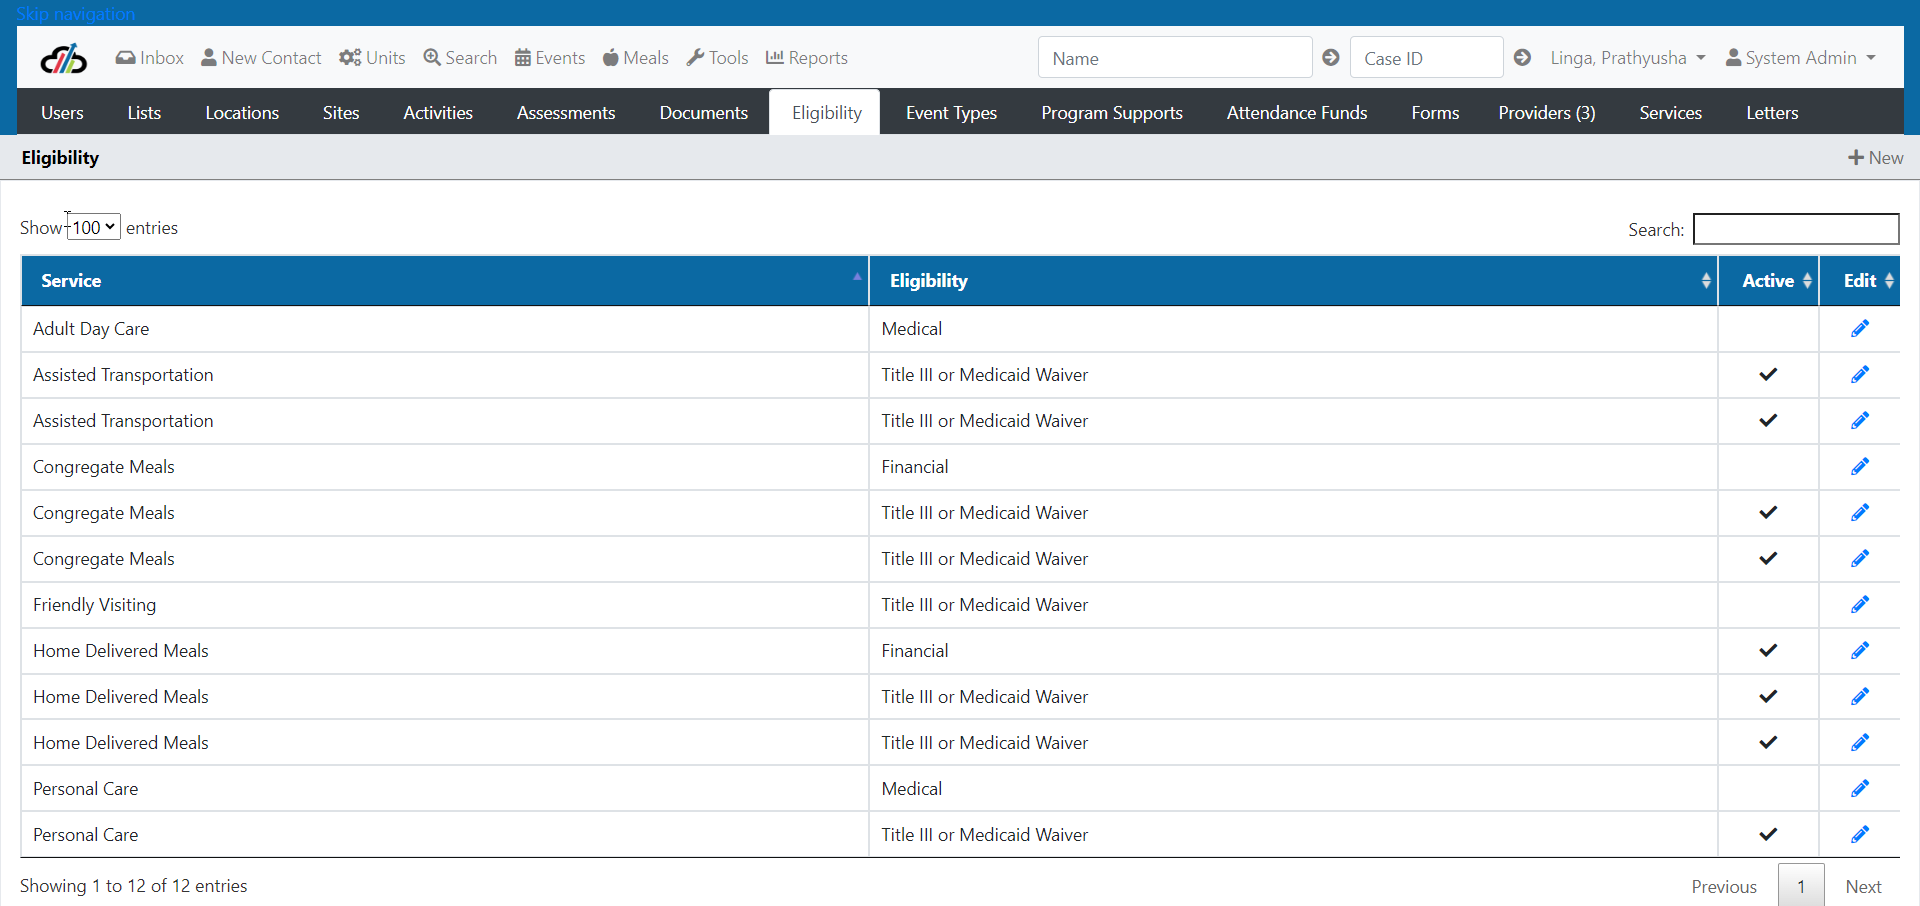
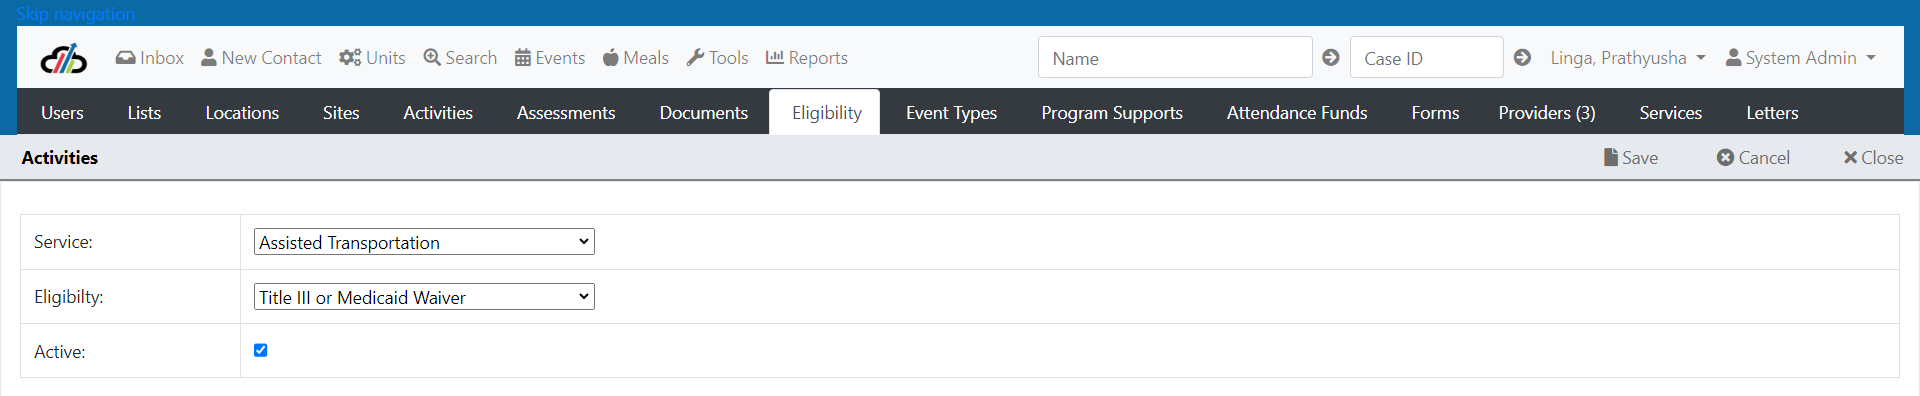
Use the eligibility tab to assign eligibility requirements to a service.
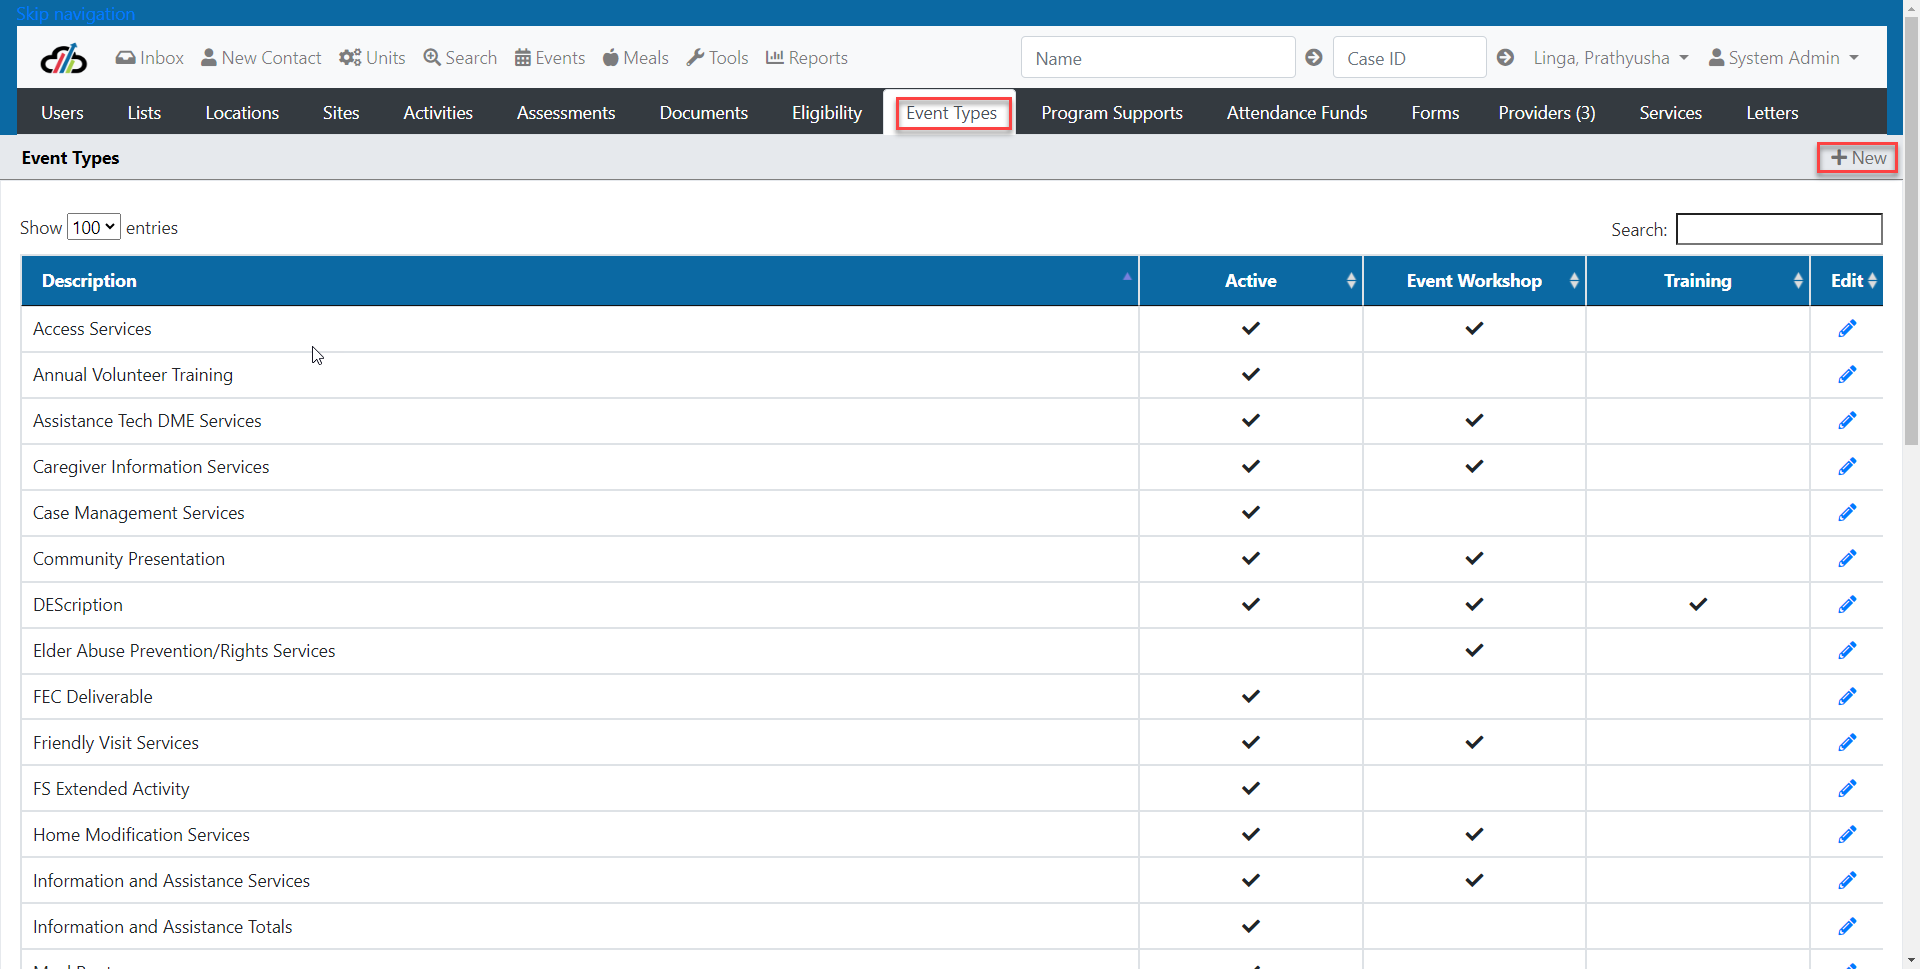
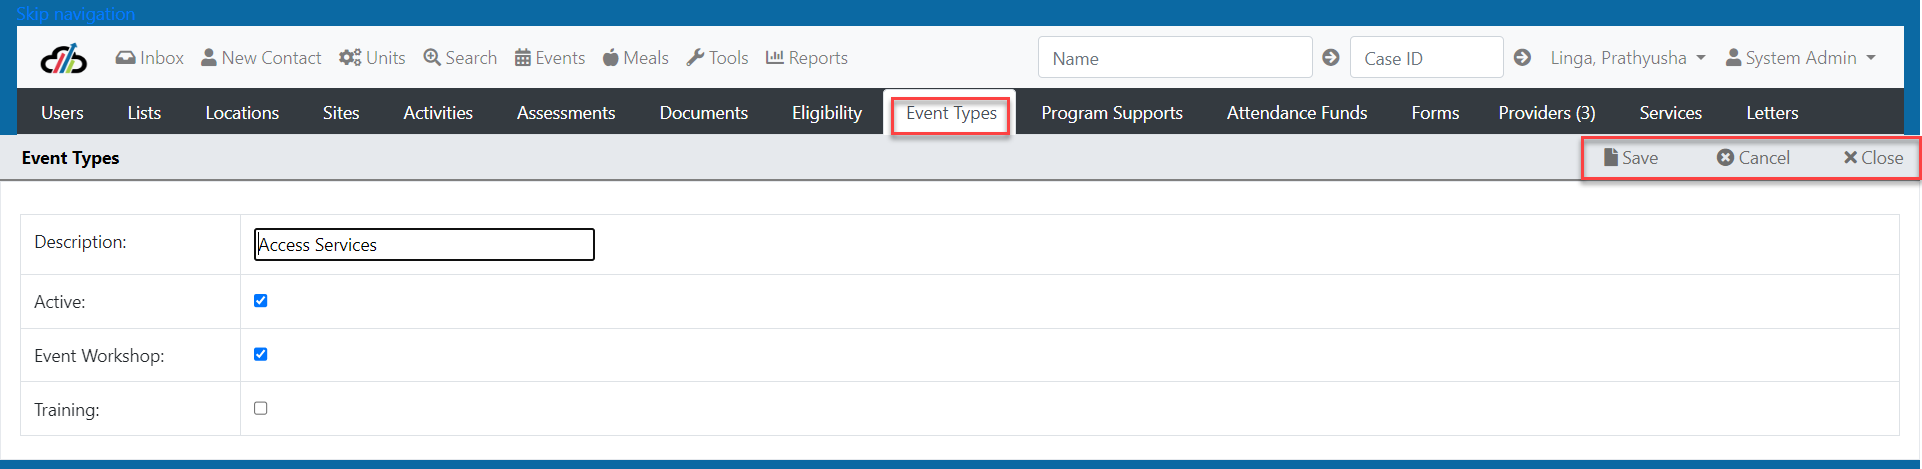
Event Types - Adding and Editing Event Types
In the event type section, the system administrator can create new event types and mange existing event types.
Program Supports
This is used to add existing support types to different event types. New support types must first be created in the lists tab. Thi is also used to edit support types that are already attached to an event type.
"Session Number" attached the support to a specific session in a multi-session event.
"In Person" must be checked for supports that are ONLY for appointments.
Attendance Funds
This is used to create and manage Attendance Funds. Attendance funds can be assigned and removed from various event types. The attendance fund populates for the case based on the amount of required attendance hours that have been completed.
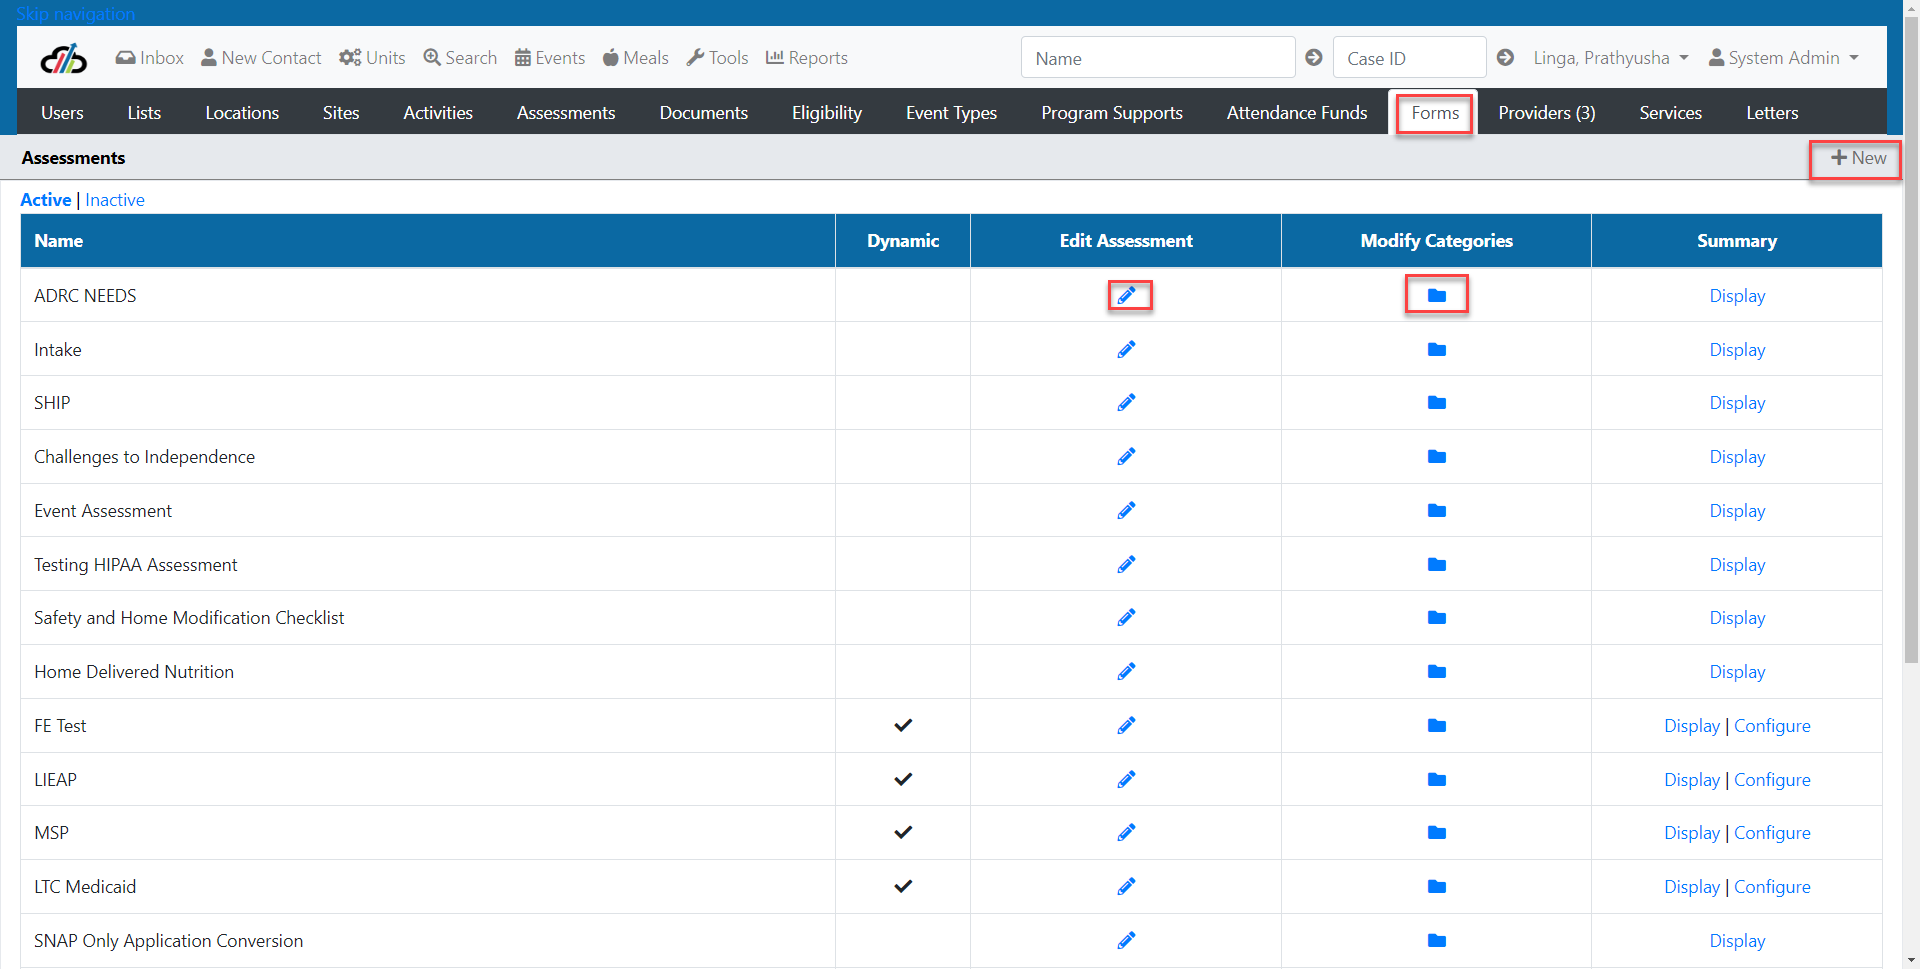
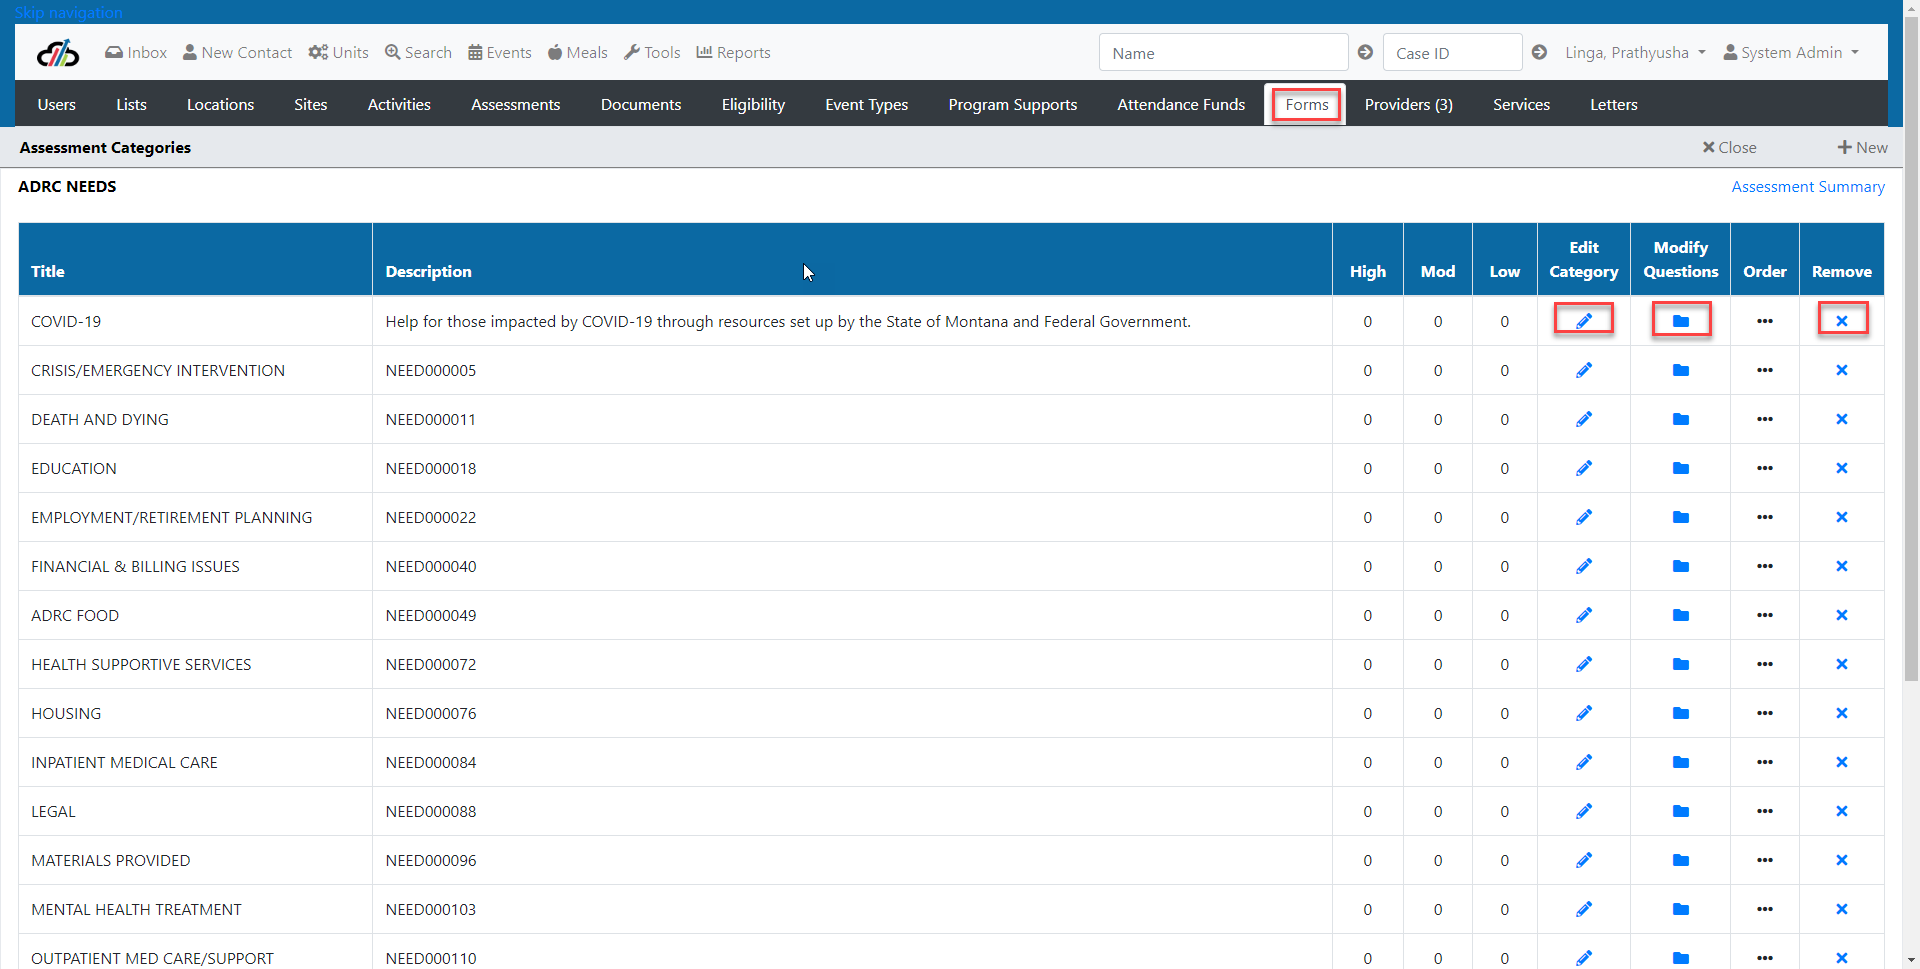
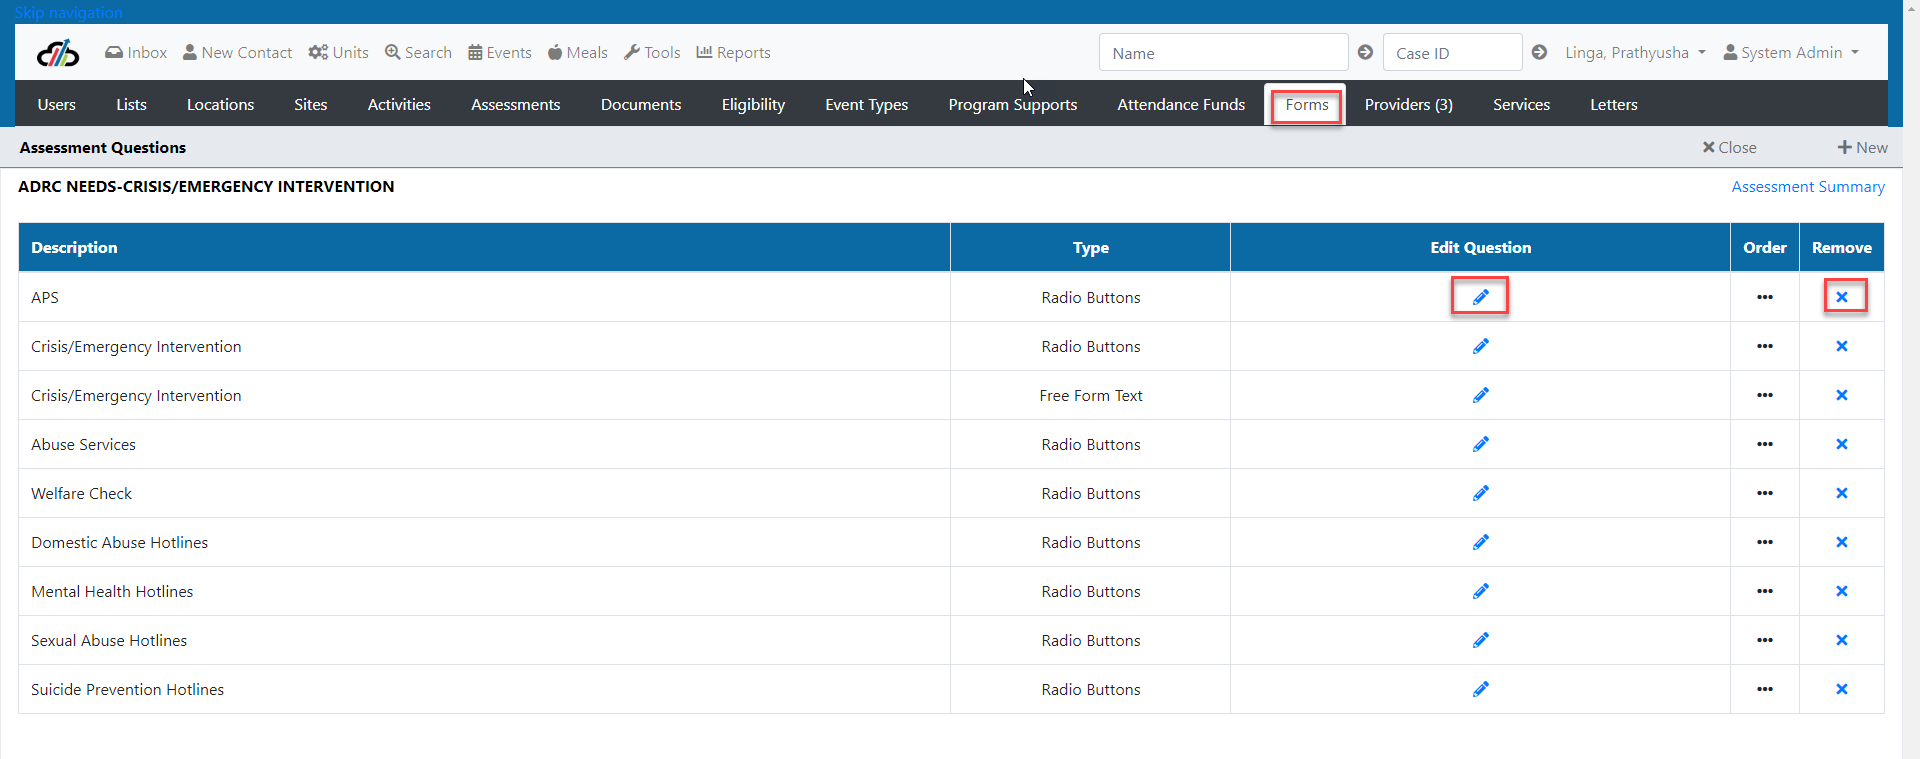
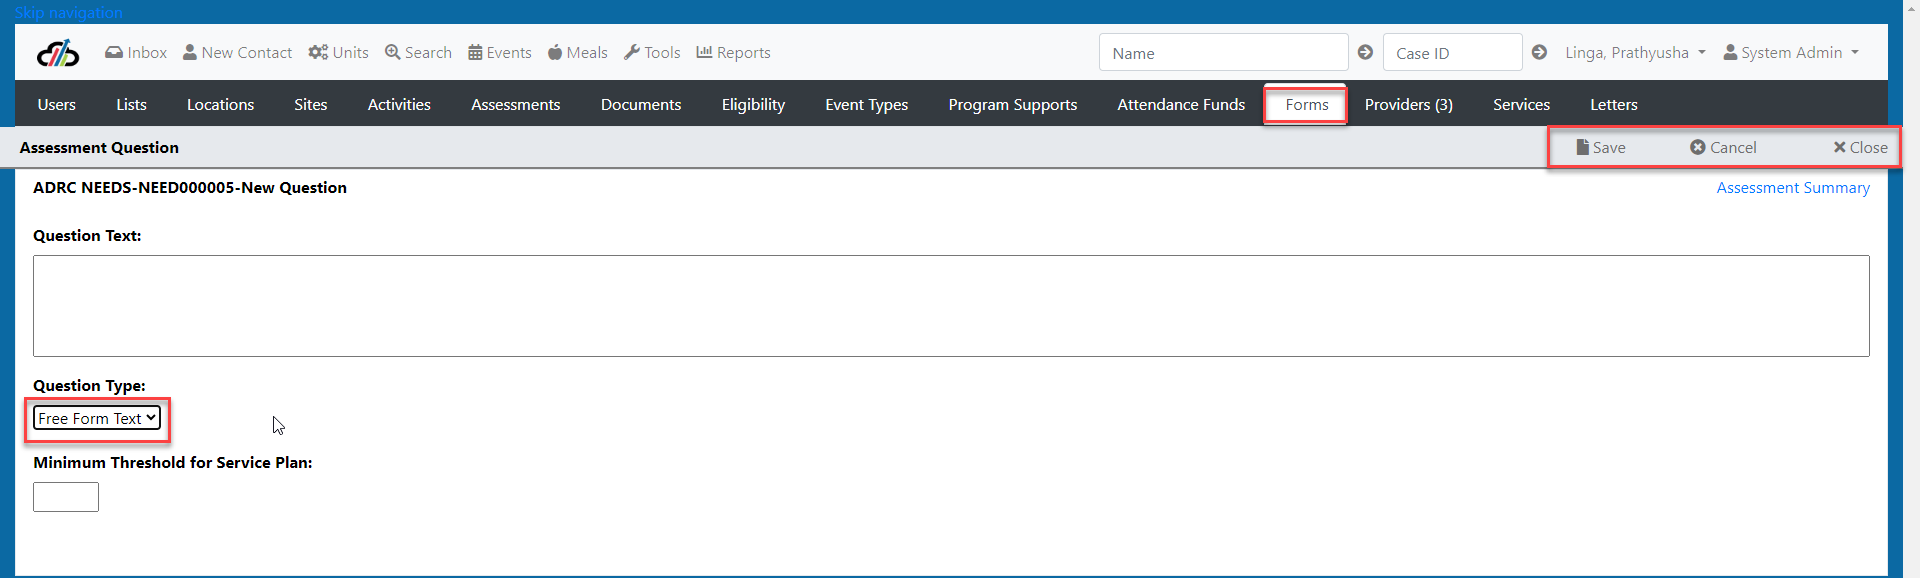
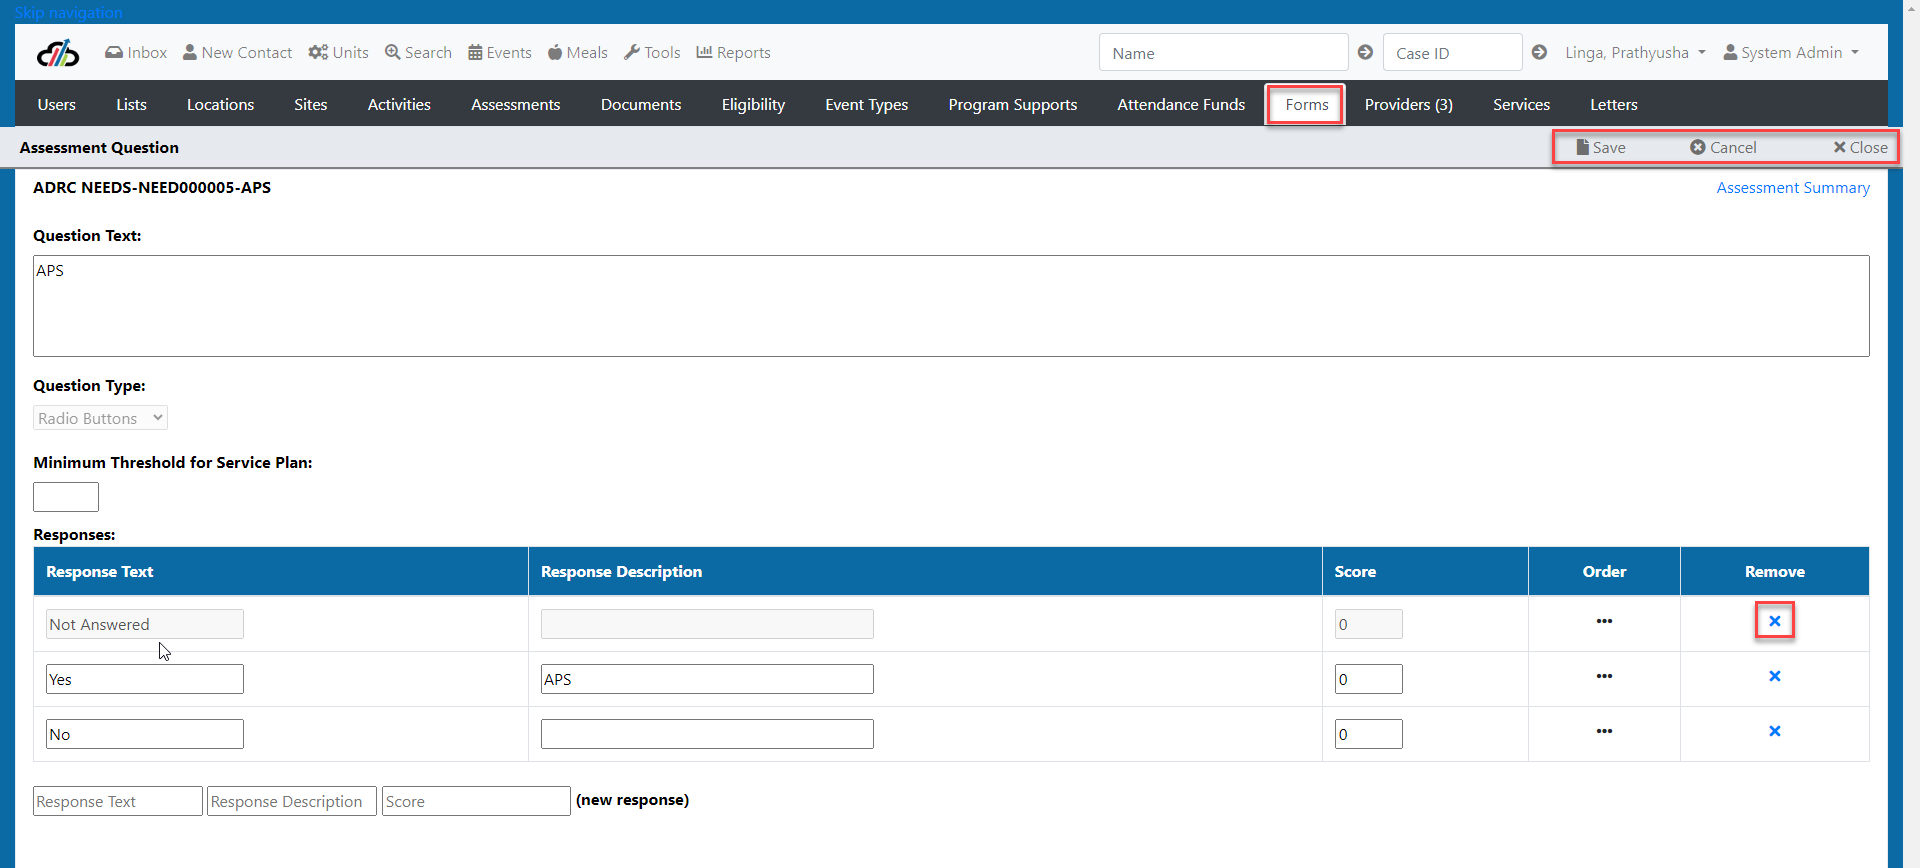
Forms Tab
On the Forms tab, create and modify assessments. You can create/modify an assessment by selecting the + New button or pencil icon. Create/modify categories and create/modify assessment questions within the category. You can create both multiple choice and free-form text questions.
This tab is where you add the details for rooms where events are scheduled.
Description – Identifiable Room Name
Minimum Capacity – Minimum number of attendees that can be scheduled for this room
Maximum Capacity – Maximum number of attendees that can be scheduled for this room
Site – where the room is located, is it at the Program State Office or at a Partner Site?
Office Visit – Is this room only used for office visits? Check mark is indicator yes. No check mark indicates no.
Active – Is this an active listing. Check mark is indicator yes. No check mark indicates no.
Services Tab
On the Services tab you can edit an existing service by selecting the pencil or create a new service by selecting + New.
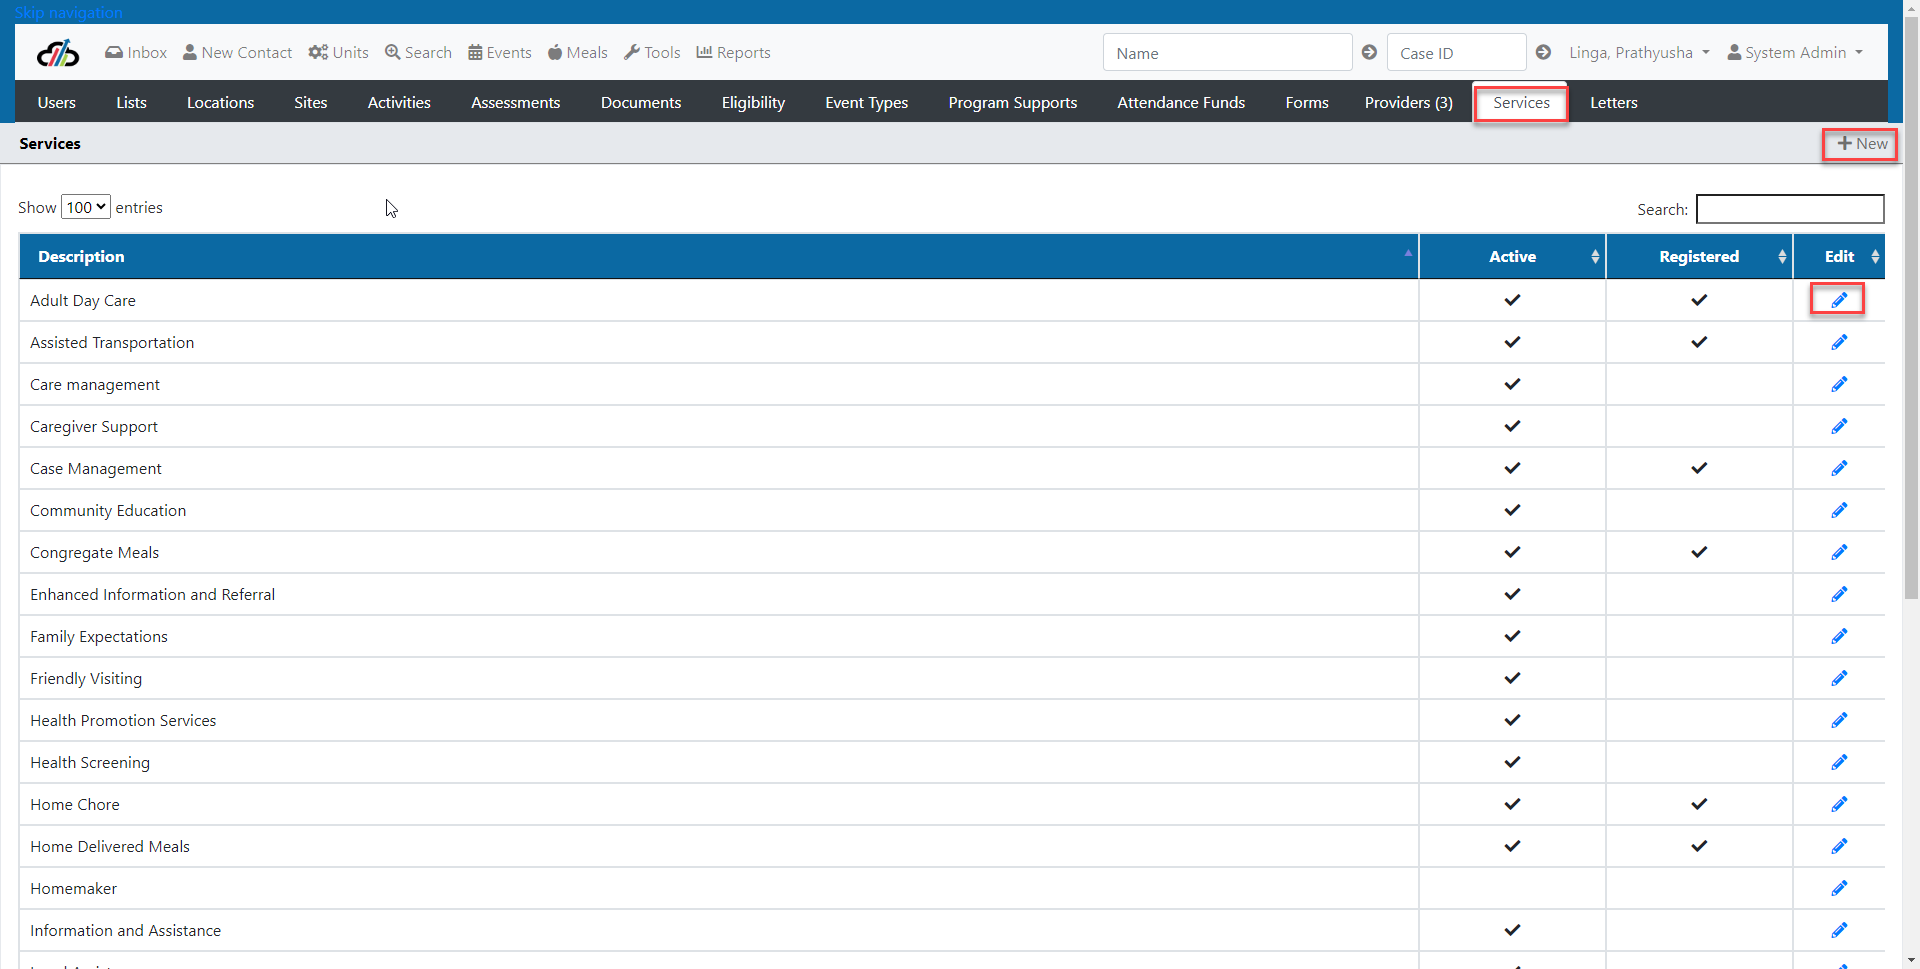
When you select to edit or select + new you will have the ability to enter the description and select Active and select if it's a registered service.
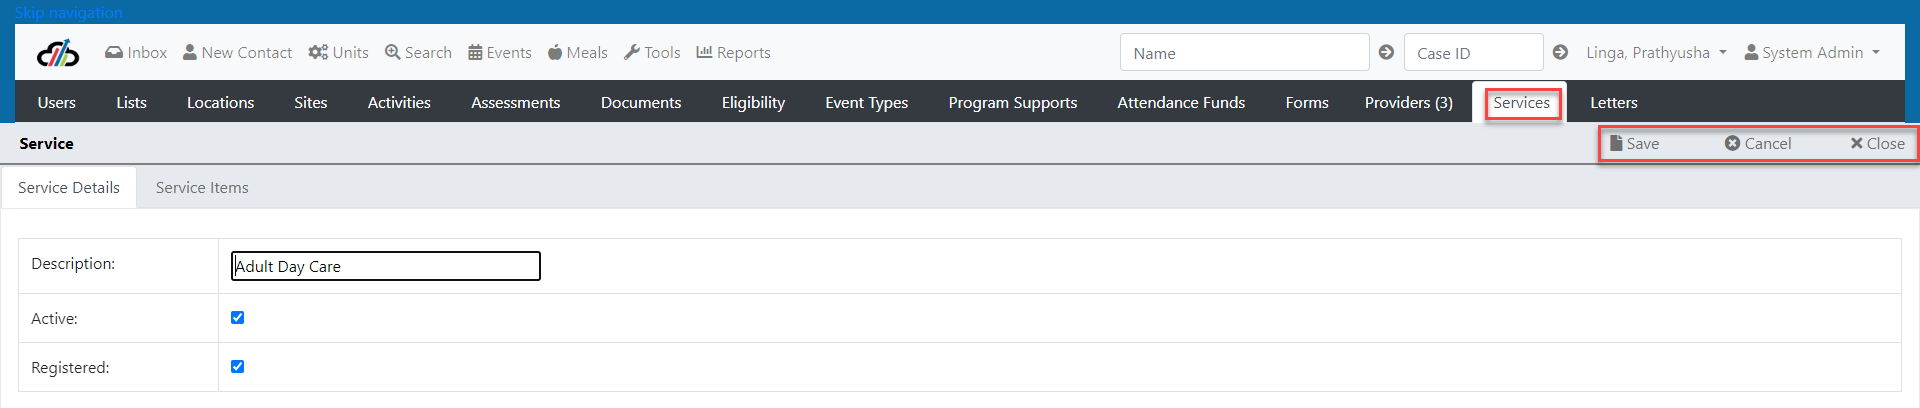
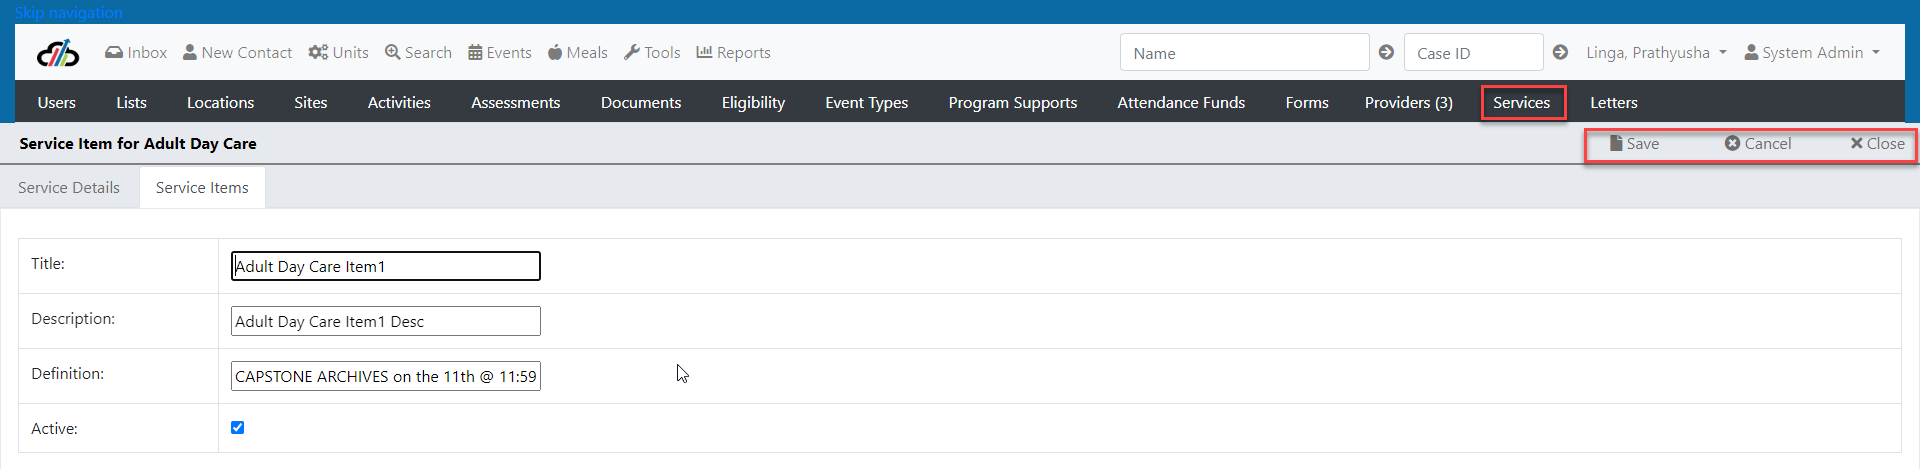
Select the Service Items tab to view the service items grid and select + New to add more service items.
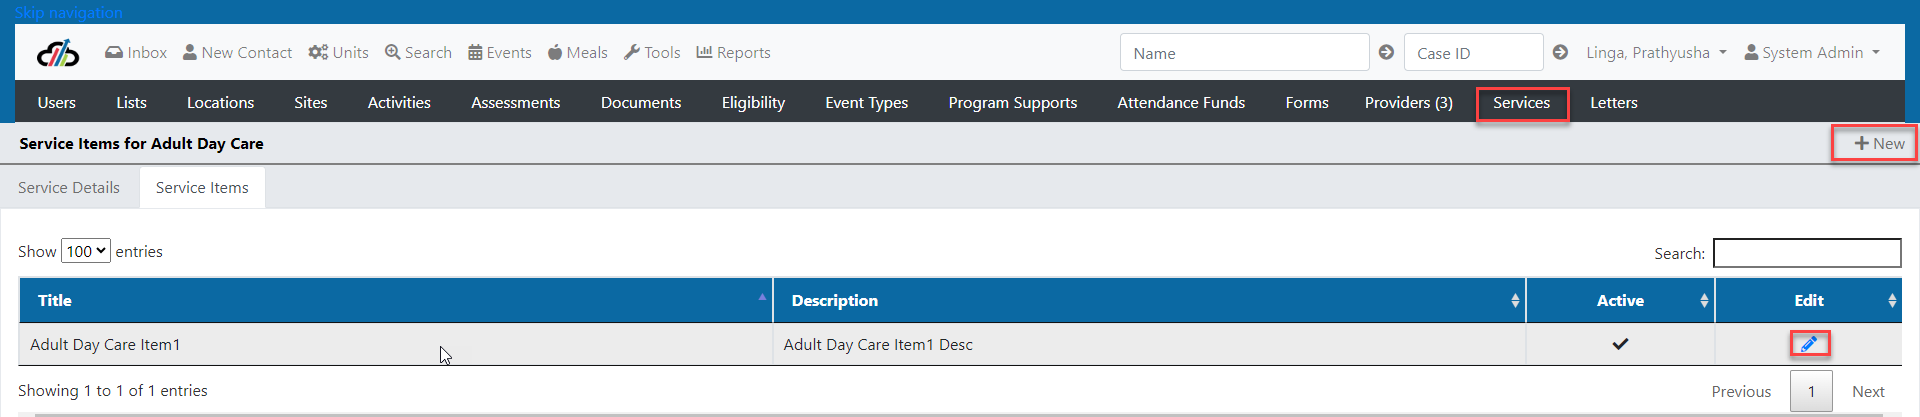
Enter the Title and Description, the description will be visible to users when they select a service to enter units on. Select the Save button before closing the page.
Letters Tab – Creating, Editing and Automating Letters
The letters tool from the system administrator role allows the user to upload letters to the system to issue for clients. To automate letters, you must first update Merge Fields in Word.
Creating and Editing Letters
When you select the Letters Tab you will see the existing letters. You can edit the letters by selecting the pencil or create new ones by selecting the + New button.
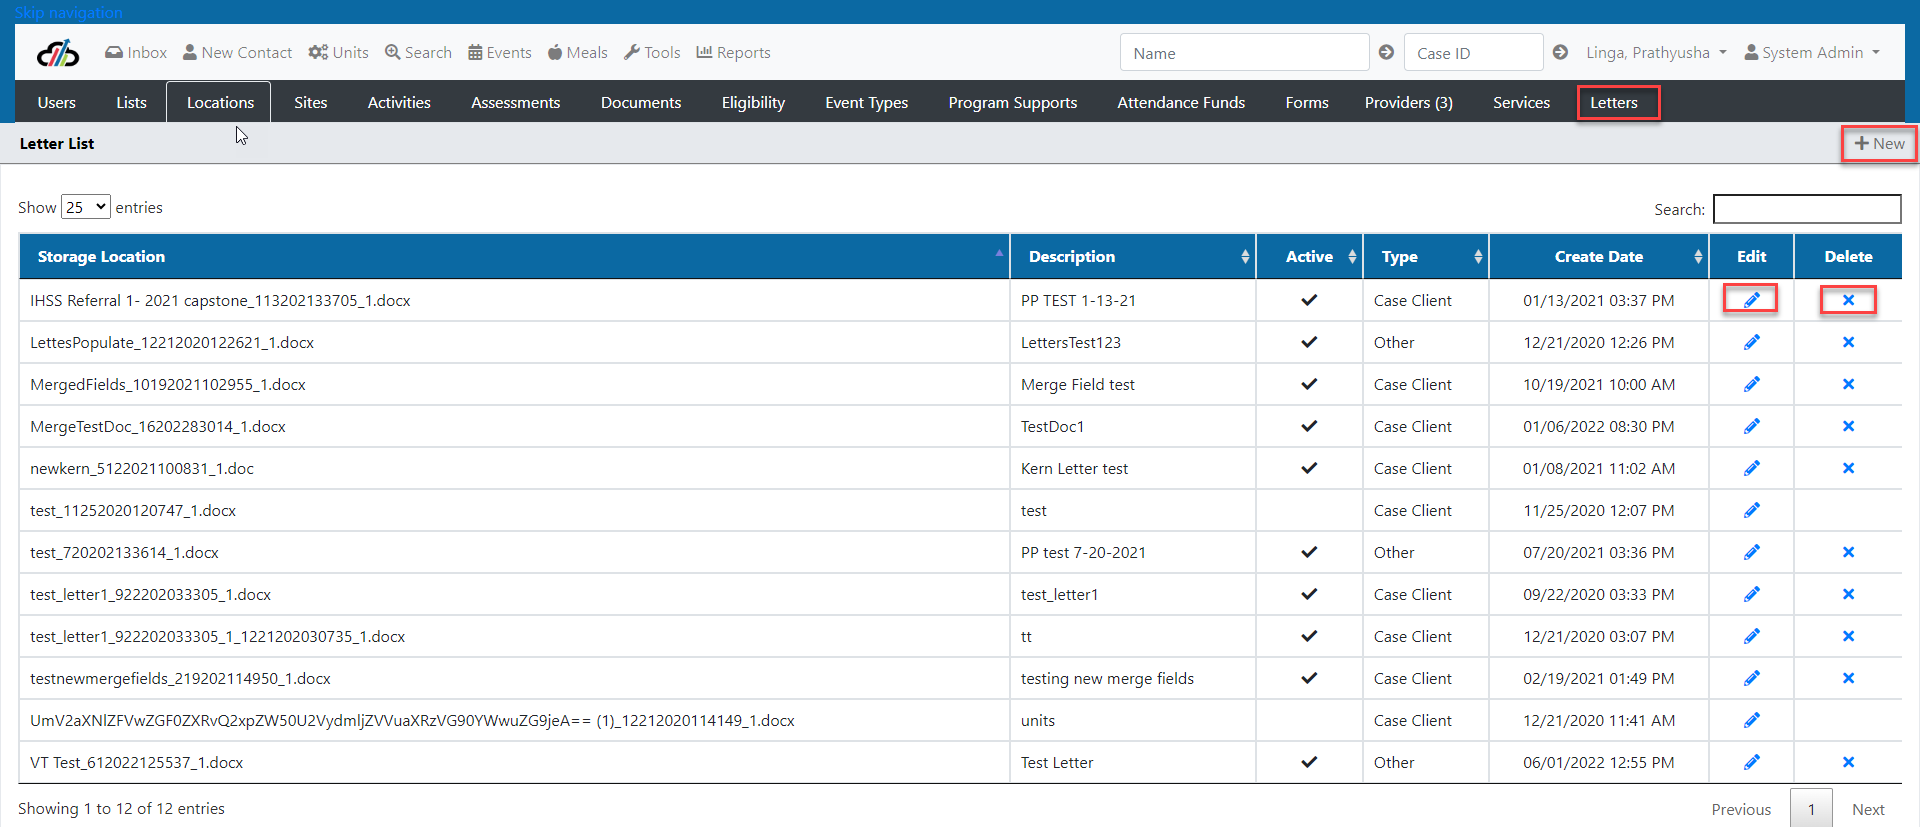
When you edit or create a new letter the fields will be the same. Upload your file with the merge fields in place, and it will be ready to use!

Automating Letters - Word Merge Fields
Using the listed merge fields in word before uploading the document to the system will instruct the system to grab data from the client record and insert that data into the letter. Below is the list of merge fields:
Note: The merge fields highlighted in grey below should be added at the beginning of every letter to instruct the system to grab data.
«Enum_ContactDetails»«Enum_WorkerDetails»«Enum_CaseContactDetails»«Enum_CallerContactDetails»
Client Name
«contactfullname»
«contactfullnamecap»
«contactname»
«contactnamecap»
«contactfirstname»
«contactmiddlename»
«contactlastname»
«contactdob»
«contactssn»
«contactethnicity»
«contactlanguage»
«contactlivingarrangement»
«contacthomephone»
«contactcellphone»
«contactotherphone»
Physical Address
«contactphysaddr1»
«contactphysaddr2»
«contactphysaddrcity»
«contactphysaddrst»
«contactphysaddrcounty»
«contactphysaddrzip»
Mailing Address
«contactmladdr1»
«contactmladdr2»
«contactmladdrcity»
«contactmladdrst»
«contactmladdrcounty»
«contactmladdrzip»
Worker/Employee
«TableStart:WorkerDetails»
«workerrole»
«workerfullname»
«workerfullnamecap»
«workername»
«workernamecap»
«workerfirstname»
«workermiddlename»
«workerlastname»
«workerphone»
«workersite»
«TableEnd:WorkerDetails»
Case Contacts
«TableStart:CaseContactDetails»
«casecontactfullname»
«casecontactfullnamecap»
«casecontactname»
«casecontactnamecap»
«casecontactfirstname»
«casecontactmiddlename»
«casecontactlastname»
«casecontactprimaryphone»
«casecontacthomephone»
«casecontactcellphone»
«casecontactotherphone»
«casecontactrelationtoclient»
«TableEnd:CaseContactDetails»
Caller Name
«callercontactfullname»
«callercontactfullnamecap»
«callercontactname»
«callercontactnamecap»
«callercontactfirstname»
«callercontactmiddlename»
«callercontactlastname»
«callercontactprimaryphone»
«callercontacthomephone»
«callercontactcellphone»
«callercontactotherphone»
«callercontactrelationtoclient»
How to Map a Letter to Client Data
In order to automate a new letter to populate with client data, you will utilize the Merge Field function that is built into Microsoft Word. Open the Word document and make sure that editing is enabled for the document.
Set the cursor to the section where the data will populate. In the menu at the top of the document, select Insert > Quick Parts > Field.
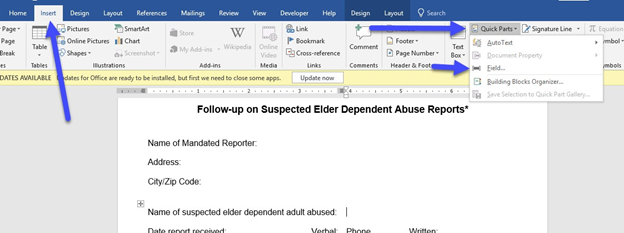
A pop-up window will open. On the left side of the window, select Merge Field. It is very important that in the “Field Name” section you enter the EXACT description of the data piece that is pre-automated from Capstone (see descriptions list above Page 67). Click OK to finish adding the merge field.
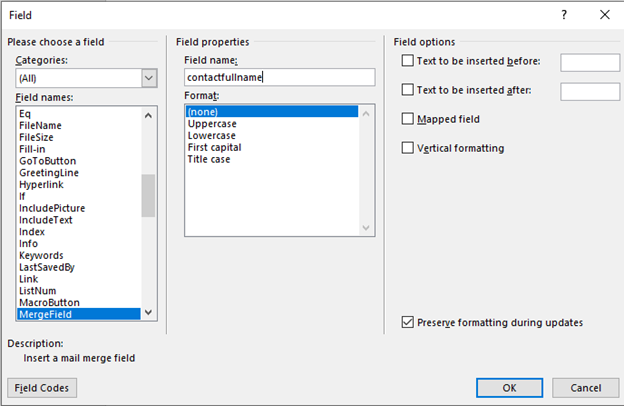
In this example, I am automating the letter to populate the client’s first name when the letter is downloaded from the investigation. If I wanted the letter to populate the client’s address, I would use the fields listed on the Physical Address or Mailing Address category.
Once you have inserted all the merged fields, save the formatted template to your machine. Once all merge fields are input, you are ready to upload the template to Capstone.
This tool allows you to move a Provider Site to a different Agency in the event that the Provider Site is entered on the wrong Agency.
To use this tool, select Reassign Site from the Tools Menu.
Begin by typing the name of the Provider Site in the box (See Site to Reassign Screenshot )
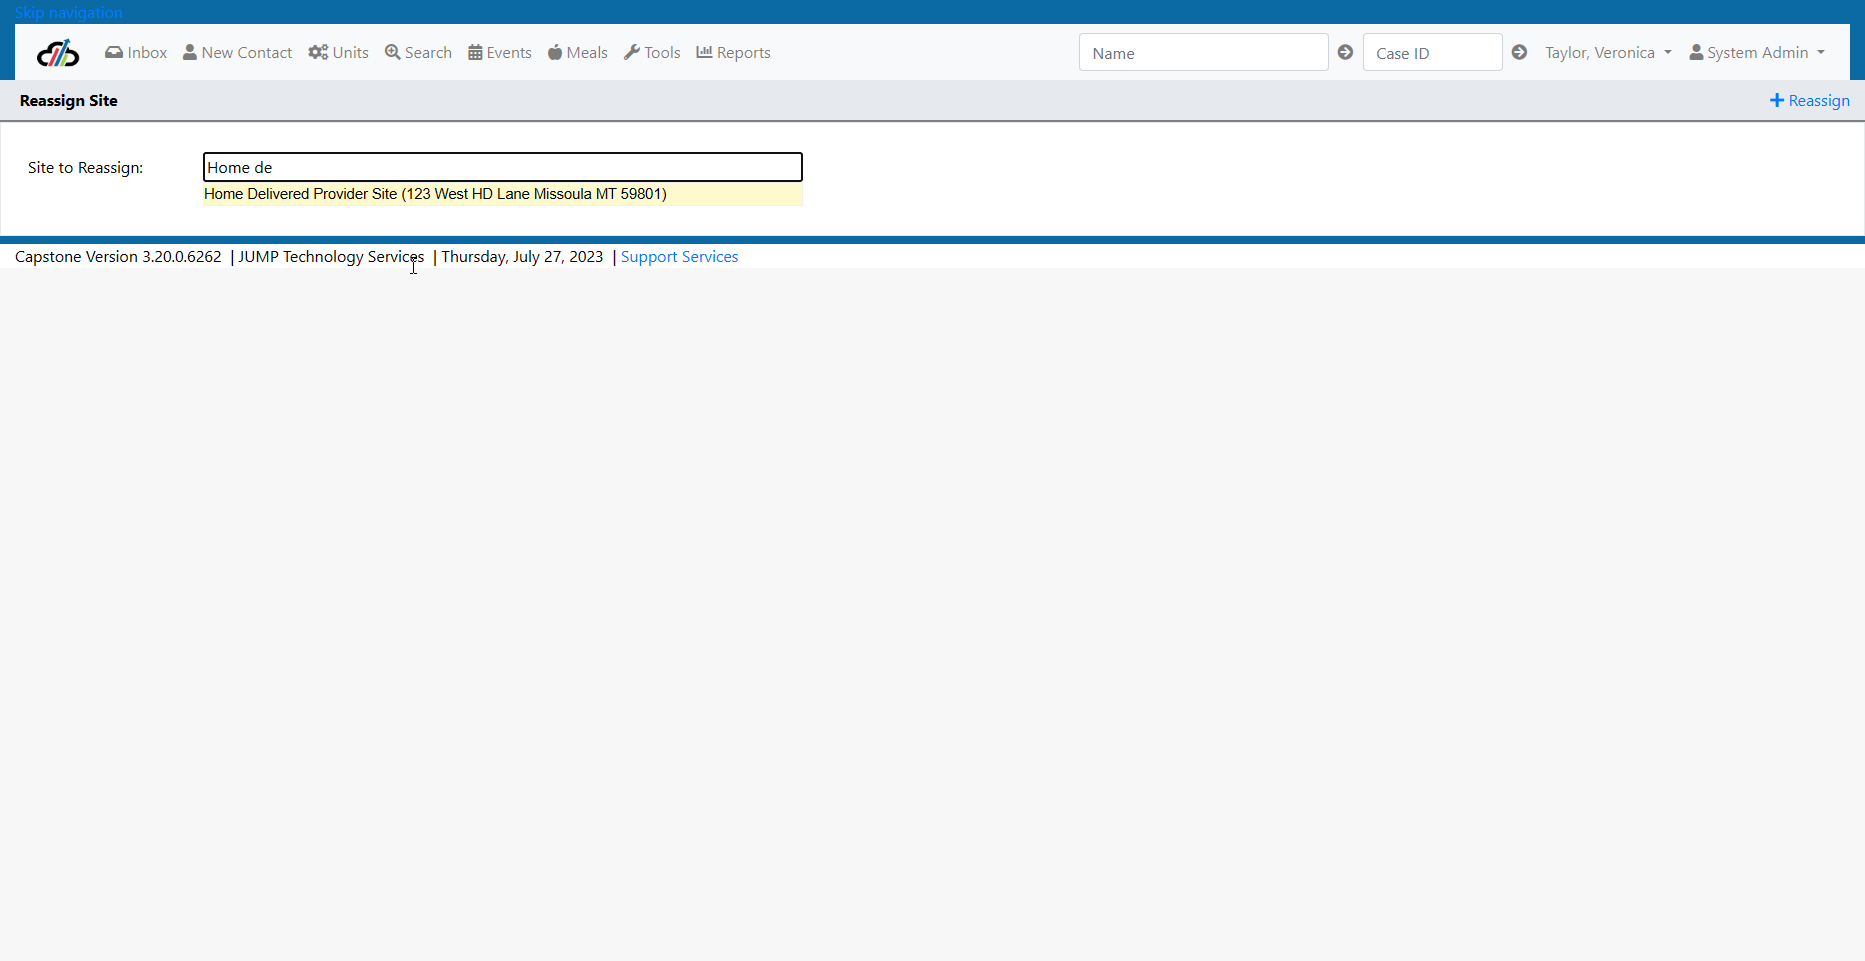
Site to Reassign
1. Select the Provider Site that you want to reassign. (Re-Assign Site 2)
2. Verify that the Assigned To Parent Organization/Agency is correct. (Re-Assign Site 2)
3. Select the Move To Agency by typing in the box and selecting from the Agencies that appear.(Re-Assign Site 2)
4. Select the +Reassign in the top right hand corner of the screen. (Re-Assign Site 2)
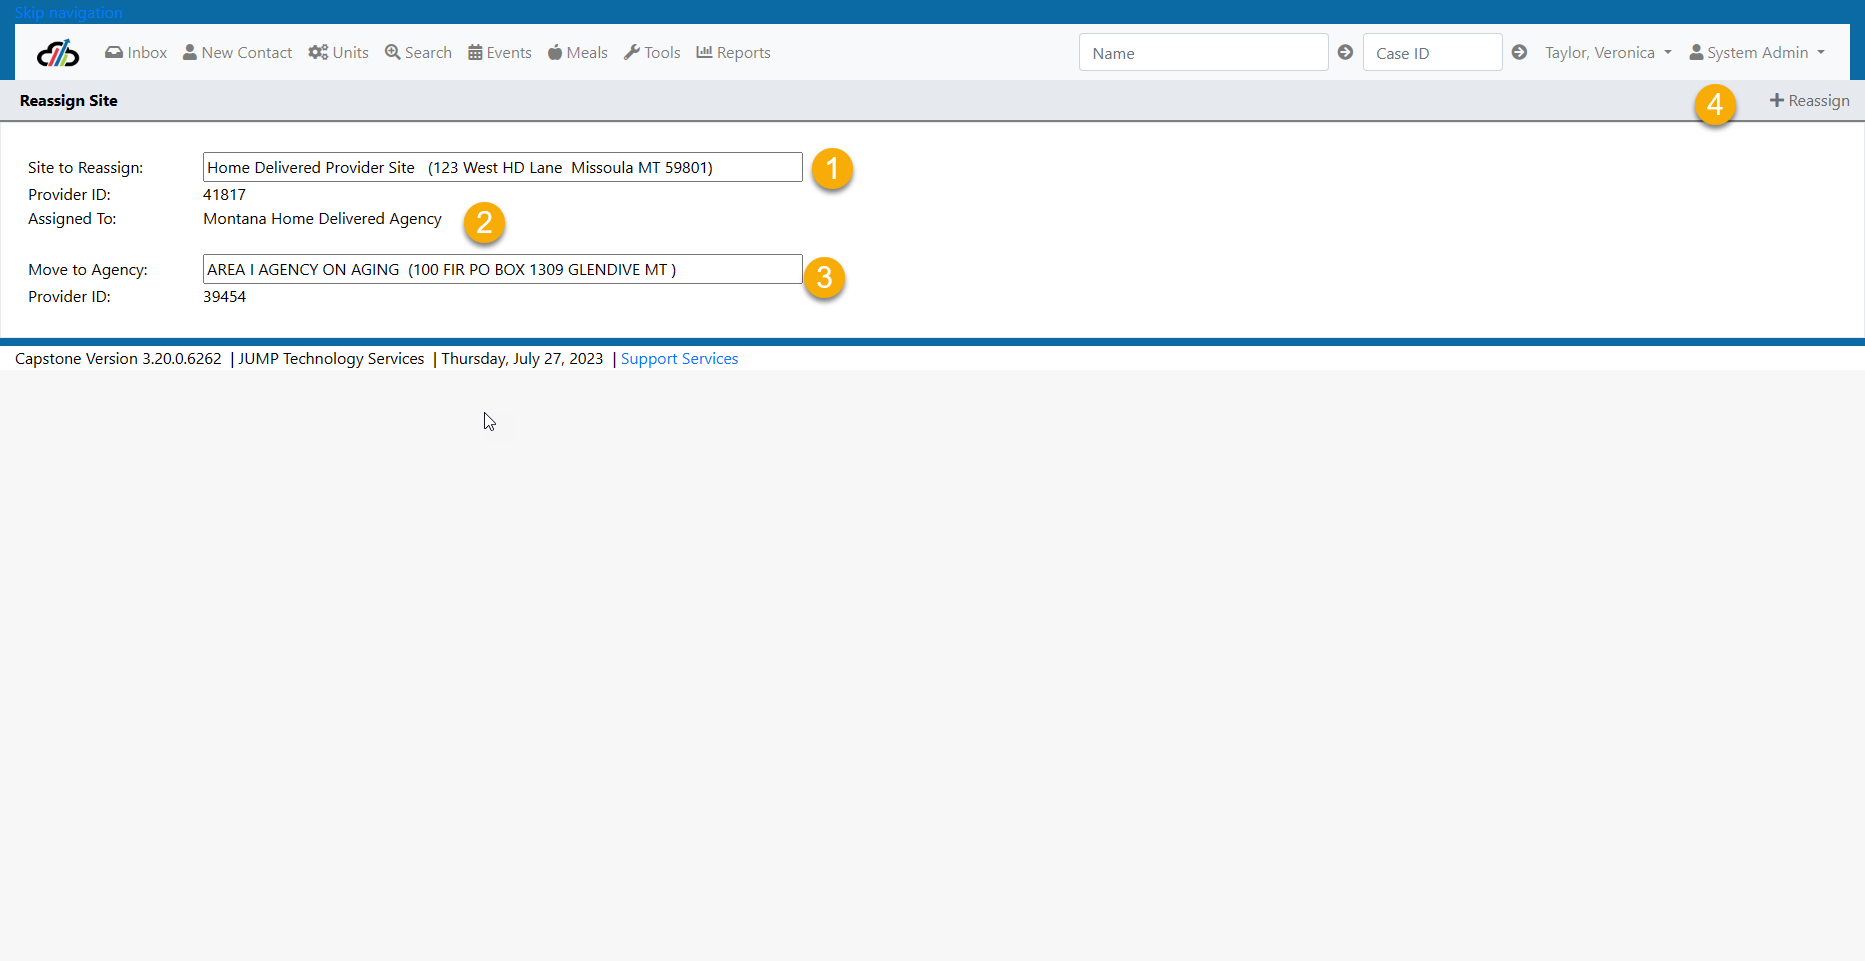
Re-Assign Site 2
Please NOTE: If the Provider Site is not listed when you begin typing in the Site to Reassign box, you will need to add the Program Site/Partner Site to the Provider General Tab. (See Screenshot Reassign - Screenshot 3, Select Program/Partner Site on Provider General Screen)
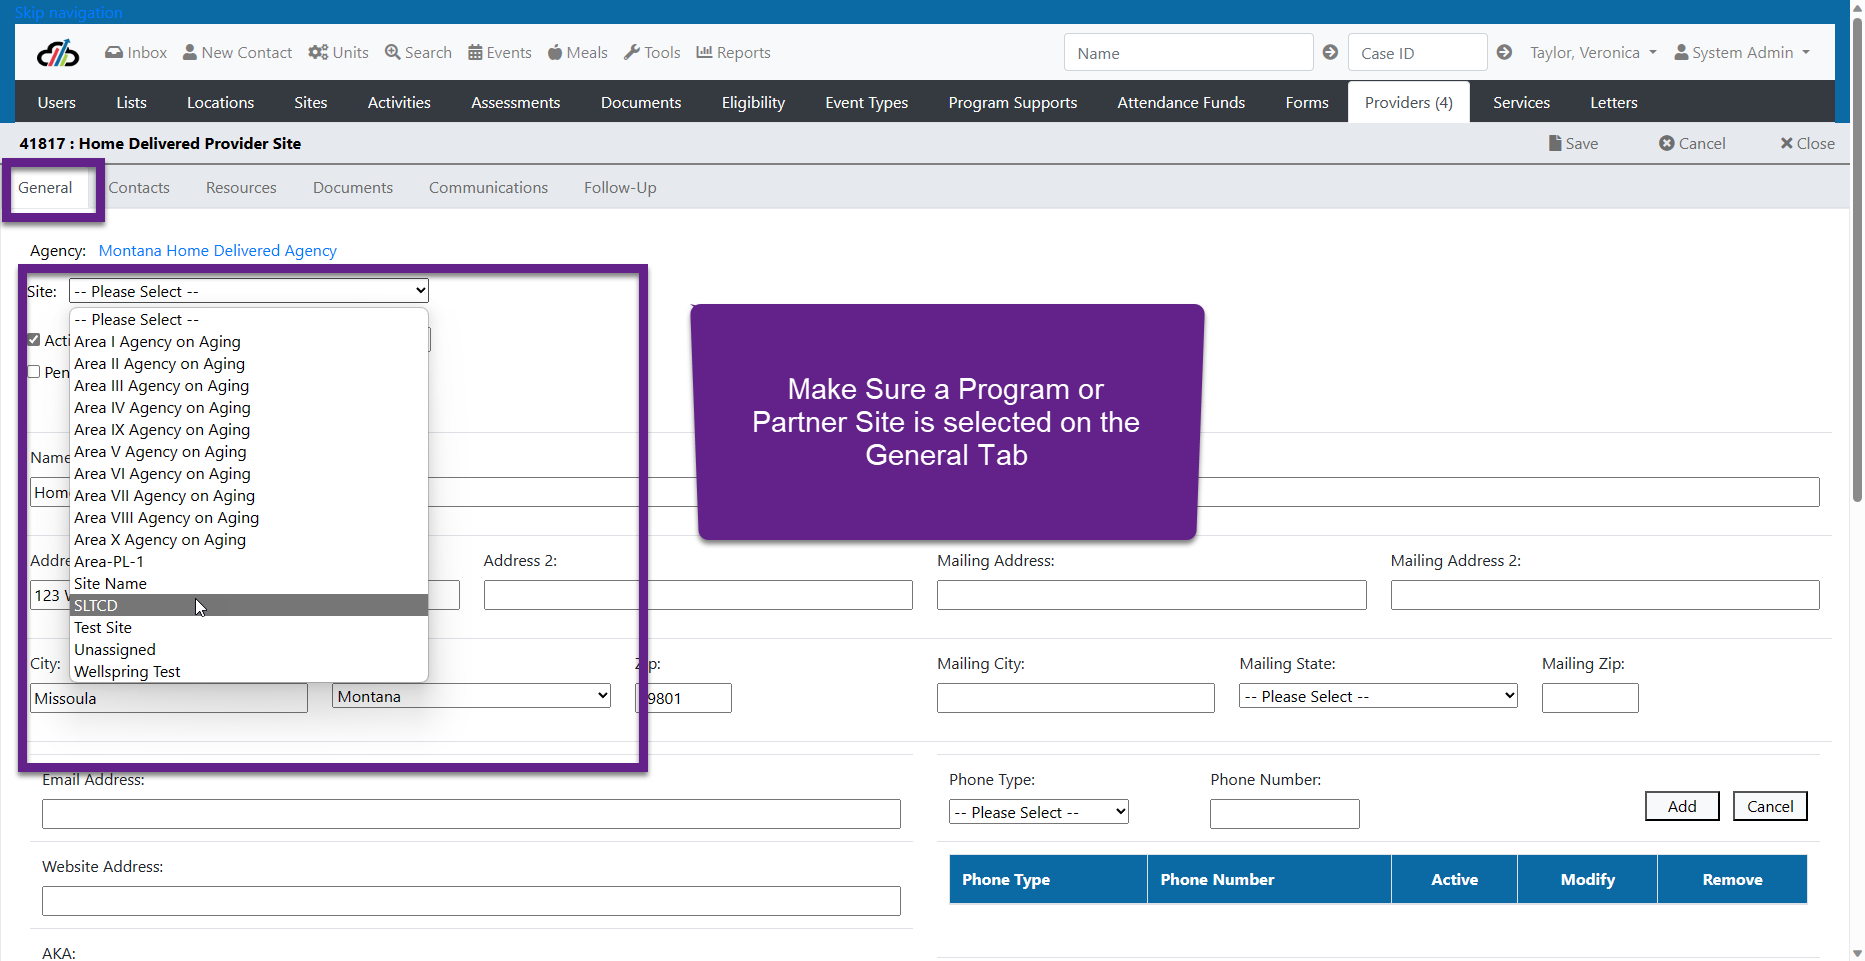
Reassign Site - Select Program/Partner Site on Provider General Screen
This tool allows System Administrators, Site Administrators and Program Administrators to reset the supports and funds issued for an event session.
NOTE: When the Reset Supports and Funds Tools is selected, the system does not hide the case tabs. This is a completely empty case. You should not attempt to add information in this case.
#ShortcutsMenu #ConsumerServiceUnitConcern #BulkUploadErrors #Site
Troubleshooting and Tips
Toolbars and Menus
Capstone has many features available which are easy to navigate once the user understands the terminology and Navigation.
Let’s start with the . Some may call this a toolbar but it is actually a Menu listed at the very top of the screen. Regardless of the role you are in or area within the system you are working, the Shortcuts Menu does not move. Some of the tabs on the Shortcuts Menu have hover functions (and select functions. This means that when you hover over a tab such as New Contact (See screenshot Shortcuts Menu 2 for example) you will see different functionality options than those that you see when you click on/select the New Contact Tab (See Shortcuts Menu 3 for example).
On the Shortcuts Menu (See Screenshot – Shortcuts Menu 1) you will see
- Inbox Tab
- New Contact Tab
- Search Tab
- Events Tab
- Transportation Tab
- Childcare Events Tab
- Reports Tab
- Tools Tab
In addition, there is a field for Quick Search by Name and Quick Search by Case ID

Entering a Client by Mistake
Entering a Client by Mistake - Clients cannot be deleted by the customer. If a client is erroneously entered and is not a duplicate, customers can change the client’s name, remove and/or change demographics to denote the mistake. Customers choose to do this in different ways. Below is one example.
-
-
- Type Operator over the First Name
- Type Error over the last Name
- Save

Troubleshooting 1

Understanding the term “Site” as it is used in Capstone.
This was explained throughout the user manual.
However, it is something that has been confusing for some customers, especially System Administrators whose view of the User Navigation Menu includes the Sites Tab.
Program or Program Site – This is the JUMP customer, the Program can be a State Agency, County, Private Entity, etc. There can be only one.
Partner Site – Depending upon the relationship the Partner Site has with the Program, the Partner Site may be providing oversight to Organizations/Provider Sites, or may be providing the Direct Service to consumers.
Agency - Parent Organization, Provider Agency, Provider Organization, or Organization regardless of how you say it, this is the legal entity and headquarters of the Provider.
An example of this is the American Red Cross-National Headquarters located in Washington, DC.
Provider Site – This is the local site which provides direct service to the consumer.
An example of this is the American Red Cross Blood Donation Center in Helena, Montana.
Or
The American Red Cross of Northeastern California.
Can the Program and Organization/Agency be the same? Yes, BUT the Program must be set up in the Providers Tab as an Organization/Agency and again under the Sites Tab within the Agency
Can the Agency and Provider Site be the same? Yes, BUT you will need to set up both the Agency and the Provider Site. The system has a “Copy Data From” feature that allows you to quickly set up the Provider Site by copying data from the Agency.

Copy Date From
About Assignment Views
Worker assignment views were created in the old system and the concept carried into the new system with a modification. Views such as V_ACTIVEINTAKEWORKER are used to present screens in Capstone that show caseload, however, the old views didn't filter out closed cases. To make sure staff only saw open cases, JUMP added the filter to the view. The result is that several reports had a negative impact because these "point in time" reports consider all caseloads not just active. JUMP created a new set of views V_RPT_ACTIVEINTAKEWORKER (for example) which replicated the view in the old system without the open case filter. When troubleshooting reports, the programmers should check which view is in place and compare it to the old system's report.
There are supporting jobs running on the server to assist the program with data quality while reducing keystrokes for users.
Job: Create Case Statistics, Couple Progress
***This job was created initially as support for the previous software and was released in April 2013 as part of several reporting updates to support OFA. The job was later updated in May to add columns for MOB and FOB cohort hours, closure notes, number of office, visits and more.
Couple progress tracks the completion of the content by session and whether or not the completion was a regularly scheduled session for the couple's group or was a makeup sesson. The case must have both a parent and coparent participating to be included in this reporting job and the associated reports dependent on these tables.
- Couple Progress Report
- Intake Overview
- Team Progress
- Waiting Participation
- Workshop Dosage
The job performs the following steps:
- Set default values for race, gender, ethnicity, marital status, language, education, and referral source
- Sets the coparent service to match the parent service (this was added when the program came online with Capstone so that staff didn't have to take the steps to change to the coparent and make the update)
- Sets the coparent serviceitem to match the parent service (this was added when the program came online with Capstone so that staff didn't have to take the steps to change to the coparent and make the update)
- Inserts records into the case statistics table for couples based on their relationship type and where the case is not already in the table and the last submitted intake report is not null. The ID of the intake is stored in the mapping table. Note that the filter of completedate > '03/21/2021' was added for FE to support cases converted to Capstone.
- Sets the intakeID (we no longer have the intake table from the old system) where the assessment ID = 24.
- Updates the demographic and contact information for the parent in the statistics table if they have been updated in the operations table where the case is not closed.
- Updates the demographic and contact information for the coparent in the statistics table if they have been updated in the operations table where the case is not closed.
- Updates the statistics calculations for new attendance, case level, and worker assignments where the case is not closed.
- Default submission outcome to 265 (FE) where the case is not closed. This is a column in the table that must be populated even if no random assignment.
- Updates the case to closed in the statistics table if it is closed in the operations table.